
How to Install vLLM on Debian and Run Local LLMs
- Last updated: Oct 11, 2026

I've already brilliantly shown how to install and configure an Ollama server to run LLMs locally. It's a very capable solution, especially for testing different models on a local machine. However, it may not be the best choice for a company environment. Indeed, Ollama is not primarily designed to efficiently serve many concurrent users, which can become a limitation when several employees need to use it at the same time. After some research, I came across vLLM, which is specifically designed for high-performance LLM inference and efficient concurrent request handling.
As often on this website, I'll be using a Debian machine. However, using an Ubuntu LTS server might be easier, as more recent NVIDIA drivers are generally available through its repositories (which can be necessary to run the latest versions of vLLM). So, in this article, I'll show how to install a recent NVIDIA driver on Debian, then how to install, configure, and use vLLM.
For this test, I managed to get my hands on an RTX A2000 12GB, which won't be able to run the largest and most recent models, but should be sufficient to run Qwen2.5-VL-3B-Instruct (I would have preferred a Mistral 🇫🇷 model, but…). I chose this model because it's a multimodal LLM (meaning it can process both text and images) and an instruct model, meaning it has been trained to understand and follow user instructions.
And last but not least, this article was largely inspired by the ComputingForGeeks tutorial. So, a big thanks to its author!
Architecture
As with Ollama, I'll be using Open WebUI as a web-based frontend, allowing multiple users to interact with our local LLM through their browsers. For this setup, I'll install vLLM directly on a Debian server, while Open WebUI will run in a Docker container on the same machine. vLLM will handle the model inference, while Open WebUI will provide a user-friendly interface accessible over the network.

Install vLLM
In this section, I'll first install the NVIDIA drivers and CUDA toolkit from the official NVIDIA repository. As mentioned earlier, recent versions of vLLM require a sufficiently recent NVIDIA driver and CUDA environment, which may not be available in the default Debian repositories. Once everything is ready, we'll move on to installing vLLM itself.
Install NVIDIA Drivers and Prerequisites
- Depending on your Debian installation, only the
mainrepository component may be enabled by default. Since the proprietary NVIDIA drivers are not included inmain, we need to enable thecontrib,non-free, andnon-free-firmwarecomponents in/etc/apt/sources.list:
deb http://deb.debian.org/debian/ trixie main non-free-firmware contrib non-free
deb-src http://deb.debian.org/debian/ trixie main non-free-firmware contrib non-free

deb http://security.debian.org/debian-security trixie-security main non-free-firmware contrib non-free
deb-src http://security.debian.org/debian-security trixie-security main non-free-firmware contrib non-free

deb http://deb.debian.org/debian/ trixie-updates main non-free-firmware contrib non-free
deb-src http://deb.debian.org/debian/ trixie-updates main non-free-firmware contrib non-free- Let's check which version of the
nvidia-cuda-toolkitpackage is available in the default Debian 13 repositories. As we can see, version12.4is available, but we'll need a more recent CUDA environment for the version of vLLM used in this guide:
root@host:~# apt update && apt policy nvidia-cuda-toolkit
nvidia-cuda-toolkit:
  Installed: (none)
Candidate: 12.4.131~12.4.1-2- To get access to a more recent version of the
cuda-toolkit, we'll first need to add the official NVIDIA CUDA repository. To do so, download and install thecuda-keyringpackage from the NVIDIA website (check the official NVIDIA documentation for the latest available version):
root@host:~# wget https://developer.download.nvidia.com/compute/cuda/repos/debian13/x86_64/cuda-keyring_1.1-1_all.debroot@host:~# dpkg -i cuda-keyring_1.1-1_all.deb- You should now see the NVIDIA CUDA repository configured in
/etc/apt/sources.list.d/cuda-debian13-x86_64.list:
root@host:~# cat /etc/apt/sources.list.d/cuda-debian13-x86_64.list
deb [signed-by=/usr/share/keyrings/cuda-archive-keyring.gpg] https://developer.download.nvidia.com/compute/cuda/repos/debian13/x86_64/ /- Let's update the package index and check the available
cuda-toolkitversion. As we can see, the NVIDIA repository provides a much more recent version, which is suitable for the vLLM environment used in this guide:
root@host:~# apt update && apt policy cuda-toolkit
cuda-toolkit:
  Installed: (none)
Candidate: 13.4.2-1- Now, install the Linux kernel headers, the
nvidia-opendriver, and thecuda-toolkitfrom the NVIDIA repository:
root@host:~# apt install linux-headers-$(uname -r) linux-headers-amd64 nvidia-open cuda-toolkit- Once the installation is complete, reboot the machine to ensure the new NVIDIA driver is properly loaded:
root@host:~# reboot- After the reboot, run
nvidia-smito verify that the NVIDIA driver is correctly installed and that your GPU is detected:
root@host:~# nvidia-smi
Tue Oct 10 20:11:37 2026
+-----------------------------------------------------------------------------------------+
| NVIDIA-SMI 615.71.09              KMD Version: 615.71.09     CUDA UMD Version: 13.4     |
+-----------------------------------------+------------------------+----------------------+
| GPU  Name                 Persistence-M | Bus-Id          Disp.A | Volatile Uncorr. ECC |
| Fan  Temp   Perf          Pwr:Usage/Cap |           Memory-Usage | GPU-Util  Compute M. |
|                                         |                        |               MIG M. |
|=========================================+========================+======================|
|   0  NVIDIA RTX A2000 12GB          On  |   00000000:21:00.0 Off |                  Off |
| 30%   33C    P8             11W /   70W |       2MiB /  12282MiB |      0%      Default |
|                                         |                        |                  N/A |
+-----------------------------------------+------------------------+----------------------+

+-----------------------------------------------------------------------------------------+
| Processes:                                                                              |
|  GPU   GI   CI        PID   Type   Process name                              GPU Memory |
|        ID   ID                                                               Usage      |
|=========================================================================================|
|  No running processes found                                                             |
+-----------------------------------------------------------------------------------------+- Check that the CUDA Toolkit is correctly installed by running
nvcc --version:
root@host:~# /usr/local/cuda/bin/nvcc --version
nvcc: NVIDIA (R) Cuda compiler driver
Copyright (c) 2005-2026 NVIDIA Corporation
Built on Tue_Sep_01_08:45:21_PDT_2026
Cuda compilation tools, release 13.4, V13.4.92
Build cuda_13.4.r13.4/compiler.38855100_0
As we can see, CUDA Toolkit 13.4 is correctly installed. With both the NVIDIA driver and CUDA Toolkit ready, we can now move on to installing vLLM!
Install vLLM on Debian
Now that the NVIDIA driver and CUDA Toolkit are installed and our GPU is correctly detected, we can finally move on to installing vLLM on Debian.
- First, install the required packages, including Python development tools and
ninja-build, which may be needed to compile some CUDA components:
root@host:~# apt install -y python3-venv curl ca-certificates python3-dev build-essential ninja-build- Create a dedicated system user named
vllm, with its home directory set to/opt/vllm. This allows us to run vLLM without root privileges:
root@host:~# useradd --system --create-home --home-dir /opt/vllm --shell /bin/false vllm- Next, install
uv, a fast Python package and environment manager recommended by the vLLM project. We'll use it to create an isolated Python environment and install vLLM without interfering with the system's Python packages:
root@host:~# curl -LsSf https://astral.sh/uv/install.sh | sudo -u vllm sh- Now, move to the
/opt/vllm/directory and create a dedicated Python virtual environment using Python 3.12:
root@host:~# cd /opt/vllm/root@host:~# sudo -u vllm /opt/vllm/.local/bin/uv venv /opt/vllm/.venv --python 3.12 --seed- Install vLLM into the virtual environment. The
--torch-backend=autooption allowsuvto automatically select an appropriate PyTorch backend based on the available hardware and supported CUDA versions:
root@host:~# sudo -u vllm /opt/vllm/.local/bin/uv pip install --python /opt/vllm/.venv/bin/python vllm --torch-backend=auto- Finally, verify that vLLM has been successfully installed by checking its version:
root@host:~# sudo -u vllm /opt/vllm/.venv/bin/vllm --versionInstall LLM Models
As mentioned earlier, my test machine has a somewhat aging GPU with only 12GB of VRAM, so I decided to use Qwen/Qwen2.5-VL-3B-Instruct, a relatively lightweight LLM capable of processing both text and images.
One important thing to understand is that, unlike Ollama, which allows us to easily switch between different models within the same server instance, vLLM generally serves one model per process. This means that if you want to serve multiple models simultaneously, you'll need to run separate vLLM instances. For example, you could serve mistralai/Ministral-3-3B-Instruct-2512 on port 8000 and Qwen/Qwen2.5-VL-3B-Instruct on port 8001. Both models would then consume GPU memory at the same time, unless you distribute them across different GPUs.
With only 12GB of VRAM available, you can probably understand why I'll stick to a single model for this guide!
- First, let's search for
Qwen/Qwen2.5-VL-3B-Instructon Hugging Face using thehfcommand-line tool:
root@host:~# sudo -u vllm /opt/vllm/.venv/bin/hf models list --search Qwen/Qwen2.5-VL-3B-Instruct
ID                                      CREATED_AT DOWNLOADS LIBRARY_NAME LIKES PIPELINE_TAG       PRIVATE TAGS                                     TRENDING_SCORE
--------------------------------------- ---------- --------- ------------ ----- ------------------ ------- ---------------------------------------- --------------
Qwen/Qwen2.5-VL-3B-Instruct             2025-01-26   2115754 transformers   712 image-text-to-text         transformers, safetensors, qwen2_5_vl...              2
Qwen/Qwen2.5-VL-3B-Instruct-AWQ         2025-02-13    441614 transformers    68 image-text-to-text         transformers, safetensors, qwen2_5_vl...              0
DevQuasar-6/Qwen.Qwen2.5-VL-3B-Instr... 2025-03-26      1404                  5 image-text-to-text         gguf, image-text-to-text, base_model:...              0
MscAbdelrahman1/Qwen-Qwen2.5-VL-3B-I... 2026-09-19         0                  0                            safetensors, region:us                                0
Hint: Use `--no-truncate` or `--format json` to display full values.- Now, download the
Qwen/Qwen2.5-VL-3B-Instructmodel from Hugging Face. The model files will be stored in the local Hugging Face cache and can later be loaded by vLLM:
root@host:~# sudo -u vllm /opt/vllm/.venv/bin/hf download Qwen/Qwen2.5-VL-3B-Instruct- Now, let's start vLLM with the
Qwen2.5-VL-3B-Instructmodel. Here are the main options used in this example:--host 127.0.0.1: Make vLLM listen only on the local loopback interface. Since we'll be running Open WebUI on the same host using Docker's host networking mode, there's no need to expose the API directly to the network.--port 8000: Set the TCP port on which the vLLM API server will listen.--max-model-len 5120: Set the maximum context length to 5120 tokens, including both the input prompt and the generated output. Higher values require more GPU memory, especially for the KV cache.--gpu-memory-utilization 0.98: Set the GPU memory utilization target to 98%, allowing vLLM to allocate most of the available VRAM for model execution and associated resources. This leaves very little headroom for other GPU processes.--enforce-eager: Disable CUDA graphs and use PyTorch eager execution instead. This can reduce GPU memory overhead, at the cost of some inference performance.--mm-processor-cache-gb 0: Disable the multimodal processor cache to reduce system RAM usage. This may affect performance when processing repeated image inputs.--enable-auto-tool-choice: Enable automatic tool selection, allowing the model to decide when to call tools exposed by applications such as Open WebUI.--tool-call-parser hermes: Use the Hermes parser to interpret tool calls generated by the Qwen2.5 model and return them in the expected API format.
root@host:~# sudo -u vllm env \
  CUDA_HOME=/usr/local/cuda \
  HF_HOME=/opt/vllm/hf-cache \
  PATH=/usr/local/cuda/bin:/usr/local/sbin:/usr/local/bin:/usr/sbin:/usr/bin:/sbin:/bin \
  /opt/vllm/.venv/bin/vllm serve Qwen/Qwen2.5-VL-3B-Instruct \
  --host 127.0.0.1 \
  --port 8000 \
  --max-model-len 5120 \
  --gpu-memory-utilization 0.98 \
  --enforce-eager \
  --mm-processor-cache-gb 0 \
  --enable-auto-tool-choice \
  --tool-call-parser hermes
Integration with Open WebUI
Now that we have a working vLLM instance, let's integrate it with Open WebUI to provide a user-friendly web interface. This will allow multiple users to interact with our local LLM directly from their browsers.
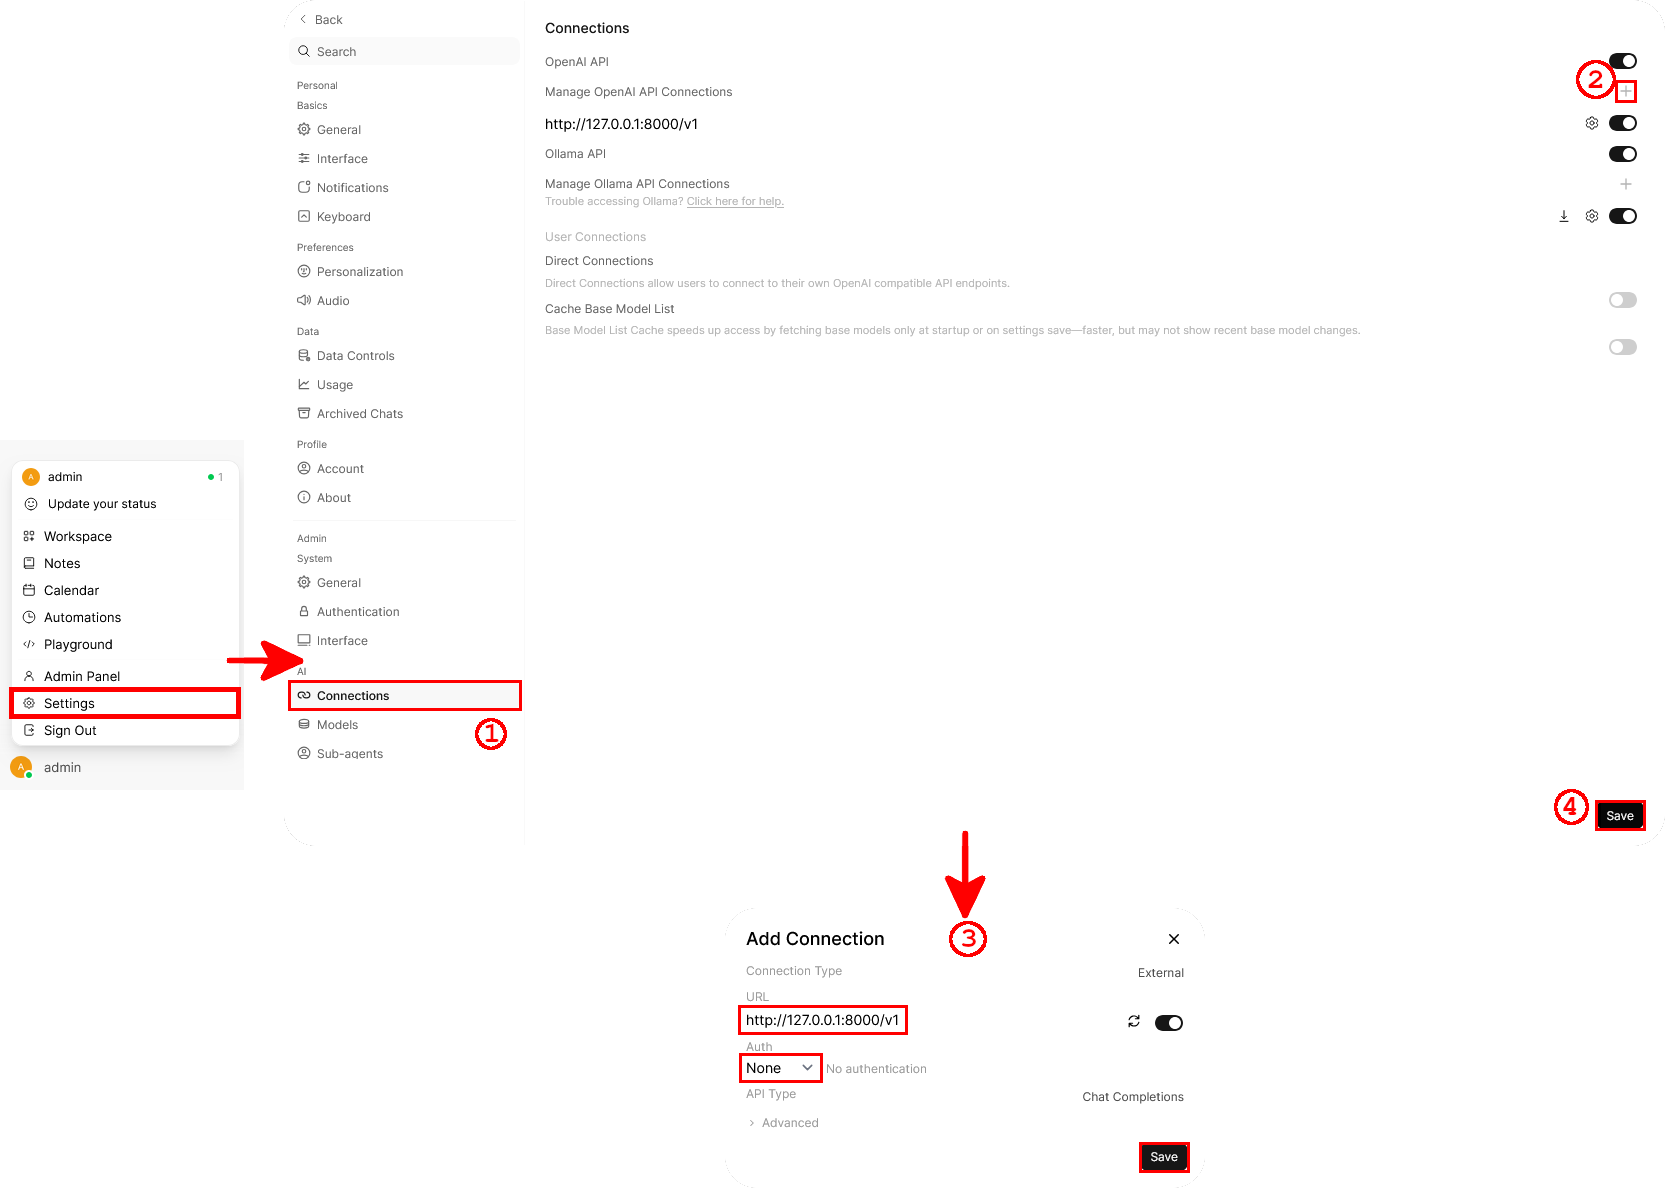
- If you already have an Open WebUI instance running, simply go to Settings > Connections, click the + button under OpenAI API, and add your vLLM server using the following settings:
- URL:
http://127.0.0.1:8000/v1 - Auth:
None(since we haven't configured API authentication yet). - API Type:
Chat Completions
- URL:
- Or if you haven't OpenWebUI, install it:
root@host:~# apt update && apt install docker.ioroot@host:~# systemctl enable --now dockerroot@host:~# docker run -d \
--name open-webui \
--network host \
-v open-webui:/app/backend/data \
-e OPENAI_API_BASE_URL=http://127.0.0.1:8000/v1 \
--restart always \
ghcr.io/open-webui/open-webui:mainYou should now be able to access Open WebUI from your web browser at http://DEBIAN_IP_ADDRESS:8080.
Configure vLLM as a systemd Service
Ok, we now have a working vLLM instance, but there's one problem: it won't automatically start when the server reboots. To fix this, we'll create a systemd service to run vLLM in the background and automatically start it at boot.
- First, create the
/etc/vllmconfiguration directory and the/var/log/vllmlog directory:
root@host:~# install -d -m 0755 -o root -g root /etc/vllmroot@host:~# touch /etc/vllm/envroot@host:~# chown root:vllm /etc/vllm/env && chmod 640 /etc/vllm/envroot@host:~# install -d -m 0755 -o vllm -g vllm /var/log/vllm- Next, edit the
/etc/vllm/envfile. We'll use it to configure the Hugging Face cache and enable offline mode, preventing vLLM from contacting Hugging Face when loading our already downloaded model:
# Directory used to store downloaded Hugging Face models.
HF_HOME=/opt/vllm/hf-cache

# Prevent Hugging Face Hub requests when loading cached models.
# The required model files must already be downloaded.
HF_HUB_OFFLINE=1

# Optional API authentication (disabled for this local setup).
# VLLM_API_KEY=sk-cfg-please-rotate-me- Now, create the
/etc/systemd/system/vllm.servicefile to configure vLLM as a systemd service. This will allow it to run in the background and automatically start when the server boots:
[Unit]
Description=vLLM OpenAI-compatible inference server
After=network-online.target nvidia-persistenced.service
Wants=network-online.target

[Service]
Type=simple
User=vllm
Group=vllm
WorkingDirectory=/opt/vllm
EnvironmentFile=/etc/vllm/env
Environment=CUDA_HOME=/usr/local/cuda
Environment=PATH=/usr/local/cuda/bin:/usr/local/sbin:/usr/local/bin:/usr/sbin:/usr/bin:/sbin:/bin

ExecStart=/opt/vllm/.venv/bin/vllm serve Qwen/Qwen2.5-VL-3B-Instruct \
  --host 127.0.0.1 \
  --port 8000 \
  --gpu-memory-utilization 0.98 \
  --max-model-len 5120 \
  --enforce-eager \
  --mm-processor-cache-gb 0 \
  --enable-auto-tool-choice \
  --tool-call-parser hermes

Restart=on-failure
RestartSec=10
TimeoutStartSec=600
TimeoutStopSec=60
LimitNOFILE=1048576

NoNewPrivileges=true
ProtectSystem=strict
ProtectHome=true
PrivateTmp=true
ReadWritePaths=/opt/vllm
ProtectKernelTunables=true
ProtectKernelModules=true
ProtectControlGroups=true

StandardOutput=journal
StandardError=journal
SyslogIdentifier=vllm

[Install]
WantedBy=multi-user.target- Before enabling the service, check the systemd unit file for configuration errors:
root@host:~# systemd-analyze verify /etc/systemd/system/vllm.service- Reload systemd to take the new service configuration into account:
root@host:~# systemctl daemon-reload- Enable the vLLM service to make it start automatically at boot, and start it immediately:
root@host:~# systemctl enable --now vllm- Check that the vLLM service is running correctly:
root@host:~# systemctl status vllm --no-pager- You can also check the service logs to monitor the model loading process or troubleshoot any issues:
root@host:~# journalctl -u vllm -f- Finally, once the model has finished loading, verify that the vLLM API is responding correctly. We'll use
python3 -m json.toolto format the JSON output for better readability:
root@host:~# curl -sS http://127.0.0.1:8000/v1/models | python3 -m json.tool
{
    "object": "list",
    "data": [
        {
            "id": "Qwen/Qwen2.5-VL-3B-Instruct",
            "object": "model",
            "created": 1791835661,
            "owned_by": "vllm",
            "root": "Qwen/Qwen2.5-VL-3B-Instruct",
            "parent": null,
            "max_model_len": 5120,
            "permission": [
                {
                    "id": "modelperm-8be568c37905e68b",
                    "object": "model_permission",
                    "created": 1791835661,
                    "allow_create_engine": false,
                    "allow_sampling": true,
                    "allow_logprobs": true,
                    "allow_search_indices": false,
                    "allow_view": true,
                    "allow_fine_tuning": false,
                    "organization": "*",
                    "group": null,
                    "is_blocking": false
                }
            ]
        }
    ]
}
As we can see, the vLLM API is responding correctly and our Qwen2.5-VL-3B-Instruct model is available, with a maximum context length of 5120 tokens.
Conclusion
We now have a working vLLM server on Debian, with a local LLM running on our NVIDIA GPU and accessible through Open WebUI. This setup allows multiple users to interact with a locally hosted AI model directly from their web browsers, without relying on external cloud AI services.
Of course, performance and the number of concurrent users the server can handle will largely depend on your GPU, available VRAM, and the model you're running. While my RTX A2000 12GB is perfectly fine for testing and experimenting with vLLM, a more powerful GPU would certainly be preferable for a production environment with many users.
What's next? Well, there's still room for improvement, especially when it comes to security. A good starting point would be to enable HTTPS for the Open WebUI interface, so that communications between users and the server are encrypted. We could also consider restricting network access and enabling authentication for the vLLM API.