How to Configure EtherChannel (LACP) on Cisco Switches, Windows, and Linux
- Last updated: Apr 28, 2025
Here we look at how to improve network performance using EtherChannel technology and the Link Aggregation Control Protocol (LACP).
For your information and according to Wikipedia: https://en.wikipedia.org/ : EtherChannel is a port link aggregation technology. Up to 8 active ports can be used, giving a total bandwidth of 800 Mbit/s, 8 Gbit/s or 80 Gbit/s, depending on port speed.
- The main features of LACP:
- IEEE Ethernet standard
- Automatic failover
- Dynamic configuration
EtherChannel on two Switches
Setting up
Let's start with a simple configuration where we have two vlans (1 and 2, to keep things simple) and a trunk interface between two switches. To improve the bandwidth between them, we'll create an EtherChannel on the trunk interface, consisting of two Gigabit links.
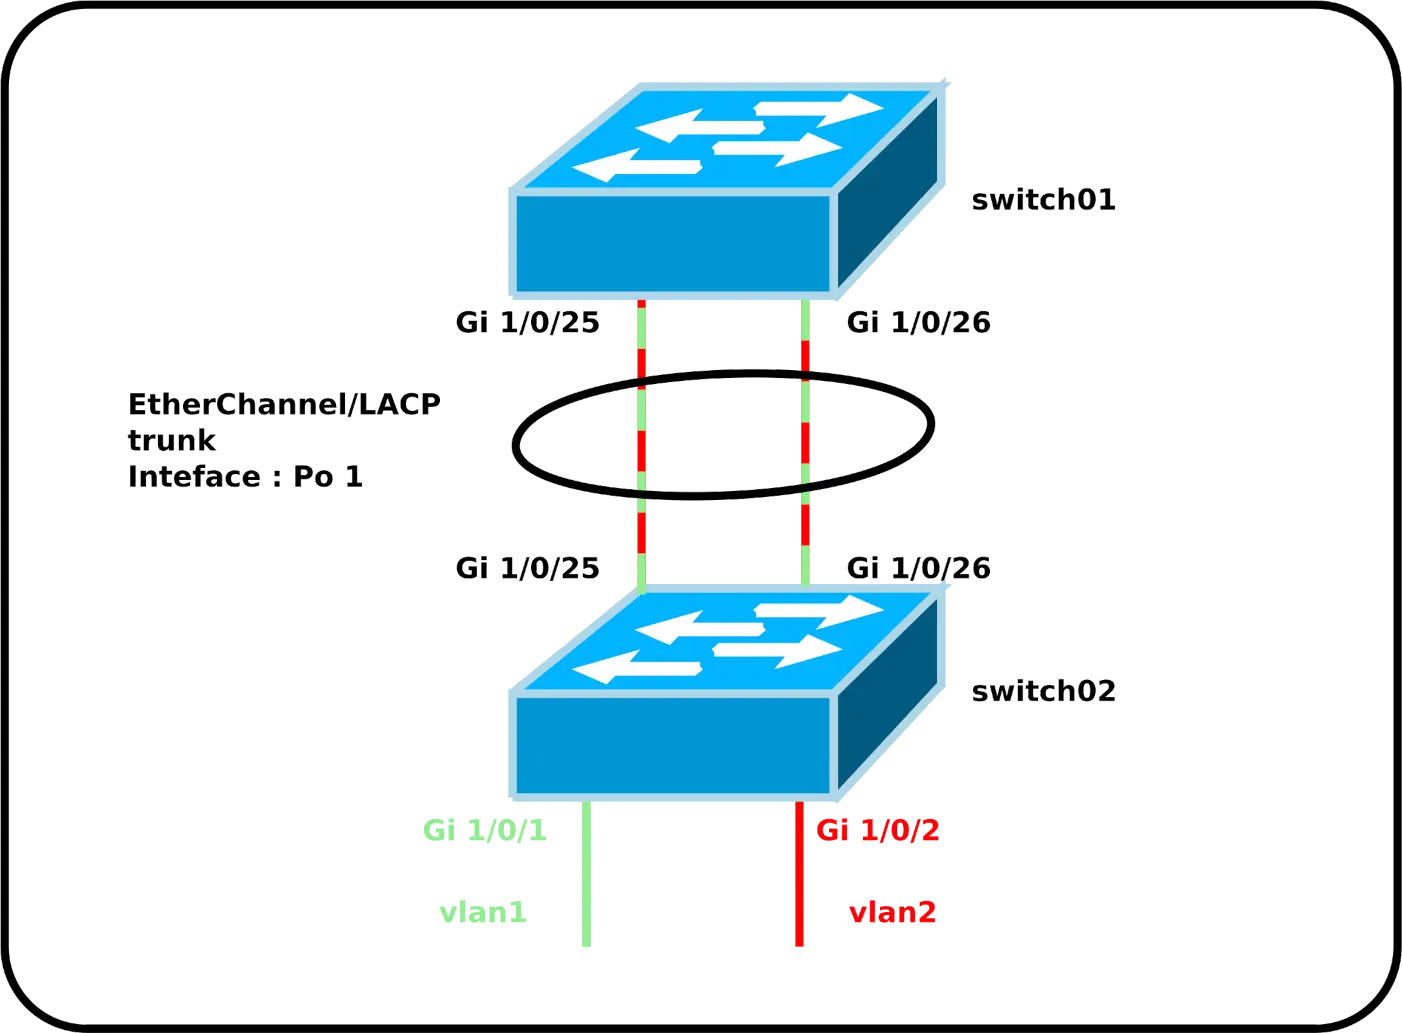
- Configure switch01:
switch01(config)# interface range GigabitEthernet1/0/25-26
switch01(config-if-range)# switchport mode trunk
switch01(config-if-range)# switchport trunk allowed none
switch01(config-if-range)# switchport trunk allowed vlan 1,2
switch01(config-if-range)# channel-protocol lacp
switch01(config-if-range)# channel-group 1 mode passive- Configure switch02:
switch02(config)# interface range GigabitEthernet1/0/25-26
switch02(config-if-range)# switchport mode trunk
switch02(config-if-range)# switchport trunk allowed none
switch02(config-if-range)# switchport trunk allowed vlan 1,2
switch02(config-if-range)# channel-protocol lacp
switch02(config-if-range)# channel-group 1 mode active- We can now configure the EtherChannel interface like any other interface, using the name
Po 1:
switch02(config)# interface port-channel 1Check configuration
- Check EtherChannel status:
switch01# show etherchannel summary
Flags:  D - down        P - bundled in port-channel
        I - stand-alone s - suspended
        H - Hot-standby (LACP only)
        R - Layer3      S - Layer2
        U - in use      N - not in use, no aggregation
        f - failed to allocate aggregator

        M - not in use, minimum links not met
        m - not in use, port not aggregated due to minimum links not met
        u - unsuitable for bundling
        w - waiting to be aggregated
        d - default port

        A - formed by Auto LAG


Number of channel-groups in use: 1
Number of aggregators:           1

Group  Port-channel  Protocol    Ports
------+-------------+-----------+-----------------------------------------------
1 Po1(SU) LACP Gi1/0/25(P) Gi1/0/26(P)- Check the load-balancing method currently in use:
switch01# show etherchannel load-balance
EtherChannel Load-Balancing Configuration:
        src-dst-ip

EtherChannel Load-Balancing Addresses Used Per-Protocol:
Non-IP: Source XOR Destination MAC address
  IPv4: Source XOR Destination IP address
IPv6: Source XOR Destination IP address- Check the effectiveness of the configured load-balancing method:
switch01# show etherchannel port-channelMisc
- Configure load balancing method:
switch01(config)# port-channel load-balance src-dst-portEtherChannel on a Windows Server

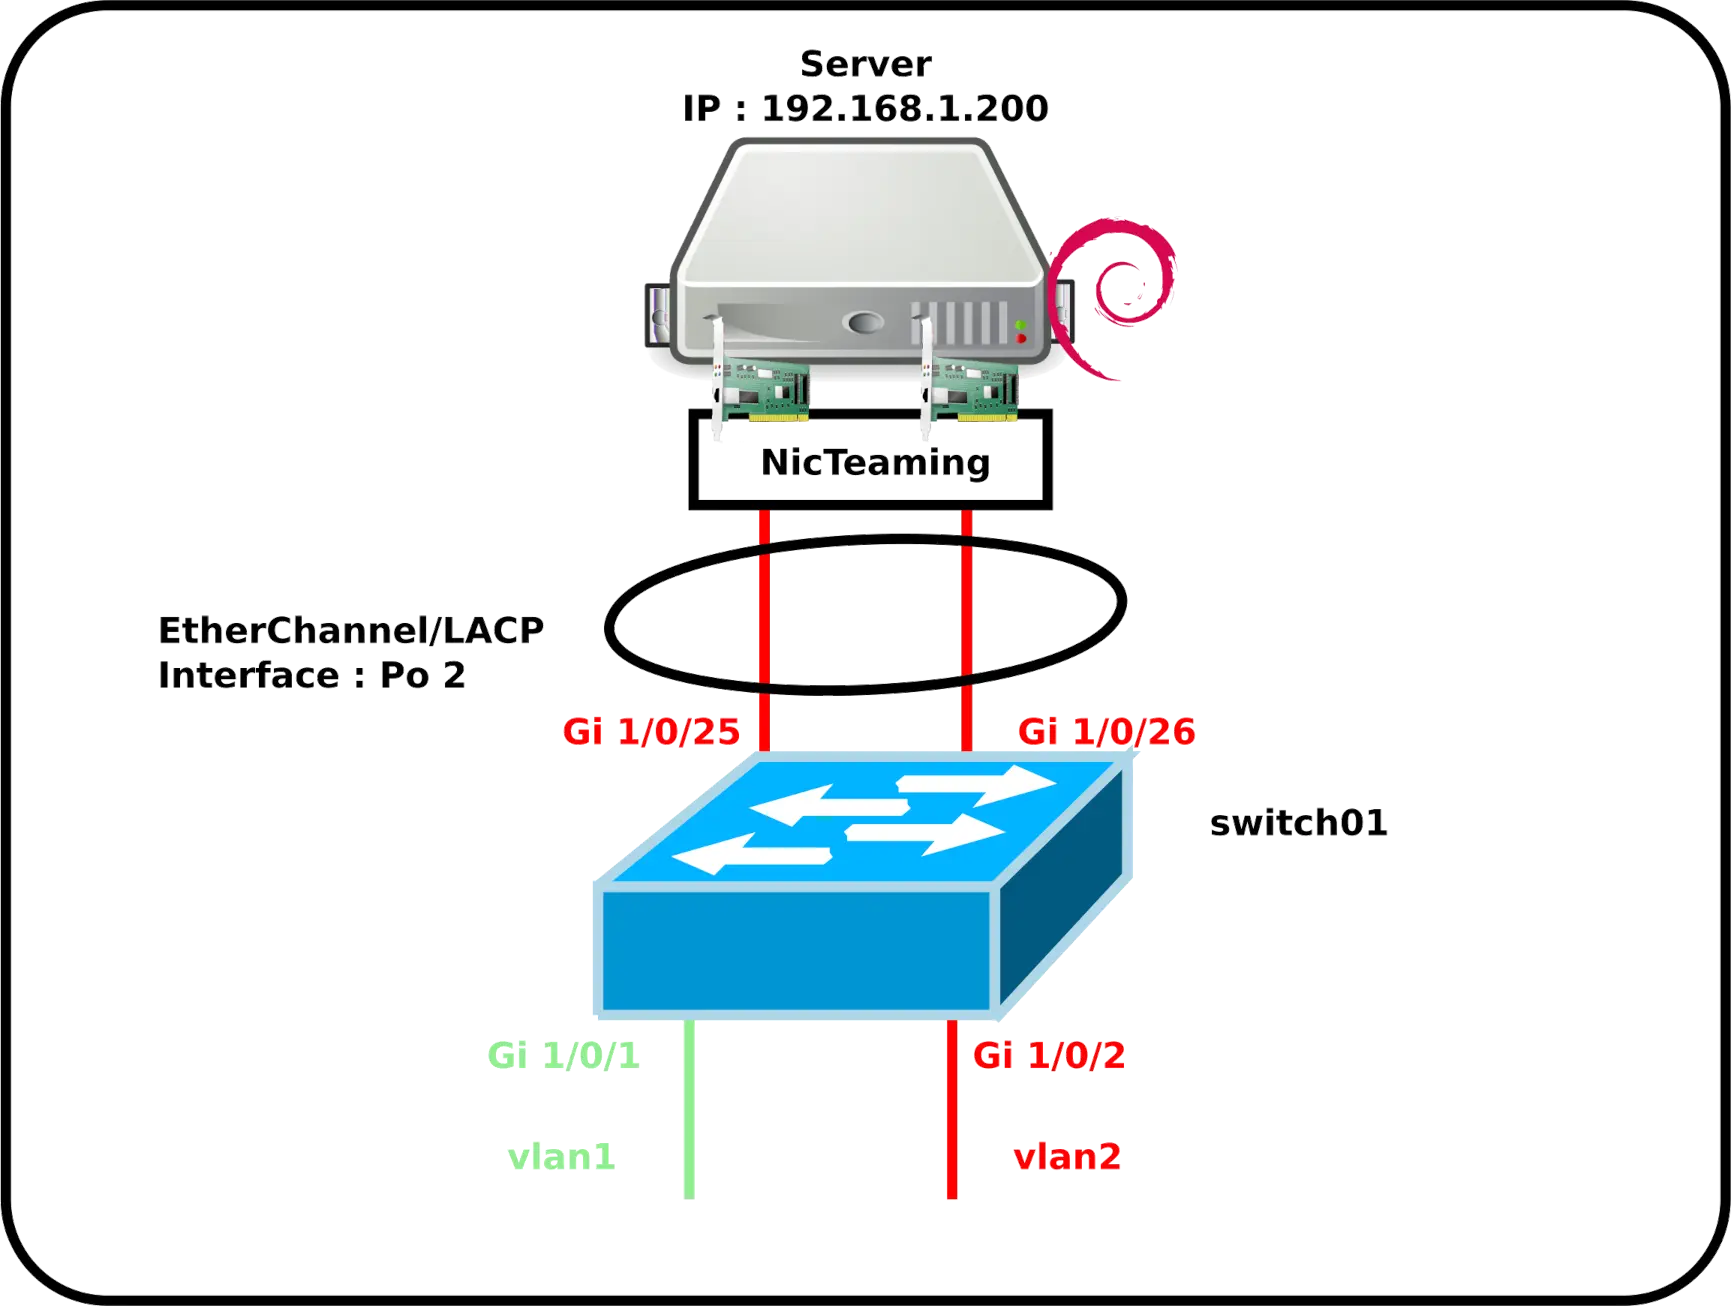
EtherChannel can also be used with Windows Server. Here's an example of a server with two network interfaces.
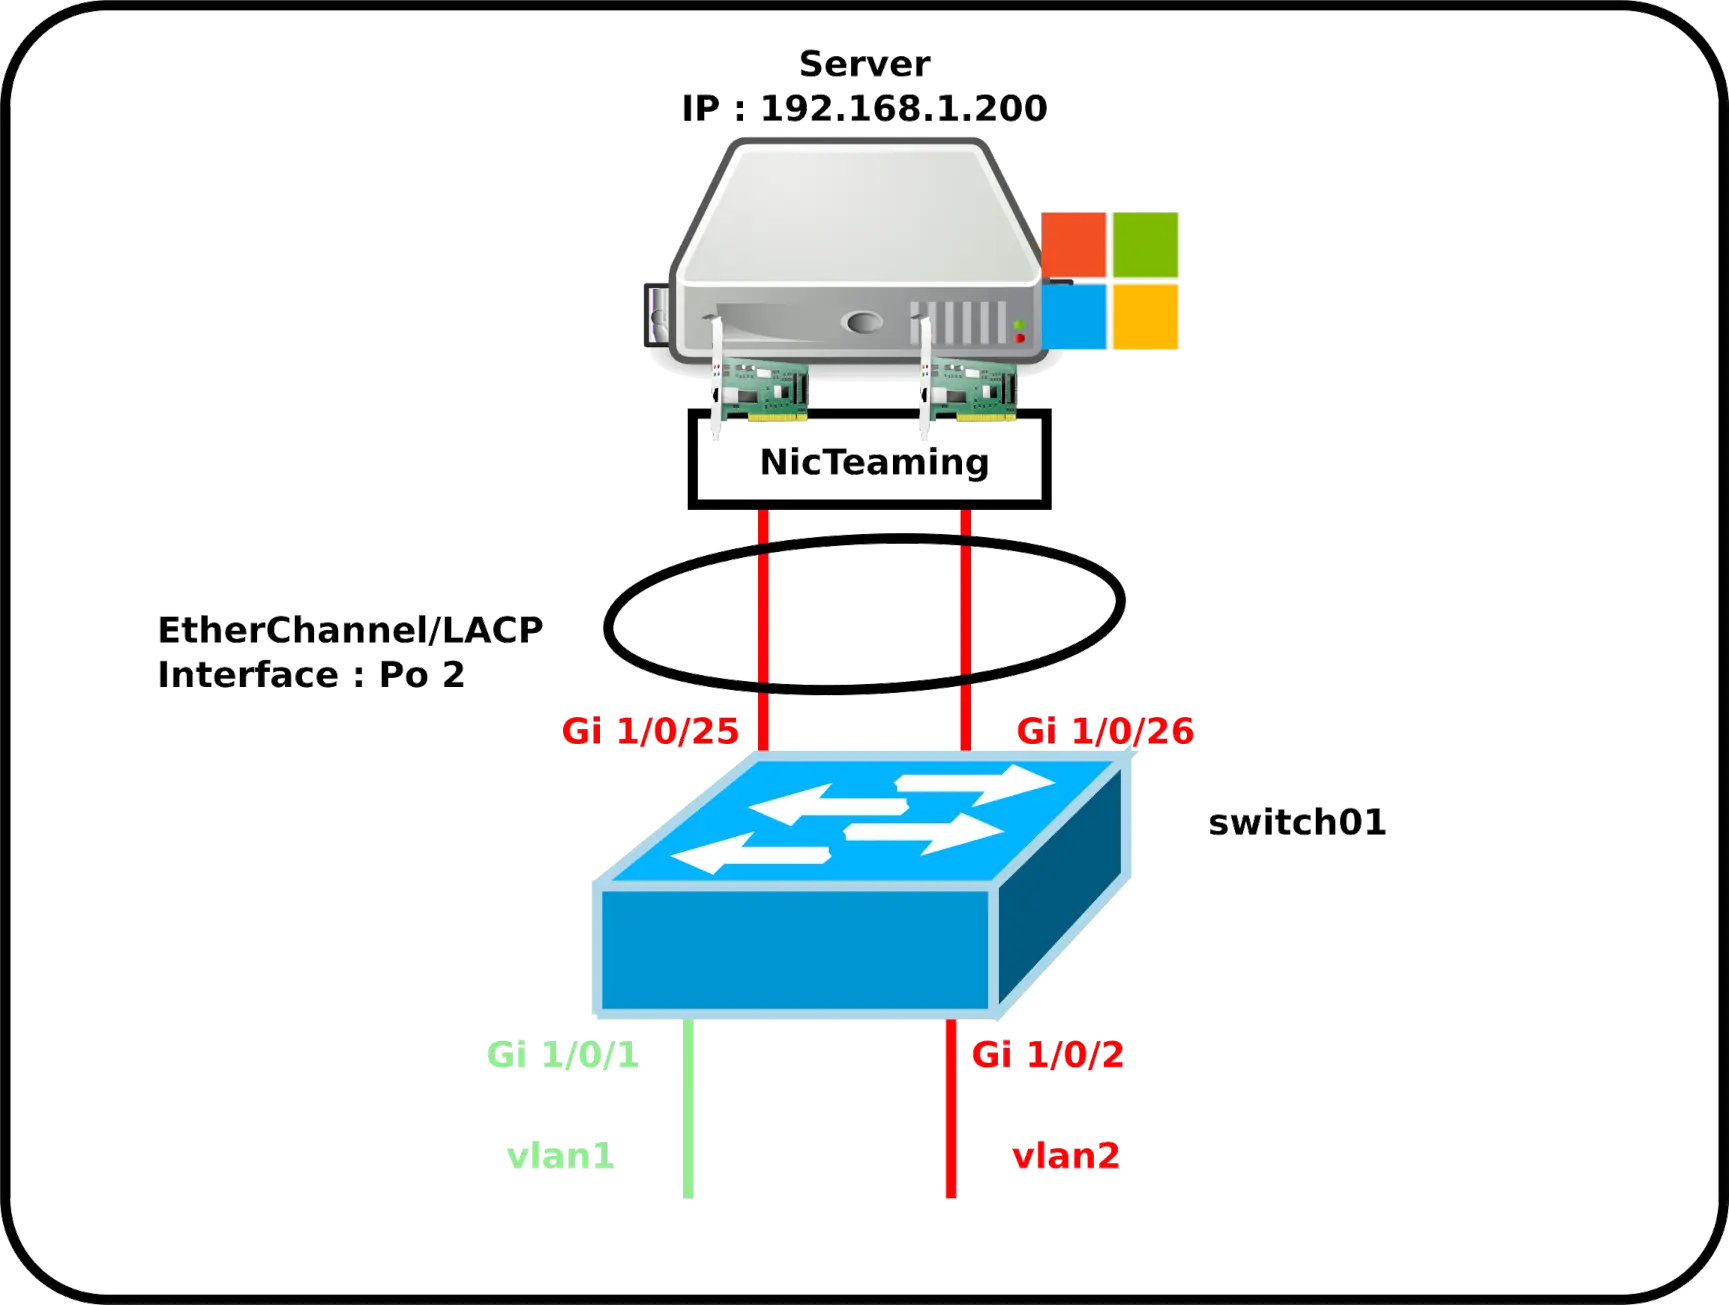
Cisco switch configuration
- Configure switch01:
switch01(config)# interface range GigabitEthernet1/0/25-26
switch01(config-if)# switchport mode access
switch01(config-if)# switchport access vlan 2
switch01(config-if)# channel-protocol lacp
switch01(config-if)# channel-group 2 mode passive- We can now configure EtherChannel interface like any other interface, using the name
Po 2:
switch01(config)# interface port-channel 2Windows Server configuration
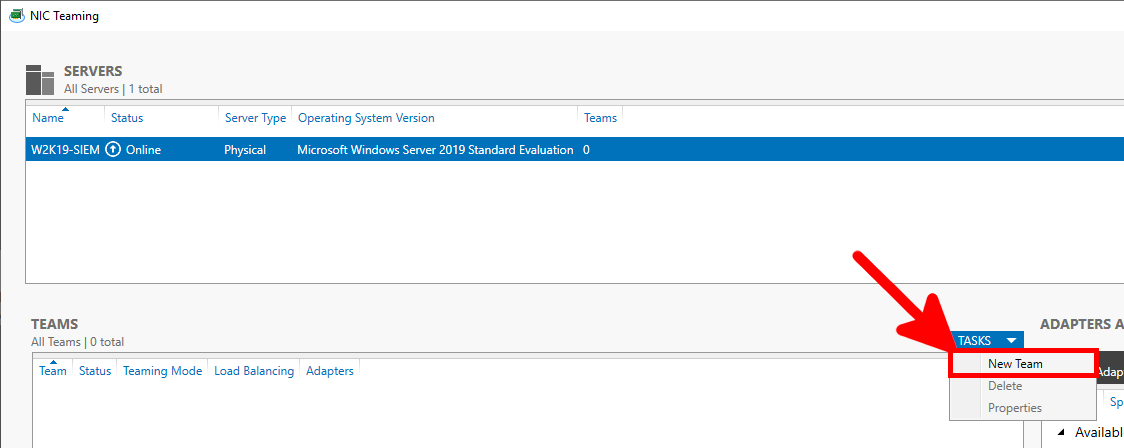
Configuration from the GUI
- In the Server Manager, click on the NIC Teaming link:

- In the NIC Teaming window, create a NewTeam:
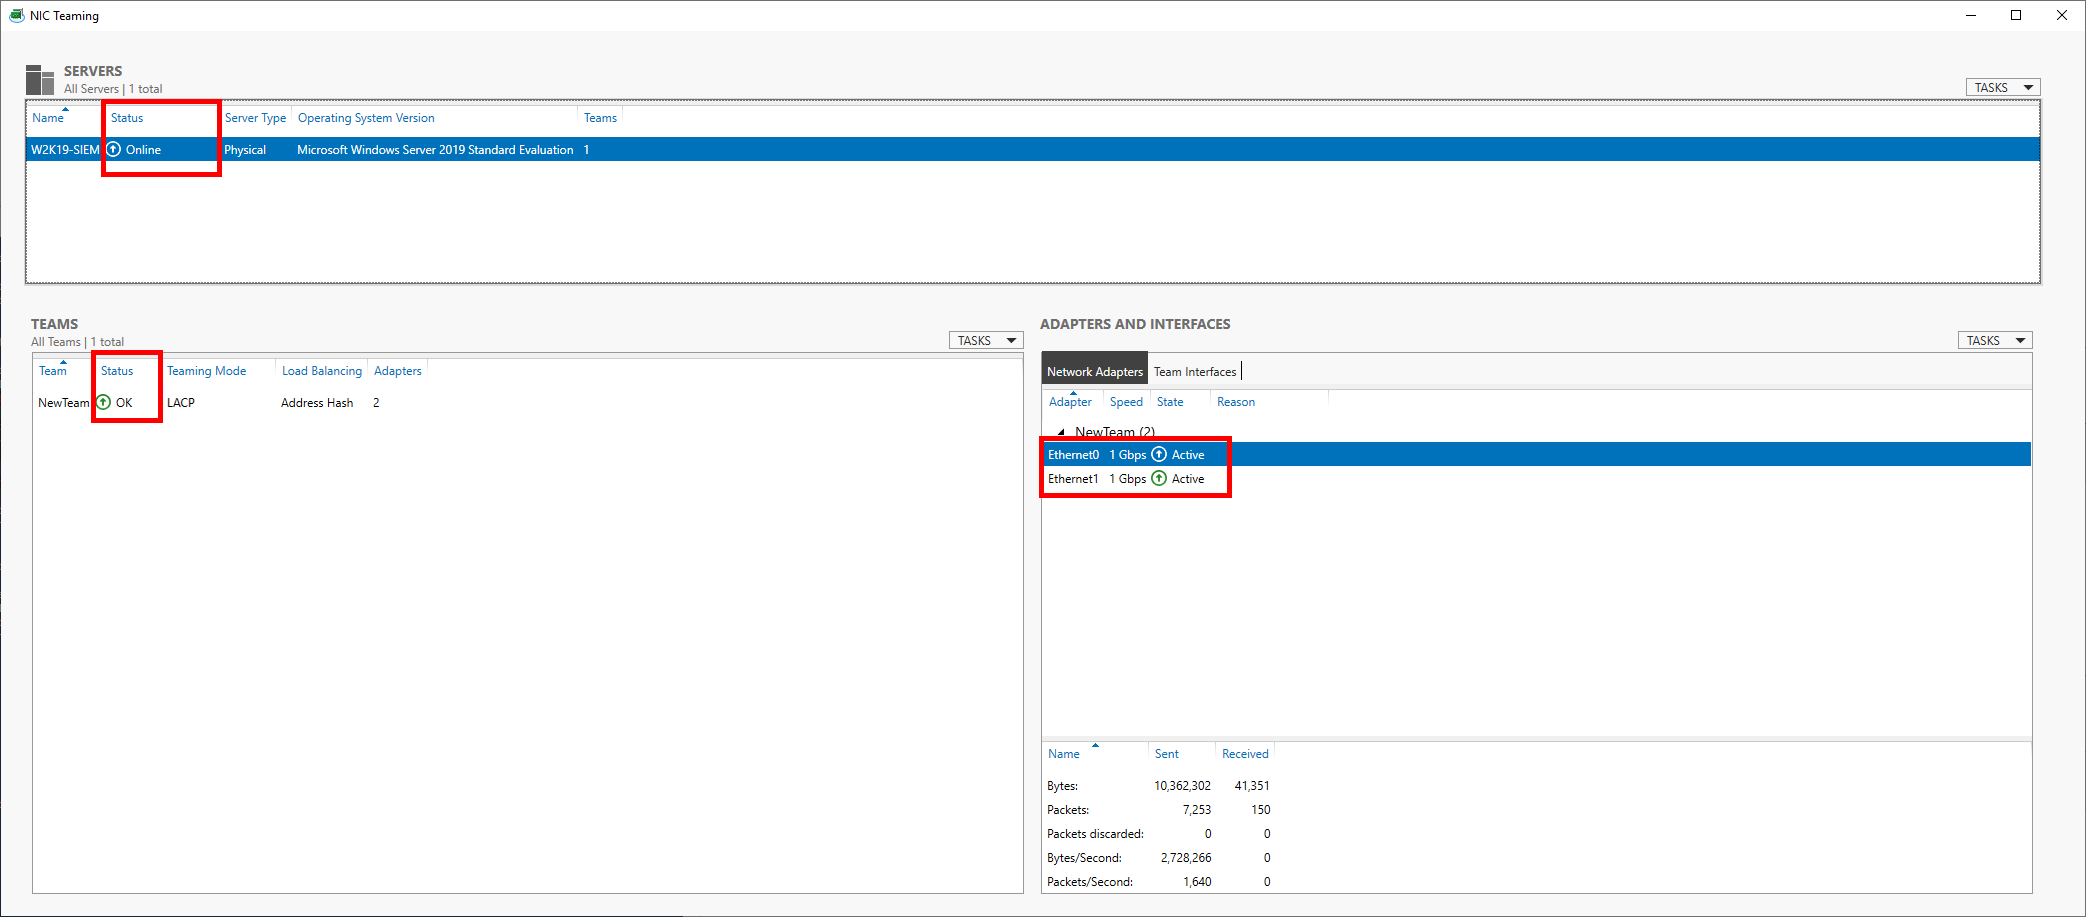
- Give the new interface a name, and define the teaming mode to LACP and Address Hash as the load balancing mode:

- Verify that everything is operational:
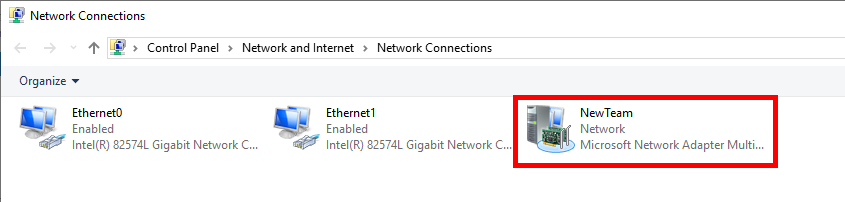
- In the Network Connections menu, define your team interface as any other network interface:
Configuration with PowerShell
- We can do the same thing with a PowerShell command line, which saves us a lot of time!:
PS C:\ > New-NetLBFOTeam -LoadBalancingAlgorithm IPAddresses -TeamingMode Lacp -Name NewTeam -TeamMembers Ethernet0,Ethernet1 -Confirm:$falseEtherChannel on a GNU/Linux Server

Cisco switch configuration
- Configure switch01:
switch01(config)# interface range GigabitEthernet1/0/25-26
switch01(config-if)# switchport mode access
switch01(config-if)# switchport access vlan 2
switch01(config-if)# channel-protocol lacp
switch01(config-if)# channel-group 2 mode active- We can now configure the EtherChannel interface like any other interface, using the name
Po 2:
switch01(config)# interface port-channel 2Debian Server
- Install the
ifenslavepackage, necessary to enable bonding:
root@host:~# apt-get install ifenslave- Edit the
/etc/network/interfacesfile, and create thebond0interface. Here with physical interfaceseth0andeth1:
# This file describes the network interfaces available on your system
# and how to activate them. For more information, see interfaces(5).

source /etc/network/interfaces.d/*

# The loopback network interface
auto lo
iface lo inet loopback

auto bond0
iface bond0 inet static
    address 192.168.1.200
    netmask 255.255.255.0
    network 192.168.1.0
    gateway 192.168.1.254
    bond-slaves eth0 eth1
    #4 for LACP/802.3ad
    bond-mode 4
    #frequency of link status check in milliseconds
    bond-miimon 100
    bond-downdelay 200
    bond-updelay 200
    bond-lacp-rate fast
    #mac and ip
bond-xmit-hash-policy layer2+3- Restart the Debian server:
root@host:~# reboot- Check that the
bond0interface is up:
root@host:~# ip address show dev bond0
4: bond0: <BROADCAST,MULTICAST,MASTER,UP,LOWER_UP> mtu 1500 qdisc noqueue state UP group default qlen 1000
    link/ether 72:17:b9:8d:1e:ad brd ff:ff:ff:ff:ff:ff
    inet 192.168.1.200/24 brd 192.168.1.255 scope global bond0
       valid_lft forever preferred_lft forever
    inet6 fe80::7017:b9ff:fe8d:1ead/64 scope link
valid_lft forever preferred_lft forever- Get information on the
bond0interface:
root@host:~# cat /proc/net/bonding/bond0
Ethernet Channel Bonding Driver: v5.10.0-9-amd64

Bonding Mode: IEEE 802.3ad Dynamic link aggregation
Transmit Hash Policy: layer2+3 (2)
II Status: up
II Polling Interval (ms): 100
Up Delay (ms): 200
Down Delay (ms): 200
Peer Notification Delay (ms): 0

802.3ad info
LACP rate: fast
in links: 0
Aggregator selection policy (ad_select): stable
System priority: 65535
System MAC address: 72:17:b9:8d:1e:ad
Active Aggregator Info:
        Aggregator ID: 1
        Number of ports: 1
        Actor Key: 15
        Partner Key: 1
        Partner Mac Address: 00:00:00:00:00:00
root@host:~# cat /sys/class/net/bond0/bonding/mode
802.3ad 4