Essential Commands for Cisco Small Business, SG & Catalyst 1300 Switches
- Last updated: Apr 10, 2026
Supported Switch Models
- Model: Cisco SG550X
- Model: Cisco SG350X
- Model: Cisco CBS250
- Model: Cisco Catalyst 1300
Commands
Show Commands
- Display the firmware version:
Cisco# show version- Display the serial number:
Cisco# show system id- Display the model, uptime, hostname, and MAC address:
Cisco# show system unit 1- Display the MAC address table:
Cisco# show mac address-table- Display GBIC (SFP module) information:
Cisco# show inventory- Display recent log messages:
Cisco# show logging- Display learned IP addresses (ARP table):
Cisco# show arpUser Account Management
- Change the password of an existing user:
Cisco(config)# username cisco password myNEWpassword- Create an admin user with privilege level 15:
Cisco(config)# username cisco privilege 15 password myNEWpassword- Disable the password maximum lifetime:
Switch(config)# password aging 0Miscellaneous
- Change the hostname of the switch:
Cisco(config)# hostname Switch- Save the current running configuration to startup config:
Switch# copy running-config startup-configSwitch# write- Set a static IP address on VLAN 1 interface:
Switch(config)# interface vlan1
Switch(config-if)# ip address 192.168.1.100 255.255.255.0
Switch(config-if)# no ip address dhcp- Configure the DNS server address:
Switch(config)# ip name-server 192.168.1.110- Disable DNS lookup for unknown commands (prevents delays if you mistype commands):
Switch(config)# no ip domain lookup- Set the default gateway:
Switch(config)# interface vlan1
Switch(config-if)# ip default-gateway 192.168.1.254- Reboot the switch:
Switch# reload- Configure a range of interfaces (use
gi1,gi2, etc. for CBS models):
Switch(config)# interface range ge1/0/4,ge1/0/30Switch(config)# interface range ge1/0/4-18- Enable the SSH server:
Switch(config)# ip ssh server- Disable the HTTP server (for web UI access):
Switch(config)# no ip http server- Disable the Bonjour discovery protocol:
Switch(config)# no bonjour enable- Disable PnP (Plug and Play) auto-discovery:
Switch(config)# no pnp enable- Check the switch’s CPU usage:
Switch# show cpu utilization- Globally disable Auto Smartport (automatic interface configuration, CBS series only):
Switch(config)# no macro auto- Erase configuration and perform a factory reset:
Switch# delete startup-config
Delete startup-config? (Y/N)[N] Y
Switch# reload
You haven't saved your changes. Are you sure you want to continue ? (Y/N)[N] Y
This command will reset the whole system and disconnect your current session. Doyou want to continue ? (Y/N)[N] Y- Disable logging of system messages to the console:
Switch(config)# no logging consoleImport / Export Configuration
- Export the current configuration to a TFTP server:
Switch# copy running-config tftp://tftp_server/YYYY-MM-DD- Export the current configuration to an SSH server (IP:
192.168.1.200, username:sshuser, password:sshpassword) into a file namedSwitch_config. The file will be saved in the user’s home directory:
Switch# copy running-config scp://sshuser:sshpassword@192.168.1.200/Switch_config- Import a configuration file from a TFTP server:
Switch# copy tftp://tftp_server/YYYY-MM-DD running-configUpdate Firmware
Easy Method (Direct Boot from TFTP)
- Boot directly from the new firmware image on a TFTP server:
Switch# boot system tftp://tftp_server/firmware.bin- Reboot the switch to apply the firmware:
Switch# reloadNormal Method (Copy to Flash Memory)
- Copy the firmware image to the switch’s flash memory:
Switch# copy tftp://tftp_server/firmware.bin flash://system/images/- List available firmware versions stored in flash:
Switch# show bootvar- Select the new firmware image to boot from:
Switch# boot system image-2- Reboot the switch:
Switch# reloadLACP (Link Aggregation)
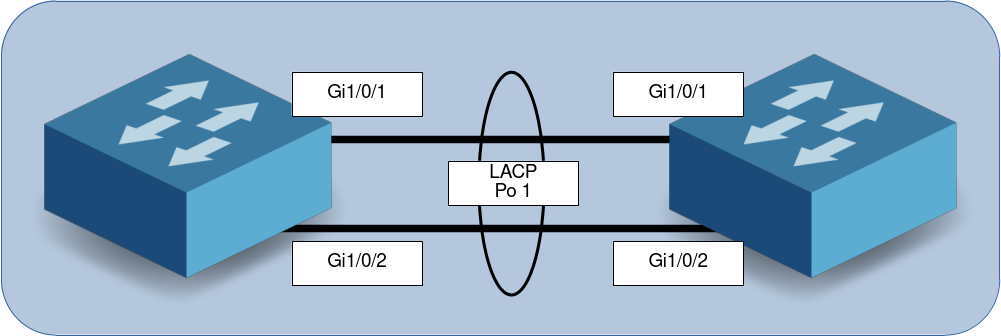
Switch01
- Create a Port-Channel using interfaces
Gi1/0/1andGi1/0/2:
Switch01(config)# interface range gi1/0/1-2
Switch01(config-if-range)# channel-group 1 mode auto- Configure the Port-Channel interface as a trunk:
Switch01(config)# interface Port-Channel 1
Switch01(config-if)# switchport mode trunk
Switch01(config-if)# switchport trunk allowed vlan all
Switch02
- Repeat the same configuration on Switch02:
Switch02(config)# interface range gi1/0/1-2
Switch02(config-if-range)# channel-group 1 mode auto
Switch02(config)# interface Port-Channel 1
Switch02(config-if)# switchport mode trunk
Switch02(config-if)# switchport trunk allowed vlan all
Show
- Verify LACP status and port-channel details:
Switch01# show lacp port-channel 1Switch01# show lacp gi1/0/1PoE (Power over Ethernet)
- Turn off PoE on interface
Gi1/0/1:
Switch(config)# interface gi1/0/1
Switch(config-if)# no power inline
- Turn on PoE on interface
Gi1/0/1:
Switch(config)# interface gi1/0/1
Switch(config-if)# power inline auto
- Display global PoE status and per-port consumption:
Switch# show power inline
Switch# show power inline gi1/0/1
VLAN Configuration
- Create VLAN 4 and assign it a name:
Switch(config)# vlan database
Switch(config-vlan)# vlan 4
Switch(config)# interface vlan 4
Switch(config-if)# name VoIP- Assign VLAN 4 to an access port (e.g.,
Gi1/0/24):
Switch(config)# interface GigabitEthernet 1/24
Switch(config-if)# switchport mode access
Switch(config-if)# switchport access vlan 4- Configure trunk mode and allowed VLANs on
Te1/0/1:
Switch(config)# interface te 1/0/1
Switch(config-if)# switchport mode trunk
Switch(config-if)# switchport trunk allowed vlan none
Switch(config-if)# switchport trunk allowed vlan add 4,100,101,150
Locked Port / Disable Port Security
Message: Your port has port security enabled and has noticed that the MAC address on that port is different from what the port had originally learned.
- Reactivate the interface
Gi2/0/4if it is in a shutdown or error-disabled state:
Switch# set interface active gi2/0/4- Check the current port security status:
Switch# show ports security gi2/0/4- Disable port security on the interface:
Switch(config) # interface gi2/0/4
Switch(config-if)# no port security
sFlow
- Set up an sFlow receiver (replace
<index>and<IP address>):
Switch(config)# sflow receiver <index of the receiver> <sflow receiver ip> port 2055- Enable sFlow sampling on multiple interfaces:
Switch(config)# interface range GigabitEthernet1/0/1-48
Switch(config-if-range)# sflow flow-sampling 1024 1
Switch(config-if-range)# sflow counters-sampling 600 1- Turn off sFlow on a specific interface (e.g.
Te1/0/1):
Switch(config)# interface TengigabitEthernet1/0/1
Switch(config-if)# no sflow counters-sampling
Switch(config-if)# no sflow flow-sampling
Port Mirroring / SPAN
- Set interface
Gi1/0/1as the SPAN destination (e.g., connected to a packet analyzer):
Switch(config)# monitor session 1 destination interface GigabitEthernet1/0/1- Mirror all traffic (both directions) from interfaces
Gi1/0/2andGi1/0/3:
Switch(config)# monitor session 1 source interface GigabitEthernet1/0/2 both
Switch(config)# monitor session 1 source interface GigabitEthernet1/0/3 both
NTP (Network Time Protocol)
- Show the current system clock:
Switch# show clock- Check SNTP (Simple NTP) status and sync info:
Switch# show sntp status- Enable SNTP and set the NTP server (replace with actual server):
Switch(config)# clock source sntp
Switch(config)# sntp unicast client enable
Switch(config)# sntp server 0.pool.ntp.org
Spanning Tree Protocol (STP)
- Show the current STP configuration and status:
Switch# show spanning-tree- Set the STP priority to make this switch the root bridge:
Switch(config)# spanning-tree priority 4096- Activate Rapid Spanning Tree Protocol (RSTP):
Switch(config)# spanning-tree mode rstpConfigure Stack
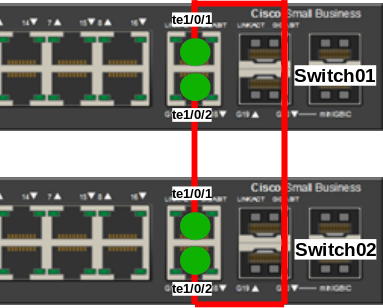
Stack two SG switches
Note: To stack two Cisco switches, ensure they use the same model and firmware version. Connect them via Te1/0/1 and Te1/0/2.
Switch01
- Enter Stack Unit 1 configuration context:
Switch01(config)# stack unit 1- Set Unit ID to
1and define stacking links:
Switch01(unit)# stack configuration links te1-2 unit-id 1- Save and reboot:
Switch01(unit)# do write
Switch01(unit)# do reload
Switch02
- Enter Stack Unit 1 configuration context:
Switch02(config)# stack unit 1- Set Unit ID to
2and define stacking links:
Switch02(unit)# stack configuration links te1-2 unit-id 2- Save and reboot:
Switch02(unit)# do write
Switch02(unit)# do reload
Verification Commands
- Show stack configuration:
Stack# show stack configuration

Unit Id  After Reboot Configuration
         Unit Id   Stack Links
-------- ------- ---------------
1        1       te1-2
2 2 te1-2 - Display general stack information:
Stack# show stack

Topology is Chain
Units stack mode: Native

Unit Id     MAC Address        Role    Network Uplink
                                       Port    Port
                                       Type    Type
------- ------------------- ---------- ------- ------
   1     40:a6:e8:e6:9c:11    active     gi      te
2 40:a6:e8:e6:9c:12 standby gi te- Show stack link details:
Stack# show stack links details

Topology is Chain

UNIT ID   Link     Status   Speed Neighbor Neighbor     Neighbor
                                  Unit ID  Link         MAC Address
------- -------- ---------- ----- -------- -------- -------------------
   1      te1      Active    10G     2       te2     40:a6:e8:e6:9c:12
   1      te2      Active    10G     2       te1     40:a6:e8:e6:9c:12
   2      te1      Active    10G     1       te2     40:a6:e8:e6:9c:11
   2      te2      Active    10G     1       te1     40:a6:e8:e6:9c:11
Remove Stack Configuration
- Remove stacking configuration from a unit:
Switch01(config)# stack unit 1Switch01(unit)# no stack configuration