Step-by-Step Guide to Installing and Using Greenbone Vulnerability Manager on Kali Linux
- Last updated: Nov 30, 2024


Greenbone Vulnerability Manager is a software framework that includes several tools (OpenVas, WebUI…) to perform vulnerability scans.
Indeed, thanks to this software framework, we can scan an entire network or a single host to see if it is prone to known vulnerabilities.
Historically, Greenbone Vulnerability Manager is a fork of the Nessus scanning tool, which is now proprietary software.
- Main features:
- Vulnerability scan
- Nessus fork
- Able to identify security holes in a computer network
- Kali Linux Release: 2024.3
Install GVM
Install
Here's how to install Greenbone Vulnerability Manager on our Kali Linux.
- First let's update the packages:
kali@kali:~$ sudo apt update && sudo apt dist-upgrade- Install all the necessary packages:
kali@kali:~$ sudo apt install gvm postgresql nsis- Run the setup script:
- Which will:
- Start services and create PostgreSQL database
- Create GVM certificate files
- Apply permissions
- Update vulnerability databases
- Create and set up admin account
- Which will:
kali@kali:~$ sudo gvm-setup[…]
[*] Please note the password for the admin user
[*] User created with password 'xxxxxxxx-xxxx-xxxx-xxxx-xxxxxxxxxx'.
[>] You can now run gvm-check-setup to make sure everything is correctly configured- Start
gvmdandgsadservices:
kali@kali:~$ sudo systemctl start gvmd.service && sudo systemctl start gsad.service- Run the check script:
kali@kali:~$ sudo gvm-check-setup
[…]
It seems like your GVM-23.11.0 installation is OK.- Check that the
gvmdservice is running:
kali@kali:~$ sudo systemctl status gvmd.service- Check that the WebUI is waiting for a connection:
kali@kali:~$ sudo ss -ltn4p
State         Recv-Q        Send-Q                Local Address:Port                 Peer Address:Port        Process
LISTEN 0 4096 127.0.0.1:9392 0.0.0.0:* users:(("gsad",pid=2243,fd=10))- Add the right to create tasks to the default
admin:
kali@kali:~$ sudo gvmd --modify-setting 78eceaec-3385-11ea-b237-28d24461215b --value admin- You should now be able to connect to the
https://127.0.0.1:9392address using theadminlogin and the associated password (use the one displayed earlier in thegvm-setupphase):

Change listening interface (Optional)
In its default configuration, the Greenbone Security Assistant (GSA) (WebUI) can only be accessed via the local address (127.0.0.1). To connect to the WebUI from other hosts, you need to modify the systemctl configuration.
- Edit the
/usr/lib/systemd/system/gvmd.servicefile:
[Unit]
Description=Greenbone Vulnerability Manager daemon (gvmd)
After=network.target networking.service postgresql.service ospd-openvas.service
Wants=postgresql.service ospd-openvas.service
Documentation=man:gvmd(8)
ConditionKernelCommandLine=!recovery

[Service]
Type=forking
User=_gvm
Group=_gvm
PIDFile=/run/gvmd/gvmd.pid
RuntimeDirectory=gvmd
RuntimeDirectoryMode=2775
#ExecStart=/usr/sbin/gvmd --osp-vt-update=/run/ospd/ospd.sock --listen-group=_gvm
ExecStart=/usr/sbin/gvmd --osp-vt-update=/run/ospd/ospd.sock -a 0.0.0.0
Restart=always
TimeoutStopSec=10

[Install]
WantedBy=multi-user.target- Edit the
/usr/lib/systemd/system/gsad.servicefile:
[Unit]
Description=Greenbone Security Assistant daemon (gsad)
Documentation=man:gsad(8) https://www.greenbone.net
After=network.target gvmd.service
Wants=gvmd.service

[Service]
Type=forking
User=_gvm
Group=_gvm
RuntimeDirectory=gsad
RuntimeDirectoryMode=2775
PIDFile=/run/gsad/gsad.pid
#ExecStart=/usr/sbin/gsad --listen 127.0.0.1 --port 9392
ExecStart=/usr/sbin/gsad --mlisten=KALI_IP_ADDRESS --listen 0.0.0.0 --port 9392
Restart=always
TimeoutStopSec=10

[Install]
WantedBy=multi-user.target
Alias=greenbone-security-assistant.service- Reload the systemd configuration:
kali@kali:~$ sudo systemctl daemon-reload- Restart the
gvmservices:
kali@kali:~$ sudo systemctl restart gvmd.servicekali@kali:~$ sudo systemctl restart gsad.serviceUseful commands
- Update Network Vulnerability Tests:
kali@kali:~$ sudo -u _gvm greenbone-nvt-sync- Keeping the feeds up-to-date:
kali@kali:~$ sudo greenbone-feed-sync --type CERT
kali@kali:~$ sudo greenbone-feed-sync --type SCAP
kali@kali:~$ sudo greenbone-feed-sync --type GVMD_DATA- Create a gvadmin user:
kali@kali:~$ sudo runuser -u _gvm -- gvmd --create-user=gvadmin --password=stPassw0rd --disable-password-policy- Get the UUIDs of all users created:
kali@kali:~$ sudo runuser -u _gvm -- gvmd --get-users --verbose- Change a user's password:
kali@kali:~$ sudo runuser -u _gvm -- gvmd --user=gvadmin --new-password=gvadminUsing GVM
Here's how to perform our first vulnerability scan on a predefined host.
Create target
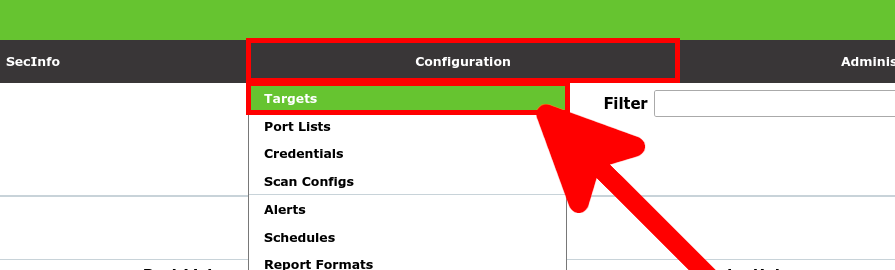
- From the Configuration menu, click on Targets:
- Click on New Target link:
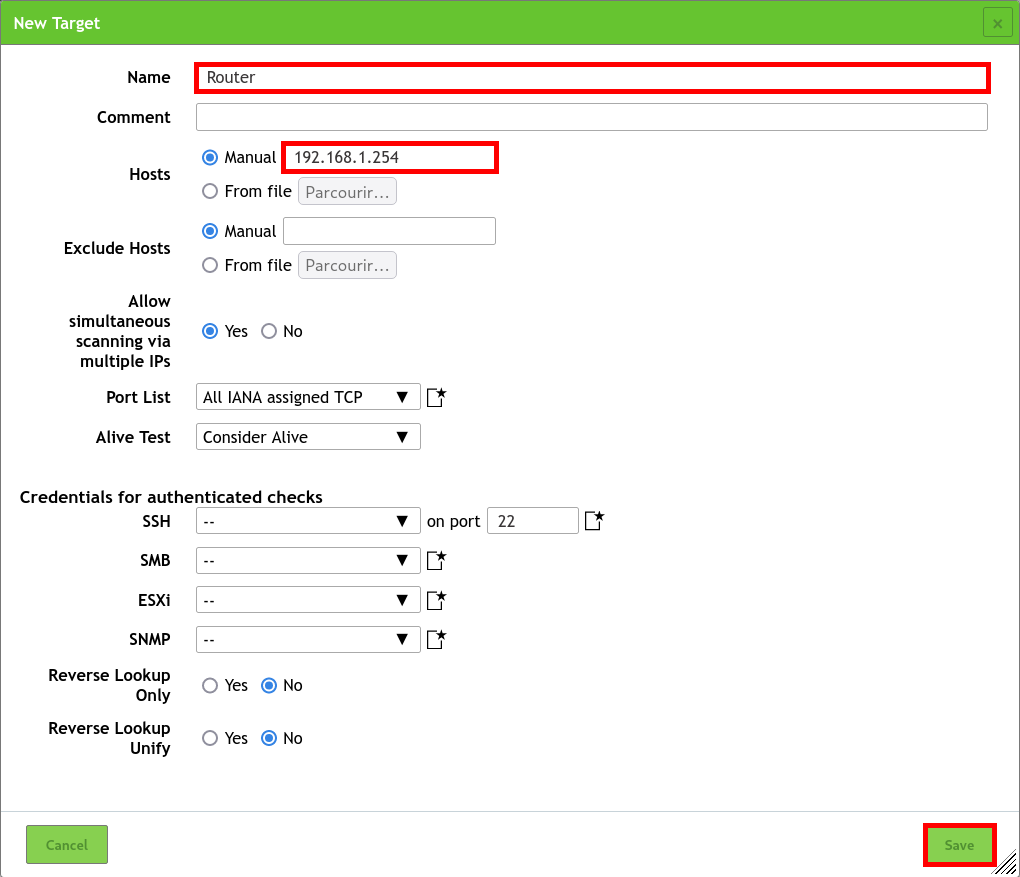
- Define the Target to be scanned by defining its IP address and giving it a Name:
Create task
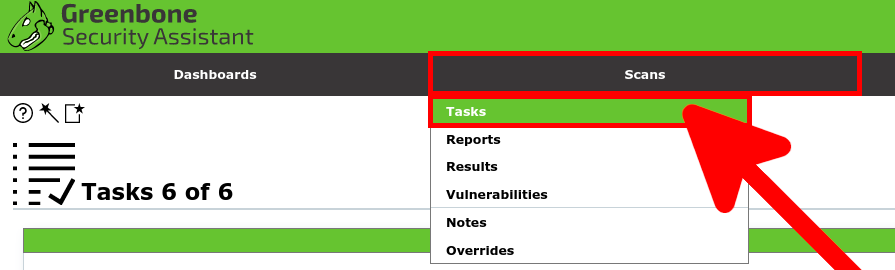
- From the Scans menu, click on Tasks:
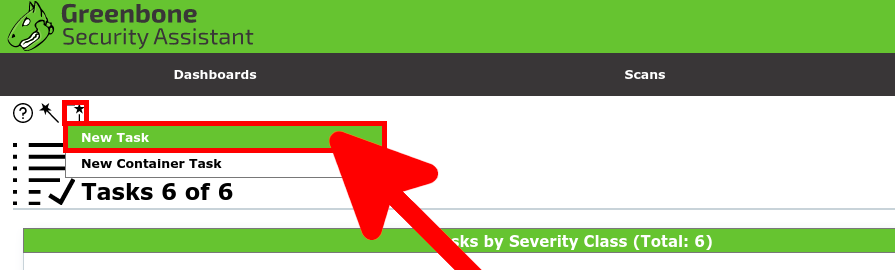
- Click on New Task icon:
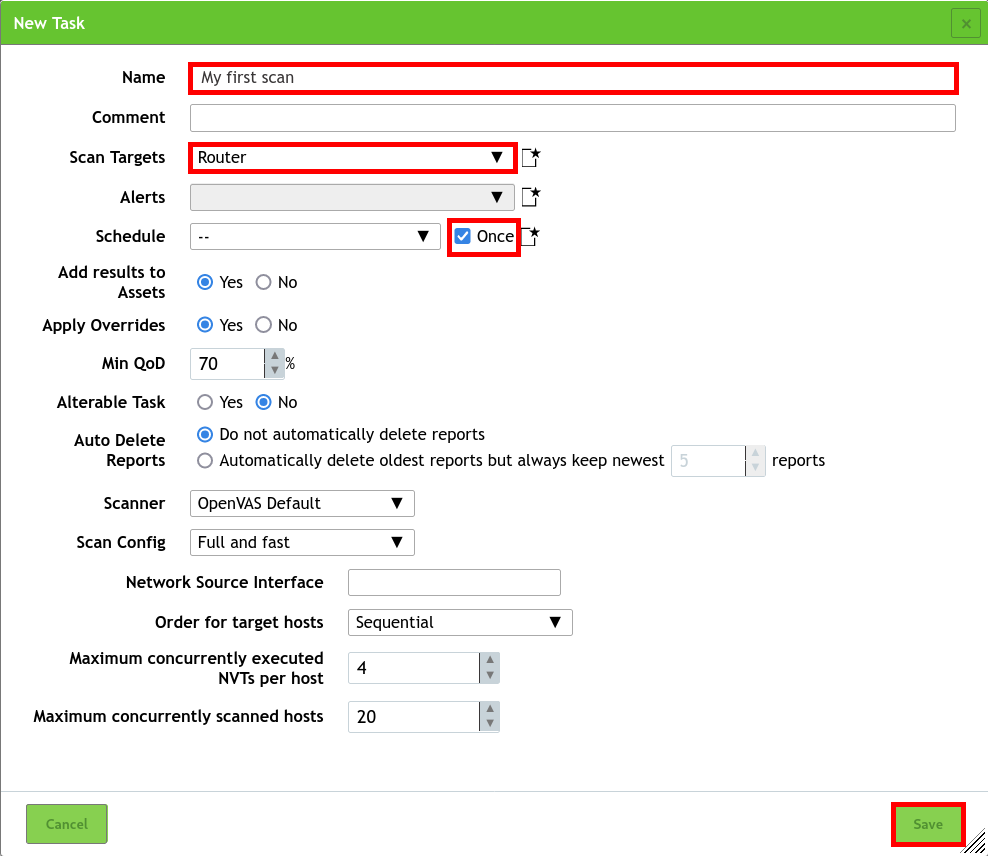
- Define the New Task by defining the Name, associating the Target and checking the Schedule Once option:
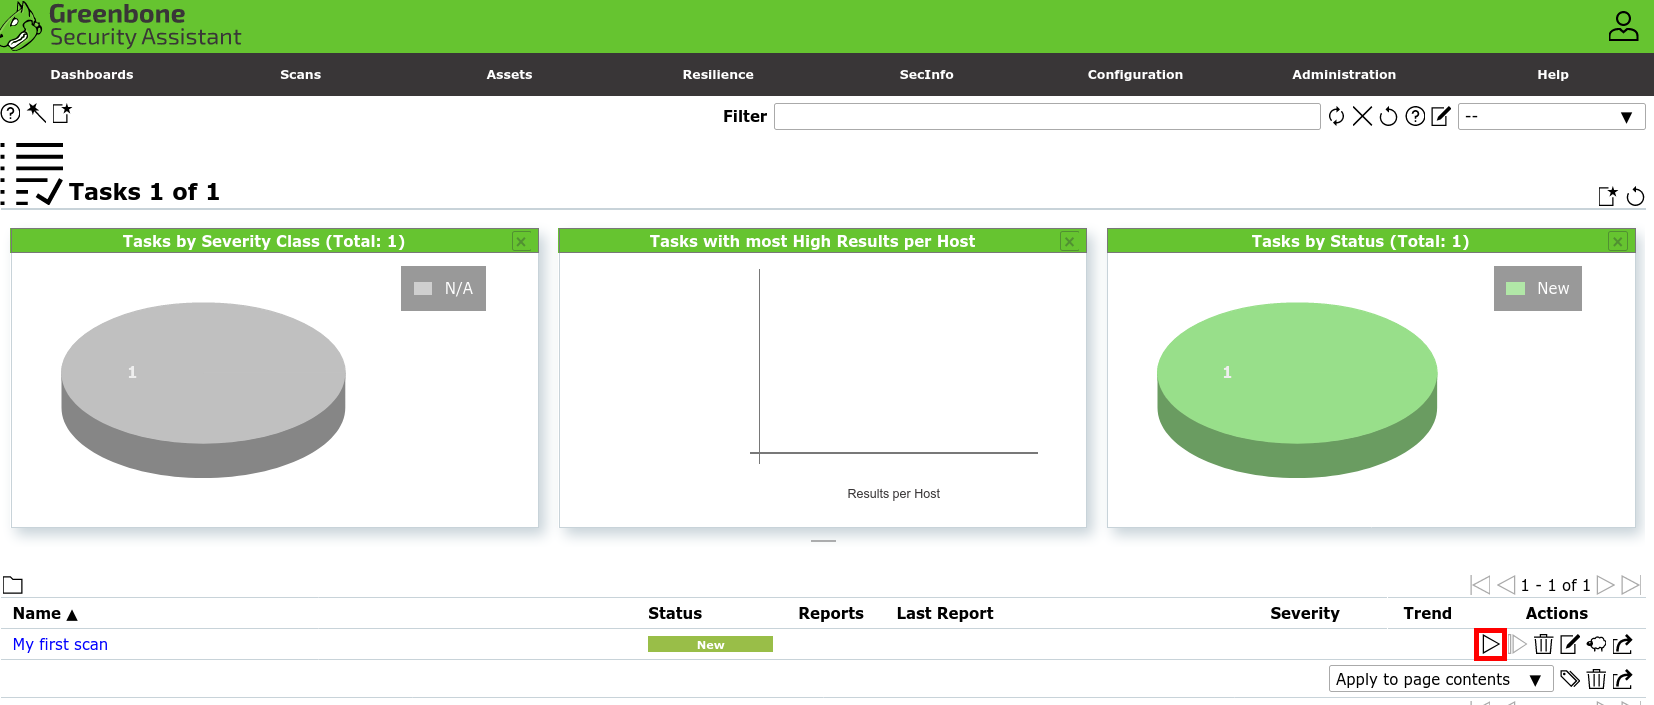
- Click on the Play button to Start the task:
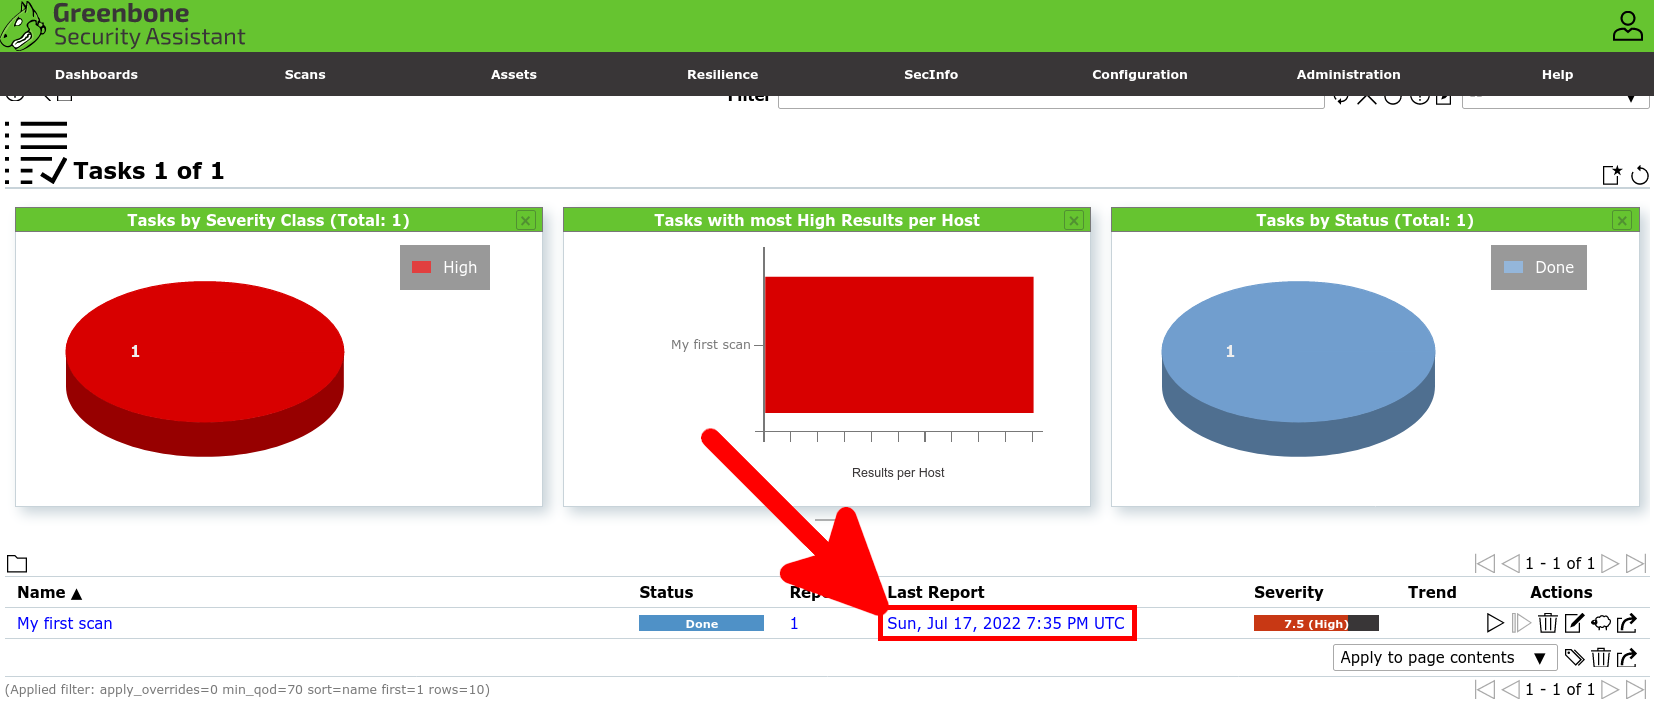
- Wait a few minutes for the task to finish, then click on the Last Report link to access the vulnerability scan report:
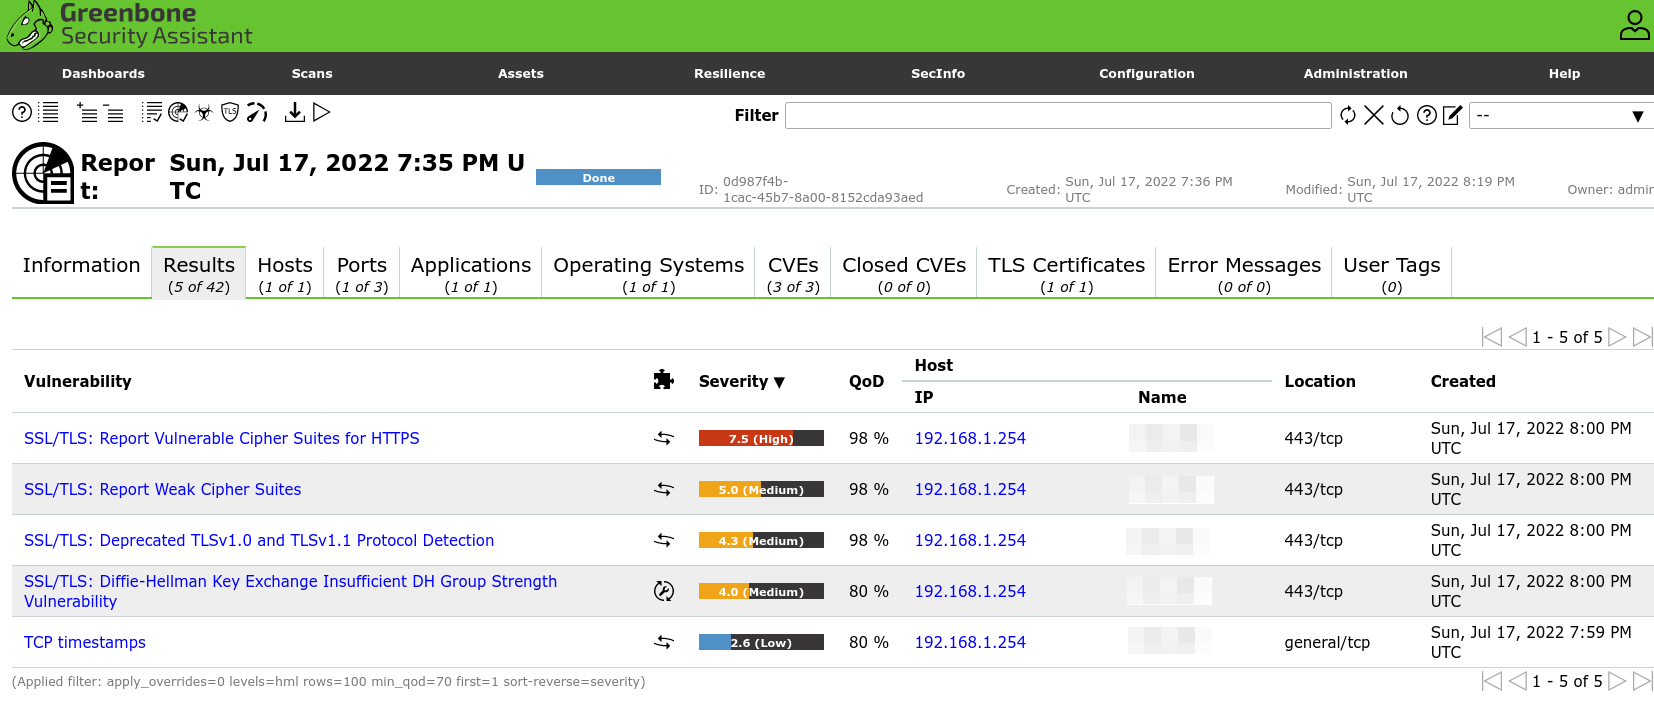
- You will have a complete report:
Dépannage
When creating the first task, you may receive the error: Failed to find config 'daba56c8-73ec-11df-a475-002264764cea'. This may be because the user does not have the right to create a task. It may also be due to the fact that not all elements have yet been downloaded. Let's see how to solve this problem.
- Give task creation to the
adminuser:
kali@kali:~$ sudo gvmd --modify-setting 78eceaec-3385-11ea-b237-28d24461215b --value admin- This may also be due to the fact that an update is in progress (a process that takes a particularly long process during the first initialization). You can monitor the logs to check progress:
kali@kali:~$ sudo tail -f /var/log/gvm/gvmd.log
md manage:   INFO:2024-11-30 16h50.23 utc:4774: Updating /var/lib/gvm/scap-data/nvdcve-2.0-2011.xml
md manage:   INFO:2024-11-30 16h51.22 utc:4774: Updating /var/lib/gvm/scap-data/nvdcve-2.0-2018.xml
md manage: INFO:2024-11-30 16h53.13 utc:4774: Updating /var/lib/gvm/scap-data/nvdcve-2.0-2019.xml- And also check the activity of the process
gvmdin the/var/lib/gvm/folder:
kali@kali:~$ sudo lsof +D /var/lib/gvm/
lsof: WARNING: can't stat() fuse.gvfsd-fuse file system /run/user/1000/gvfs
      Output information may be incomplete.
lsof: WARNING: can't stat() fuse.gvfsd-fuse file system /run/user/109/gvfs
      Output information may be incomplete.
COMMAND  PID USER FD   TYPE DEVICE SIZE/OFF    NODE NAME
gvmd    4771 _gvm 18uW  REG    8,1        0 1493222 /var/lib/gvm/feed-update.lock
gvmd    4774 _gvm 18u   REG    8,1        0 1493222 /var/lib/gvm/feed-update.lock
gvmd    4774 _gvm 20r   DIR    8,1      4096 1453575 /var/lib/gvm/scap-data
gvmd    4774 _gvm 21r   REG    8,1 107150285 1493243 /var/lib/gvm/scap-data/nvdcve-2.0-2020.xml