
How to Install Proxmox VE 9: Step-by-Step Guide
- Last updated: Sep 12, 2026

I've been using VMware ESXi for many years. For me, it was long considered the best choice for bare-metal virtualization. I appreciated its lightweight interface, powerful features, and even its flexible licensing, which made it easy to use in test environments. Back then, there were no subscription-only licenses - in short, everything you’d expect from professional-grade software. But that was before Broadcom took over.
I won't rehash the story, but basically, it stinks to high heaven, and it's only getting worse. So I decided to move on to another solution, and that's what I'm going to detail in a series of tutorials dedicated to Proxmox.
I chose Proxmox VE for several reasons: it’s free to use, open-source, powerful, and highly flexible. Paid subscriptions are also available, providing access to the enterprise repository and official support while helping fund the continued development of the project. And - last but not least - not controlled by Broadcom. Of course, as with any migration or platform change, it’s important to compare the features and limitations before making the switch. While Proxmox VE meets all my needs, it still doesn’t match VMware in every area.
This first tutorial - starting right from the basics - will focus on installing Proxmox VE 9.
Download the ISO
First, visit the official Proxmox download page: https://www.proxmox.com/en/downloads and download the latest Proxmox VE 9 ISO Installer.
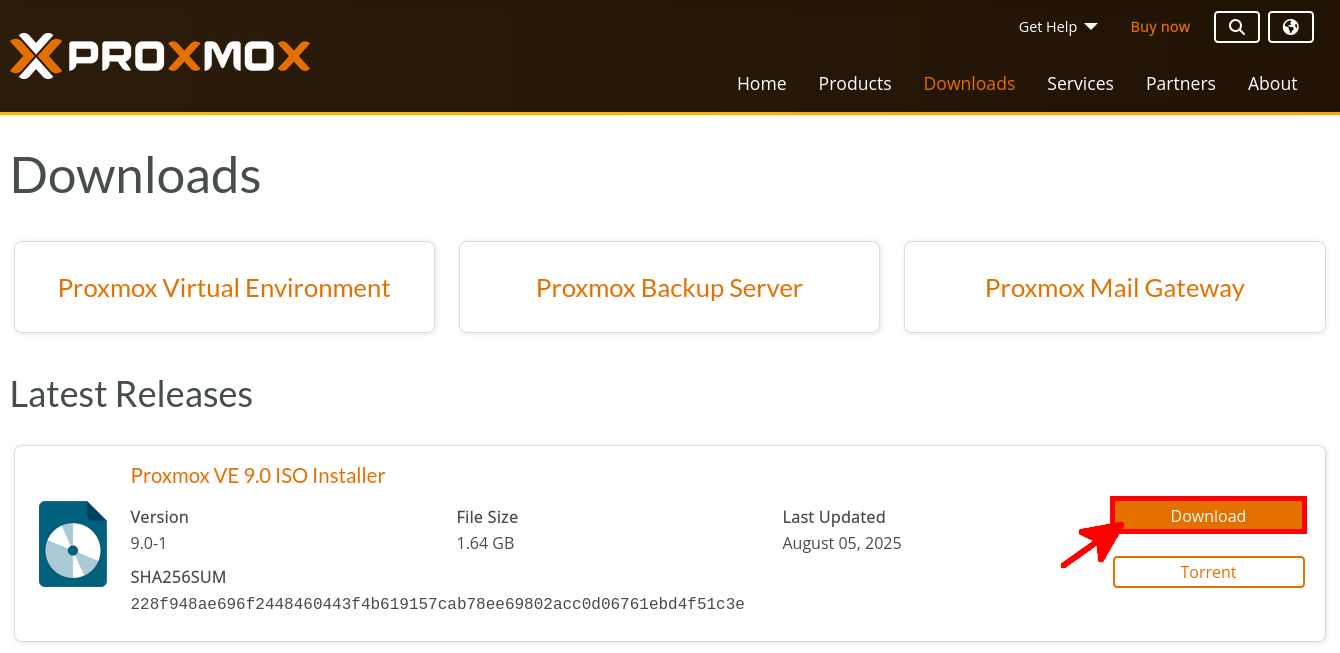
Next, prepare your installation media. You can create a bootable USB drive using a tool such as Rufus, write the ISO to a USB drive with dd on a Unix-like system, or mount the ISO remotely using a server management interface such as Dell iDRAC Virtual Media. You can find additional installation media methods in the official Proxmox wiki: https://pve.proxmox.com/wiki/Prepare_Installation_Media.
Architecture Overview
Network Configuration
In this example, the server is equipped with two physical network interfaces. After installing Proxmox VE 9, the interfaces are named according to the systemd predictable network interface naming scheme. For more information, see the official Proxmox documentation: https://pve.proxmox.com/wiki/Network_Configuration.
- On this server, the two physical interfaces are named
eno1andeno2:
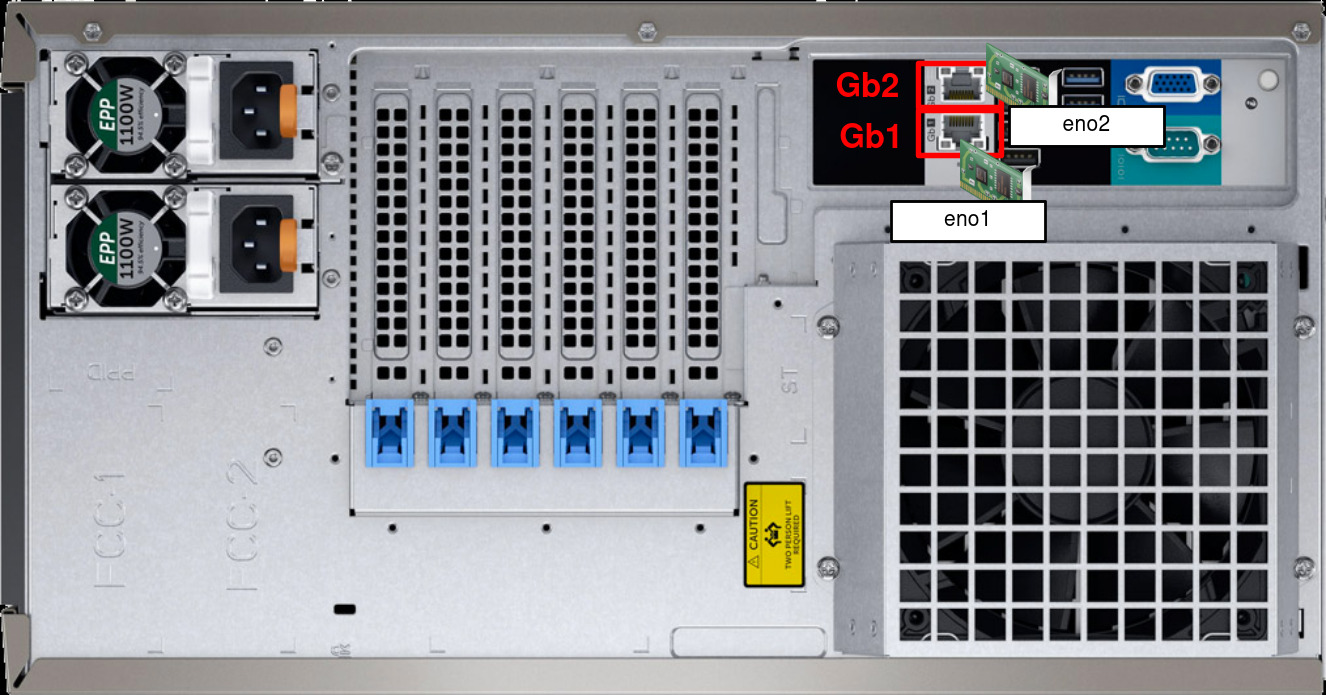
eno1 and eno2 in Proxmox VE.- Since my server has two physical network interfaces, I chose to dedicate one to management traffic and the other to the virtual machine network. This helps separate administrative traffic from VM traffic, which can improve both security and network organization. It is also possible to use a single physical interface for both management and VM traffic, depending on your environment:
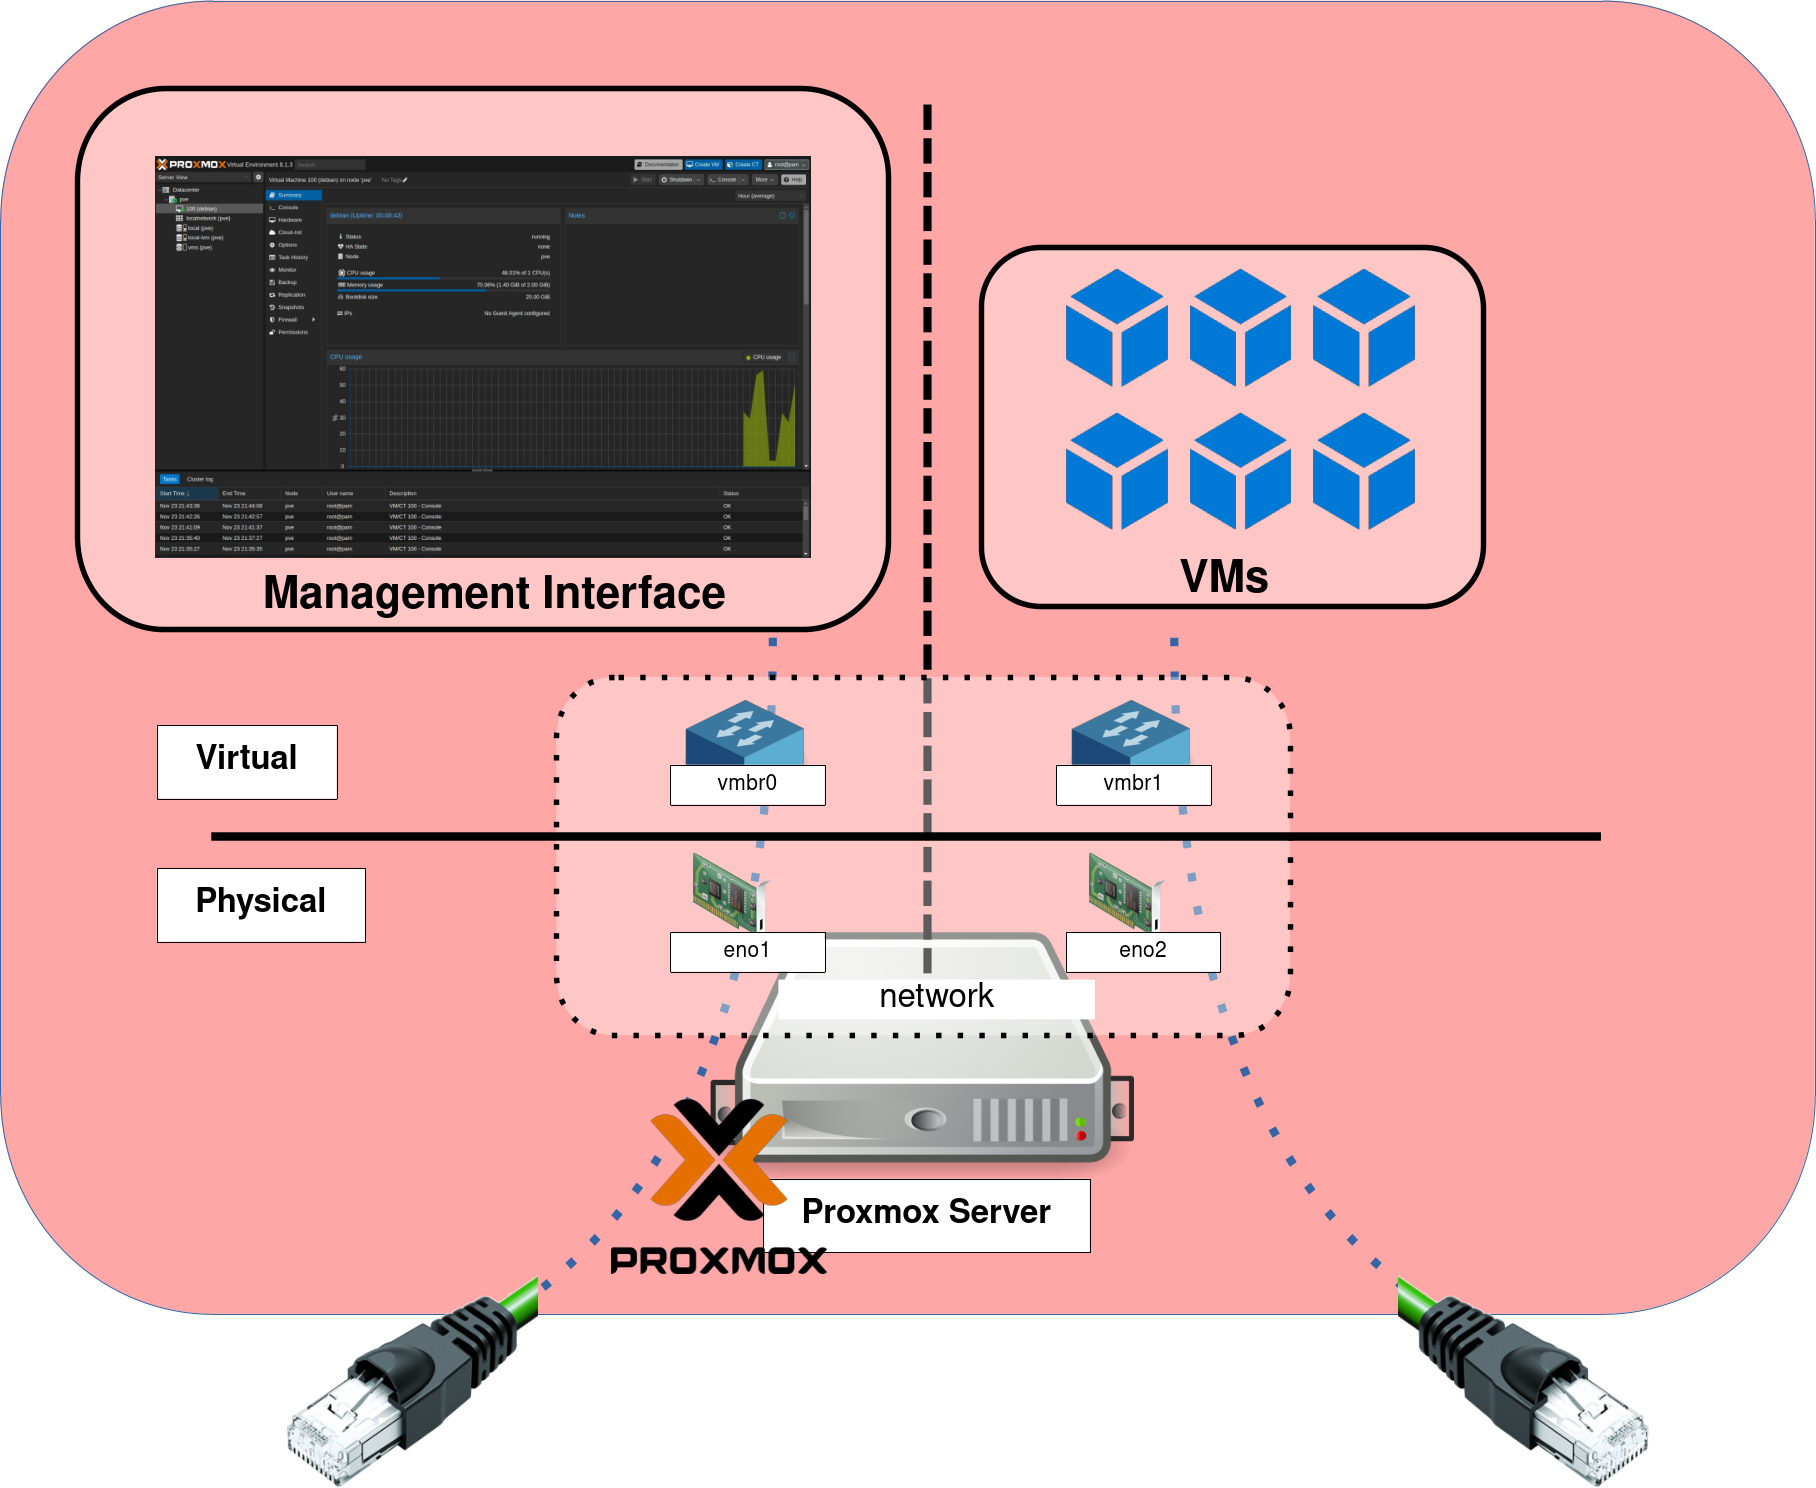
- This second diagram shows the logical network configuration: each virtual machine is connected to the
vmbr1Linux bridge for VM traffic, while the Proxmox VE management interface uses thevmbr0Linux bridge:
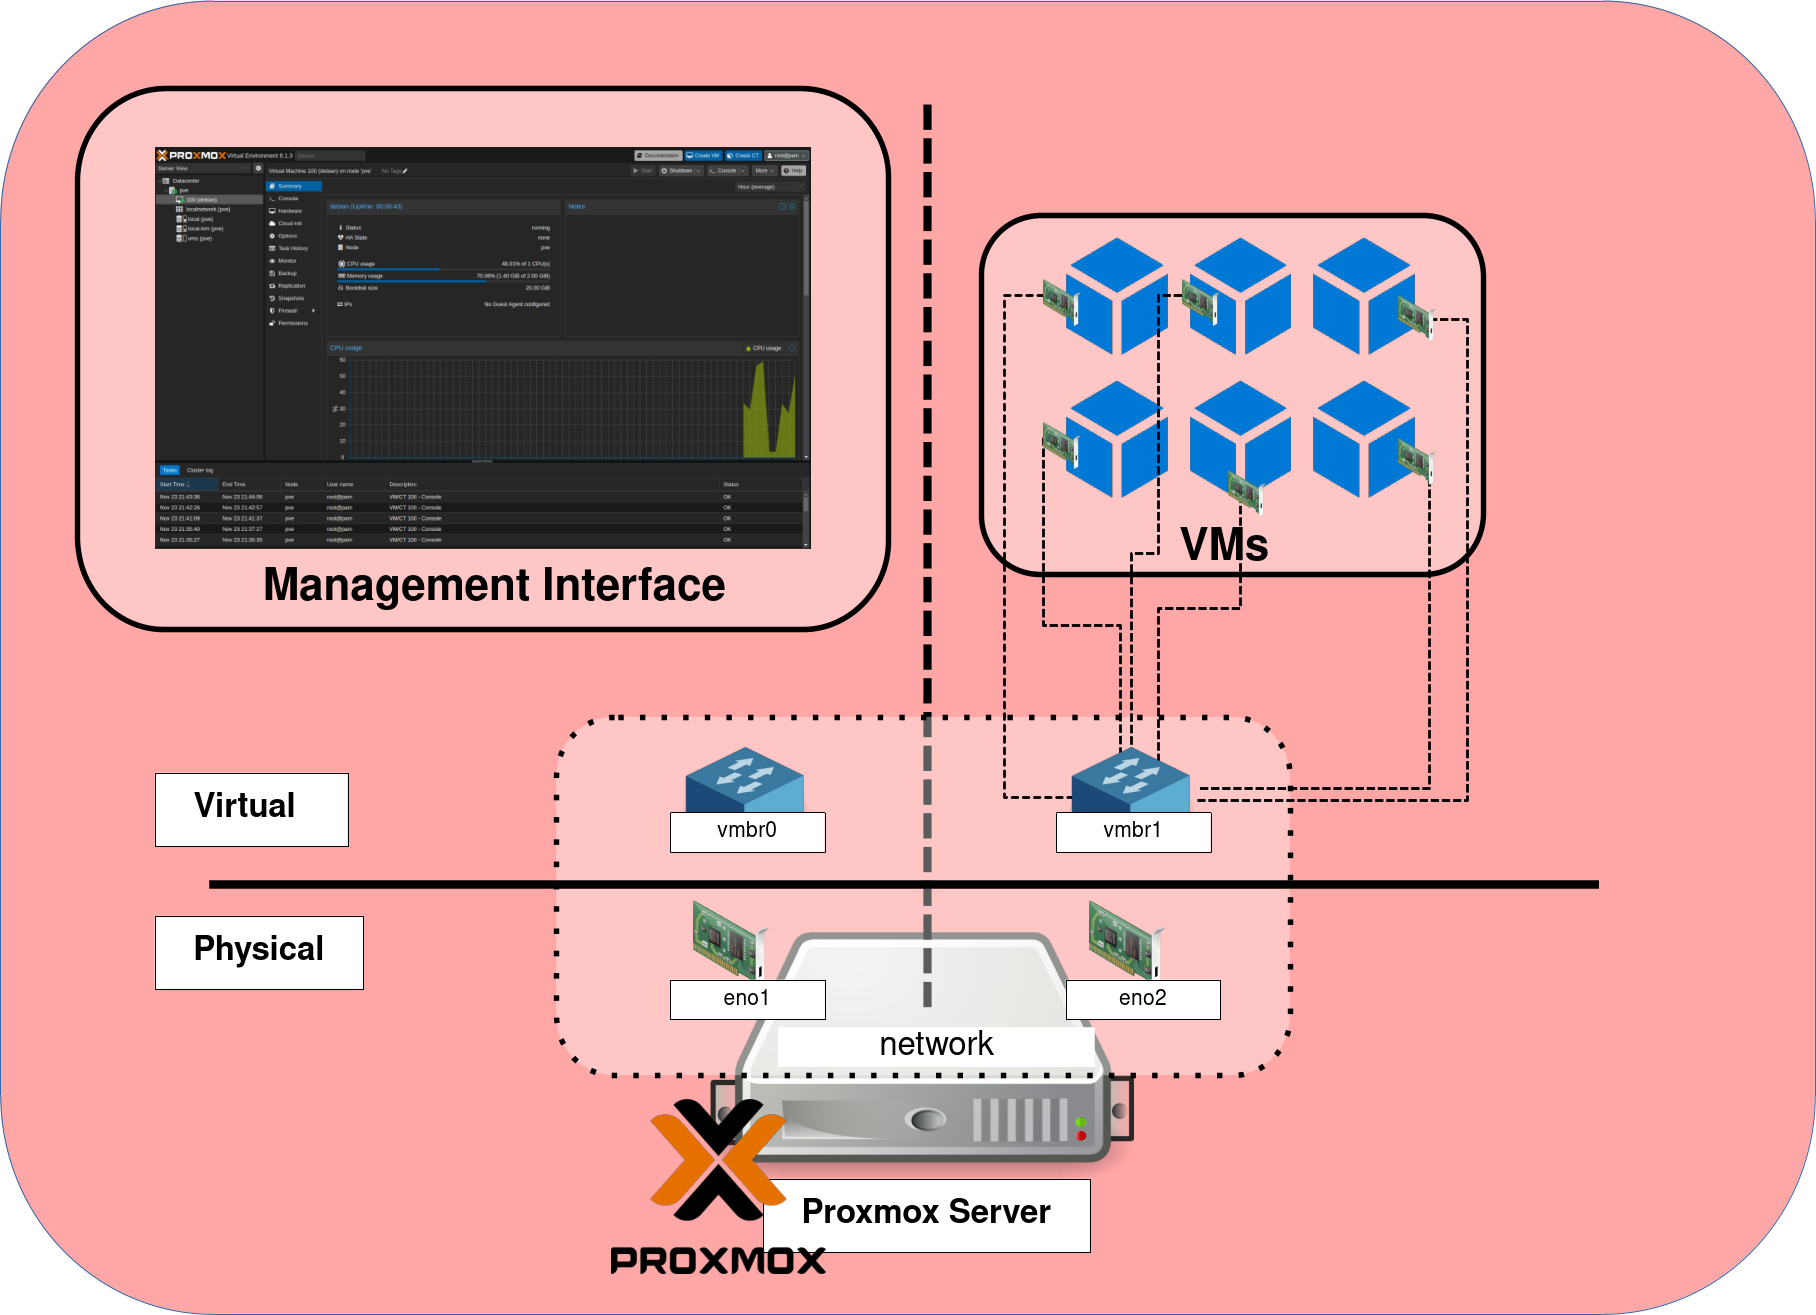
vmbr0 dedicated to management and vmbr1 used for virtual machine traffic.Storage Configuration
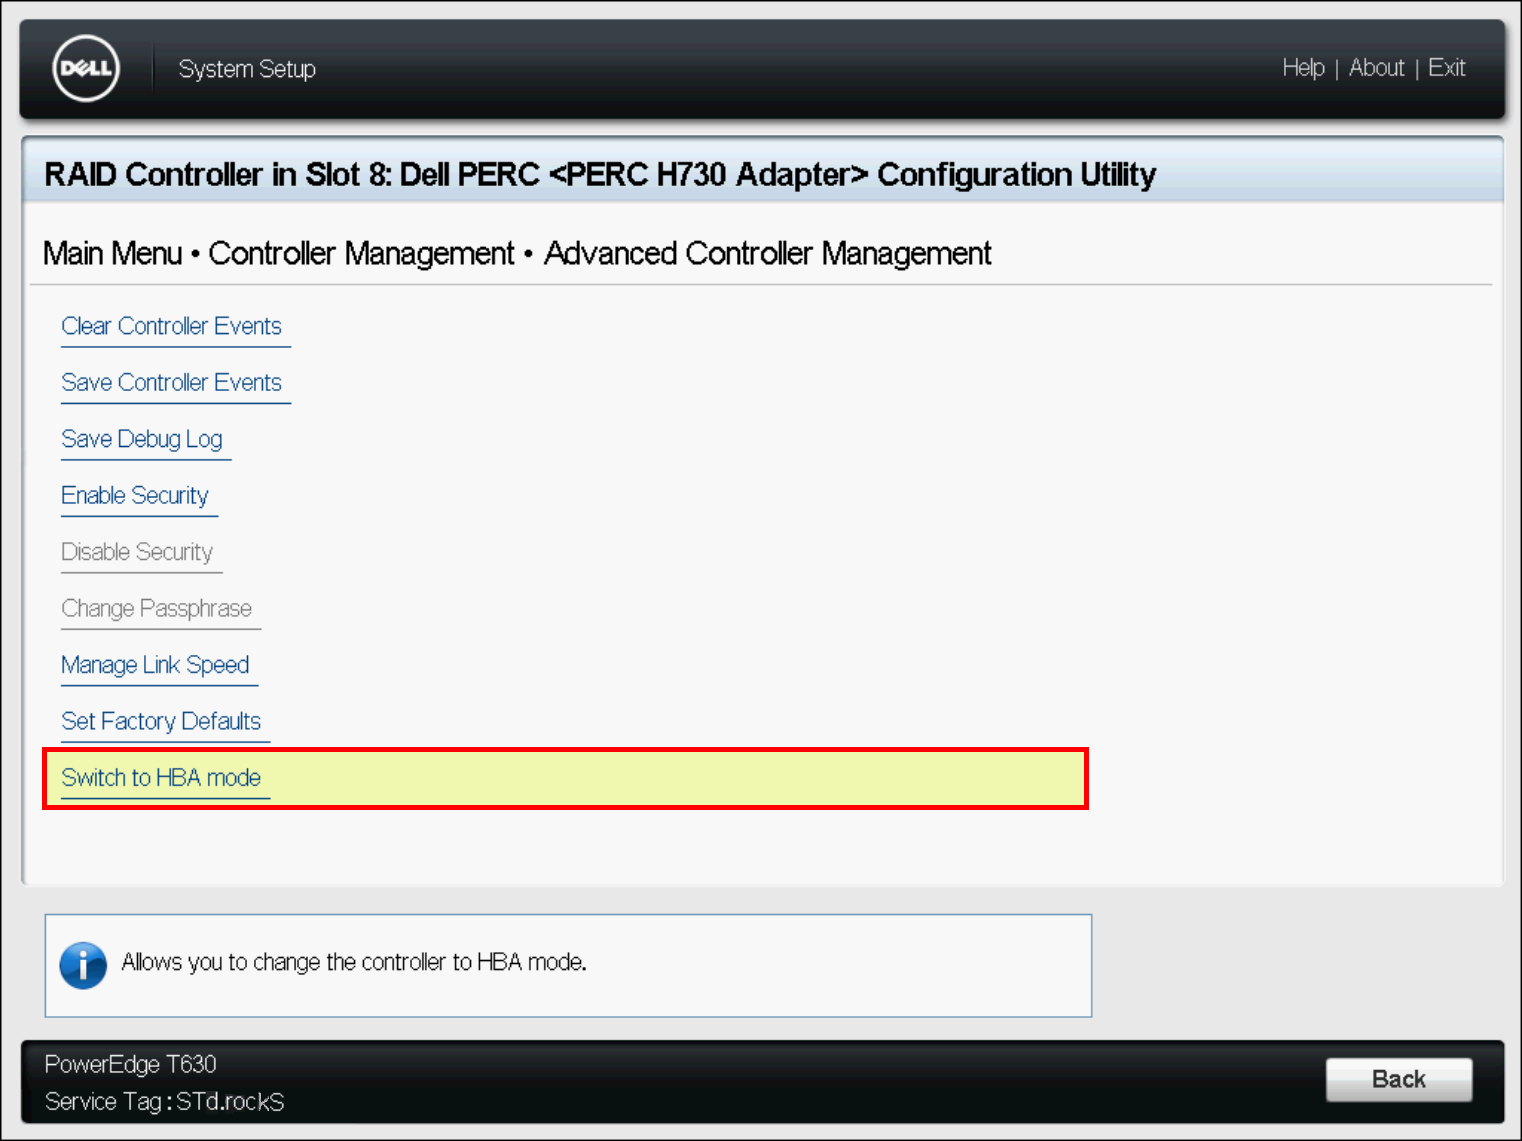
For my storage setup, I wanted to use ZFS, so I configured my Dell PERC controller in HBA mode. This allows Proxmox VE 9 and ZFS to access the disks directly, which is the recommended approach for getting the best reliability and data integrity from the ZFS filesystem.
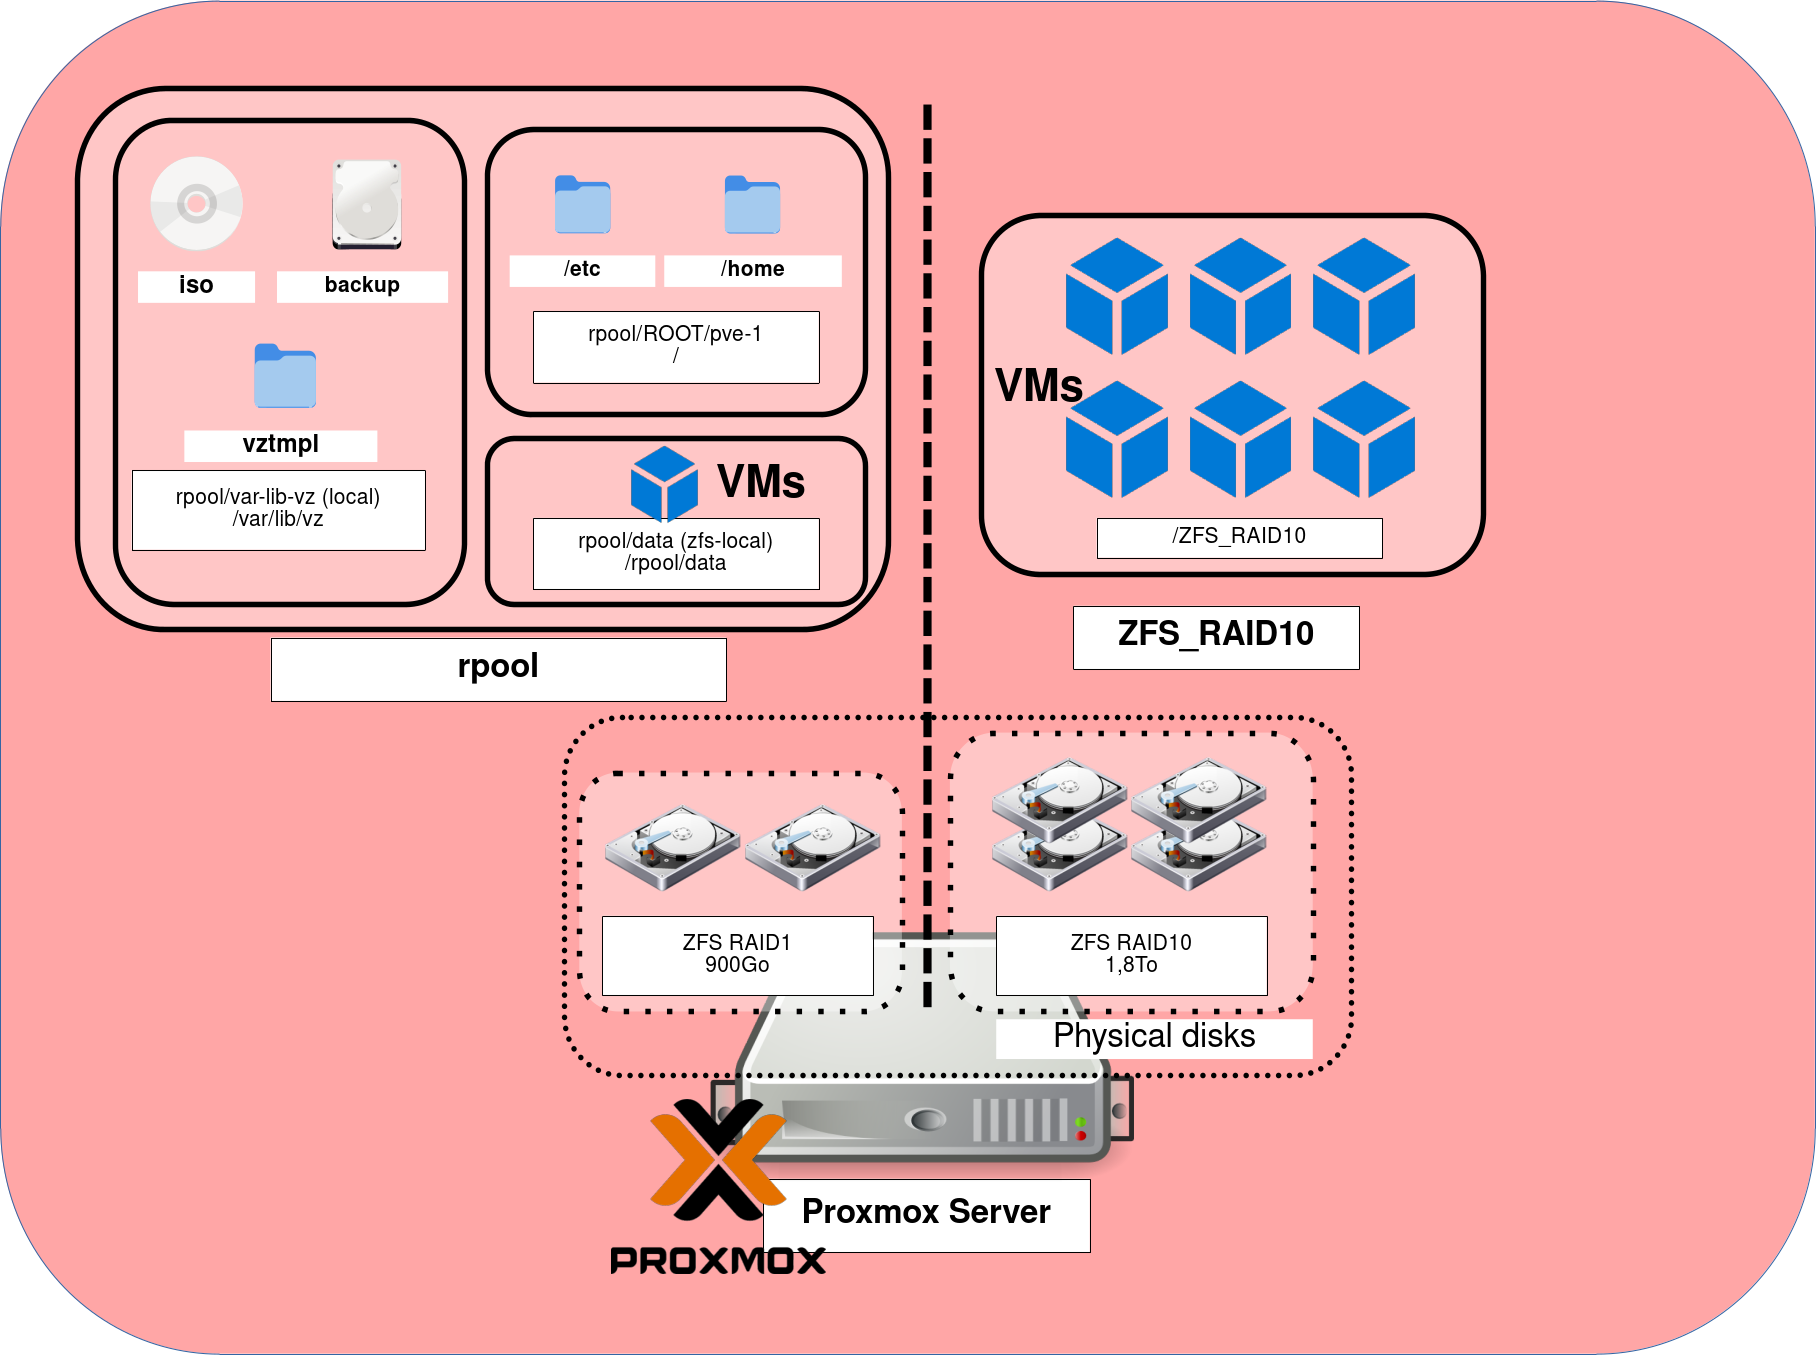
During installation, I created a ZFS RAID1 (mirror) for the system disks, where the Proxmox VE hypervisor is installed. I then configured the four remaining disks as a ZFS RAID10-style storage pool dedicated to virtual machine storage.
In practice, ZFS works best when it has direct access to the physical disks rather than sitting on top of a hardware RAID layer. This allows ZFS to manage redundancy, caching, and data integrity itself. You can read more in the official documentation: https://pve.proxmox.com/wiki/ZFS_on_Linux.
If you are using a Dell PERC controller and plan to use ZFS, it is worth checking whether your card supports switching from RAID mode to HBA mode. Dell provides a guide here: Dell: Convert RAID Mode to HBA Mode.
- Example: switching a Dell PERC H730 controller from RAID mode to HBA mode before deploying Proxmox VE 9 with ZFS:
- Example of a ZFS storage layout in a Proxmox VE 9 environment, with a mirrored system pool and a separate RAID10-style pool for virtual machine storage:
Installing Proxmox VE 9
Once the installation media is ready, you can start the Proxmox VE 9 installation. The graphical installer guides you through the main configuration steps, including storage, localization, administrator credentials, and network settings.
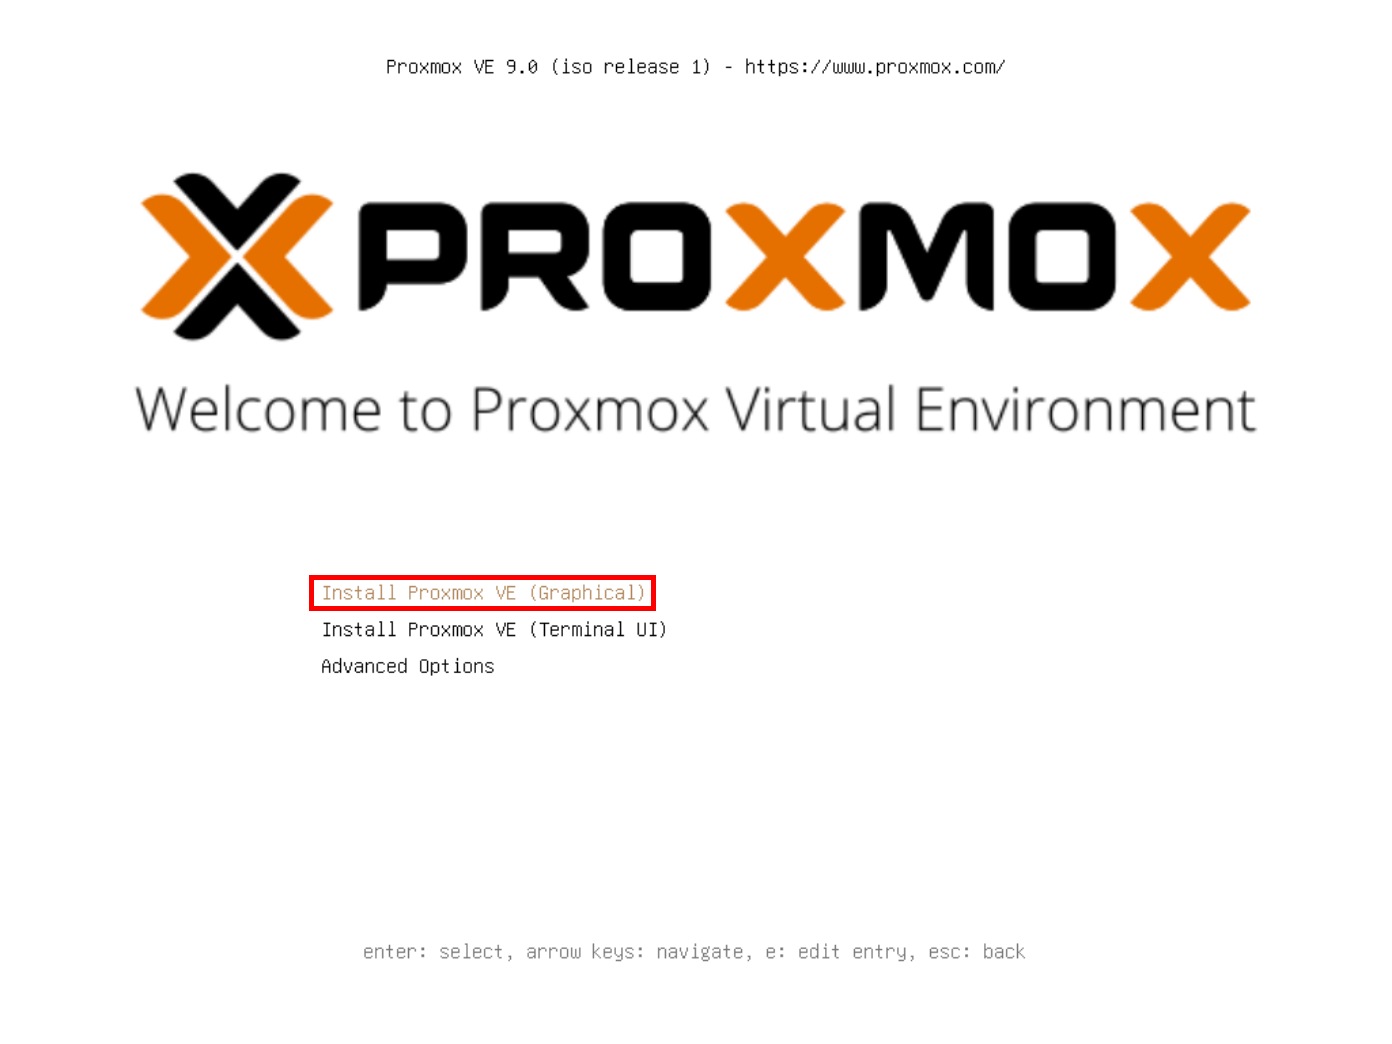
- Boot from your prepared installation media. When the Proxmox VE welcome menu appears, select Install Proxmox VE (Graphical) to start the guided installation:
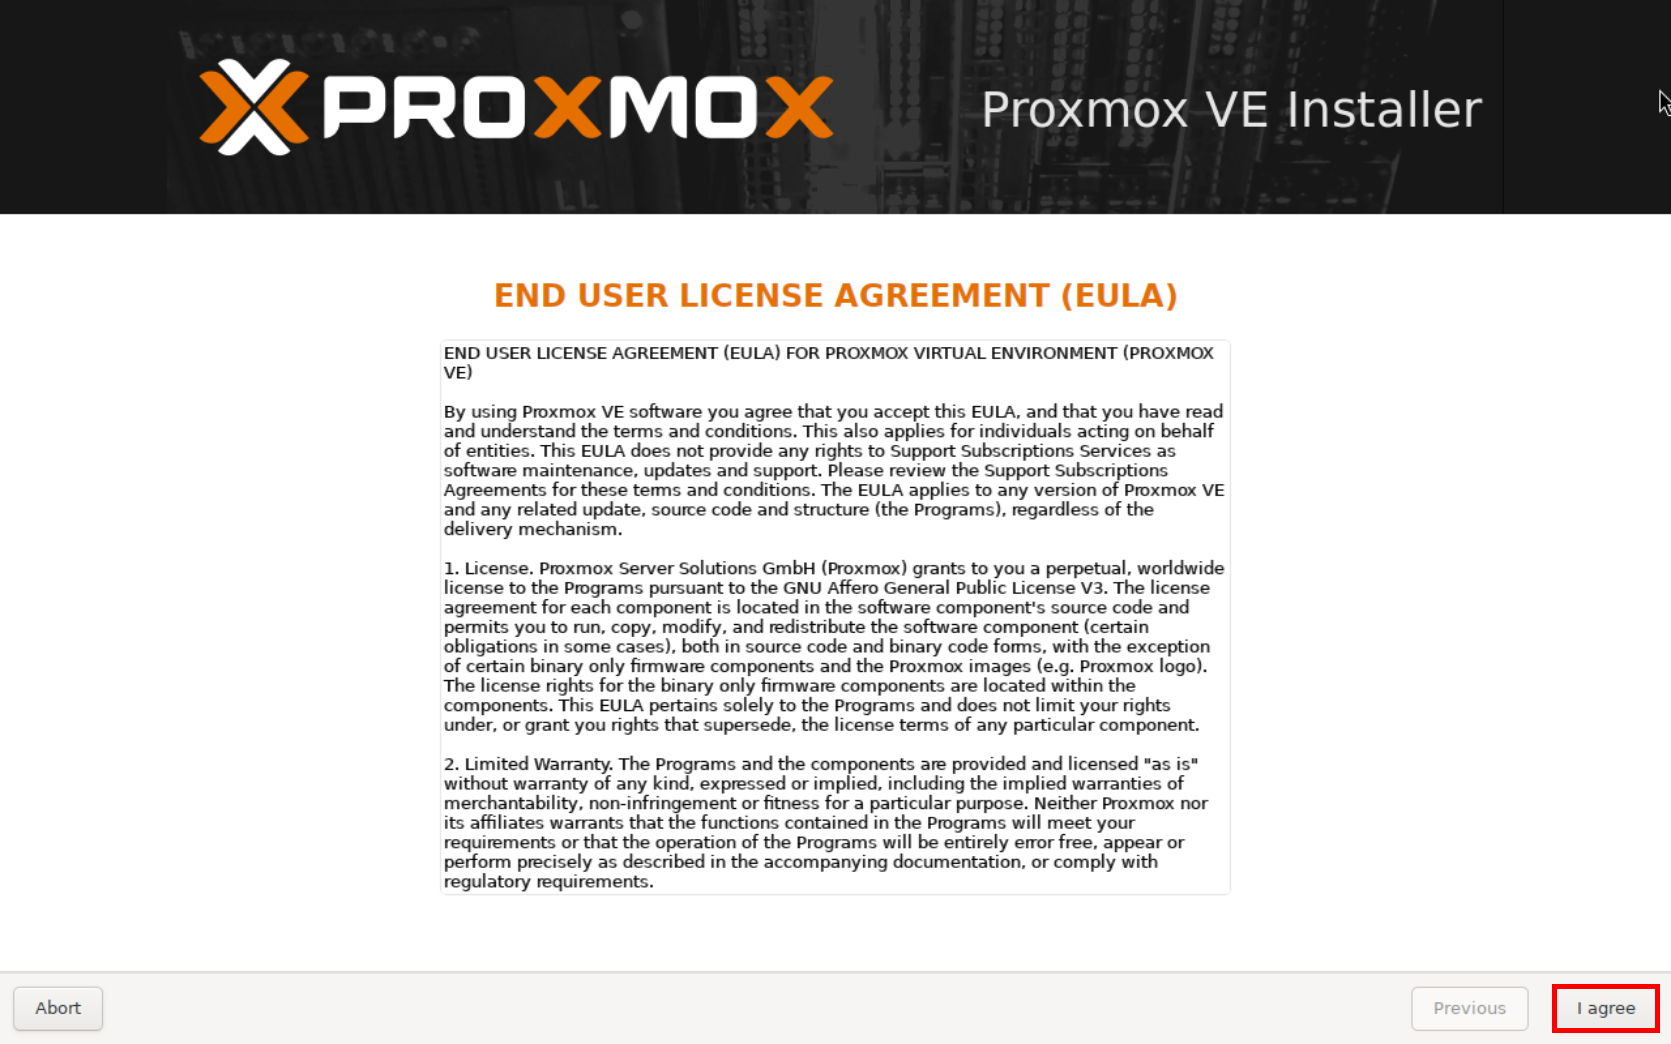
- Accept the End User License Agreement (EULA) by clicking I Agree to continue:
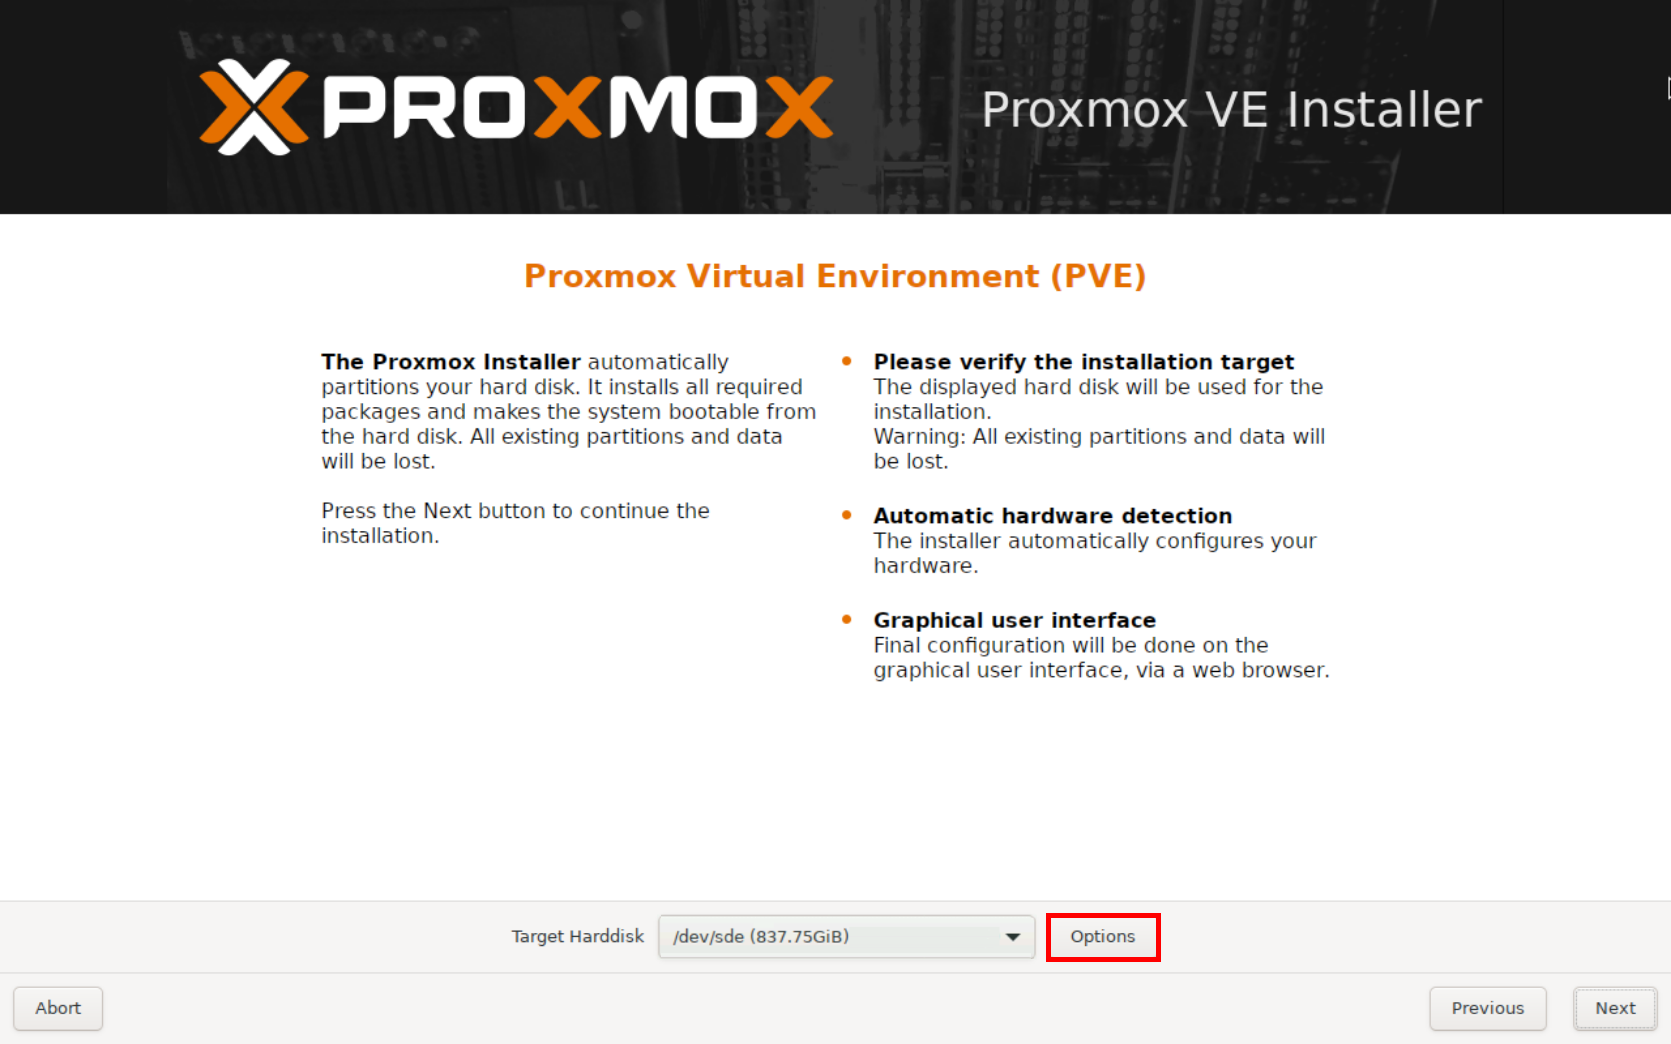
- On the Target Harddisk screen, click Options to configure the storage layout for the Proxmox VE 9 installation:
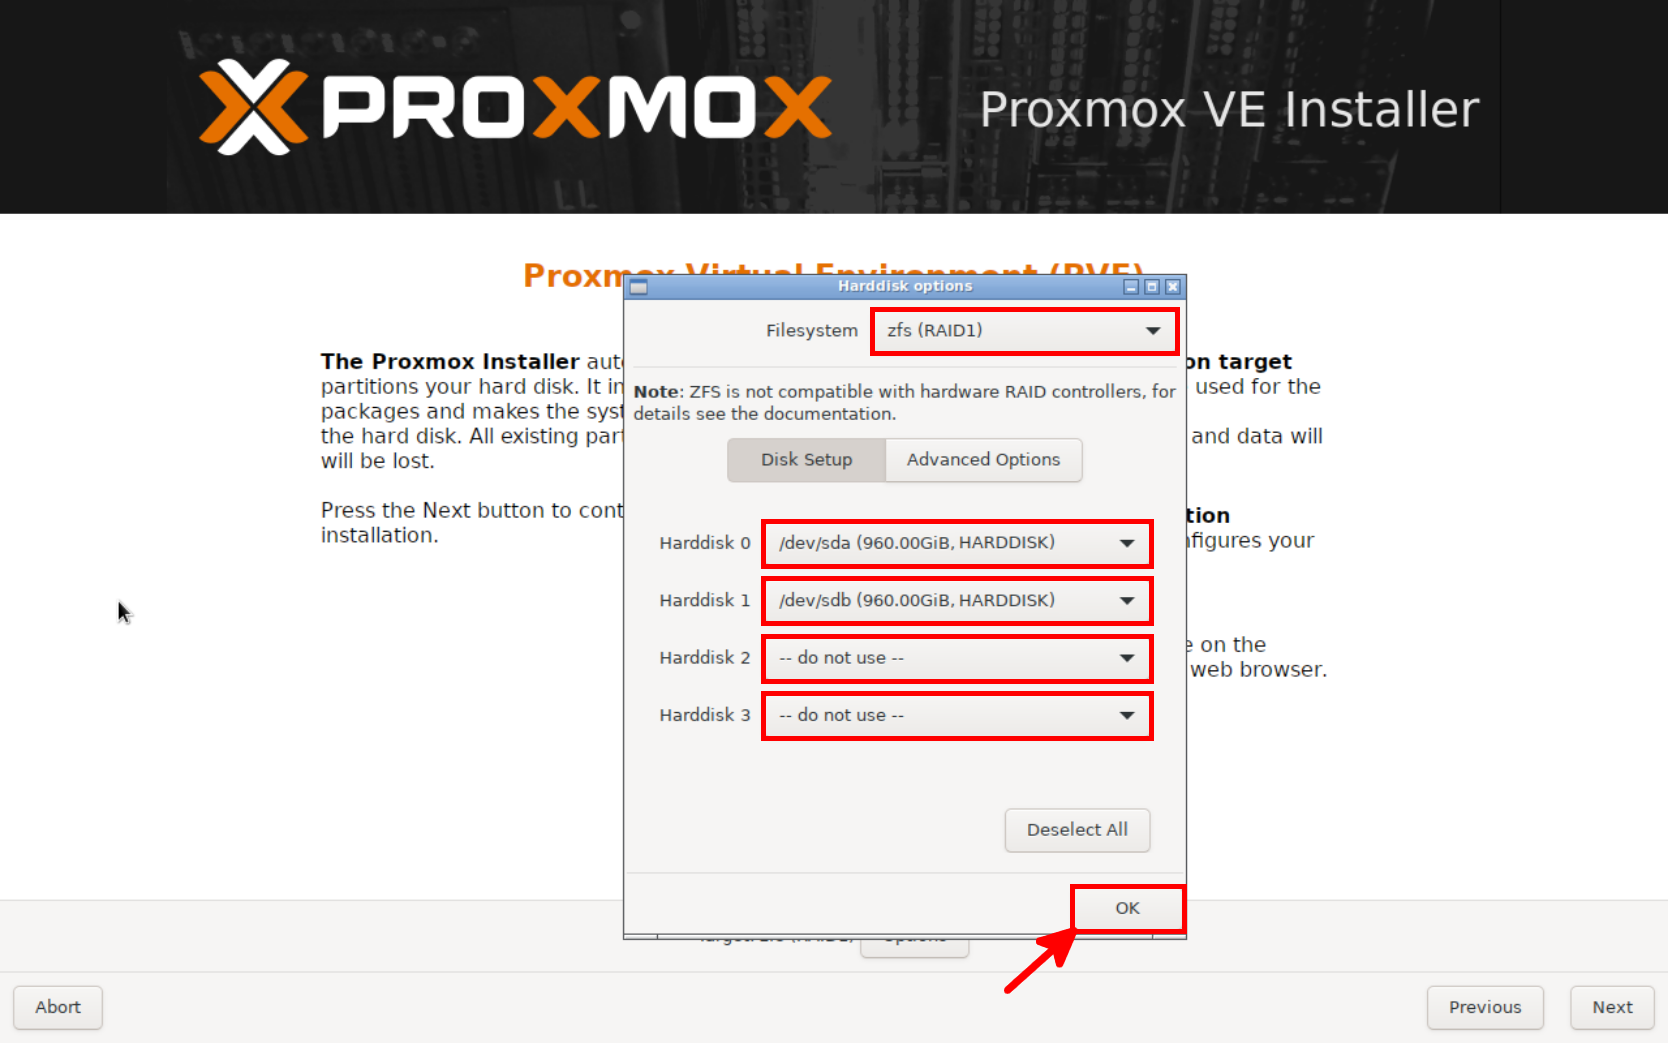
- In the Hard Disk Options window, select ZFS (RAID1) and choose the two disks that will host the Proxmox VE 9 system. Set the remaining disks to Do not use so they remain available for a separate VM storage pool after installation:
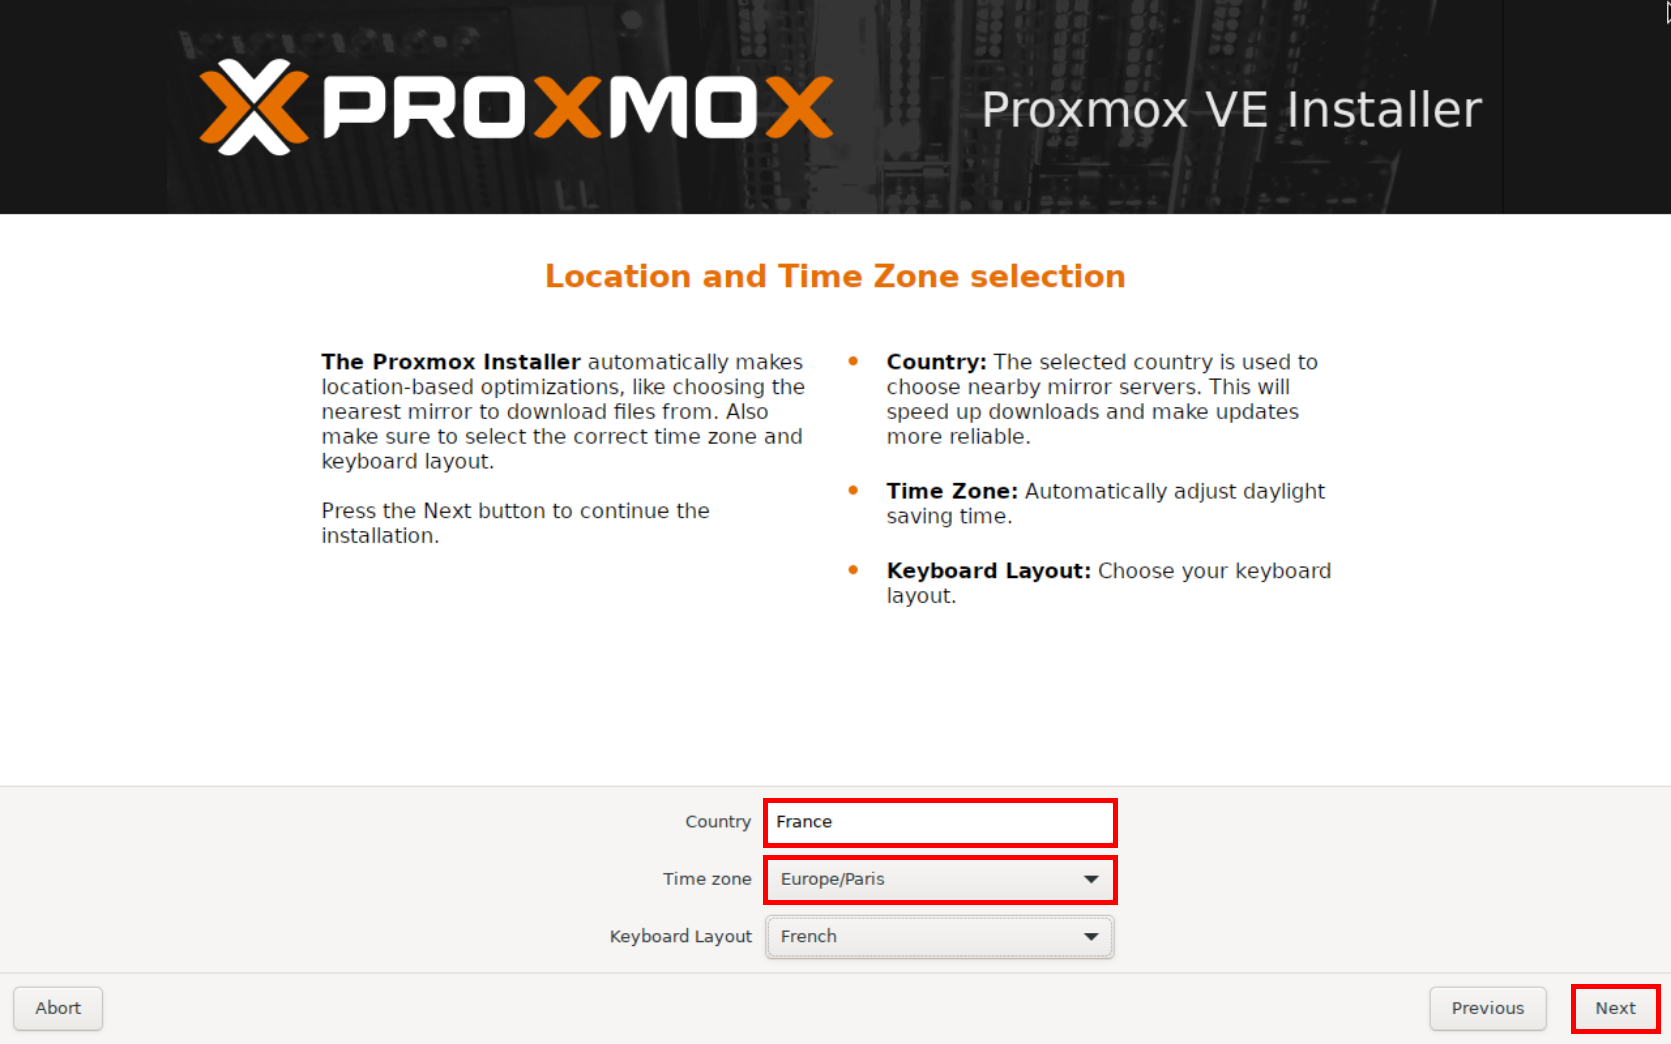
- Select your country, time zone, and preferred keyboard layout:
- Set a strong password for the
rootaccount and enter an email address for system and administrative notifications:
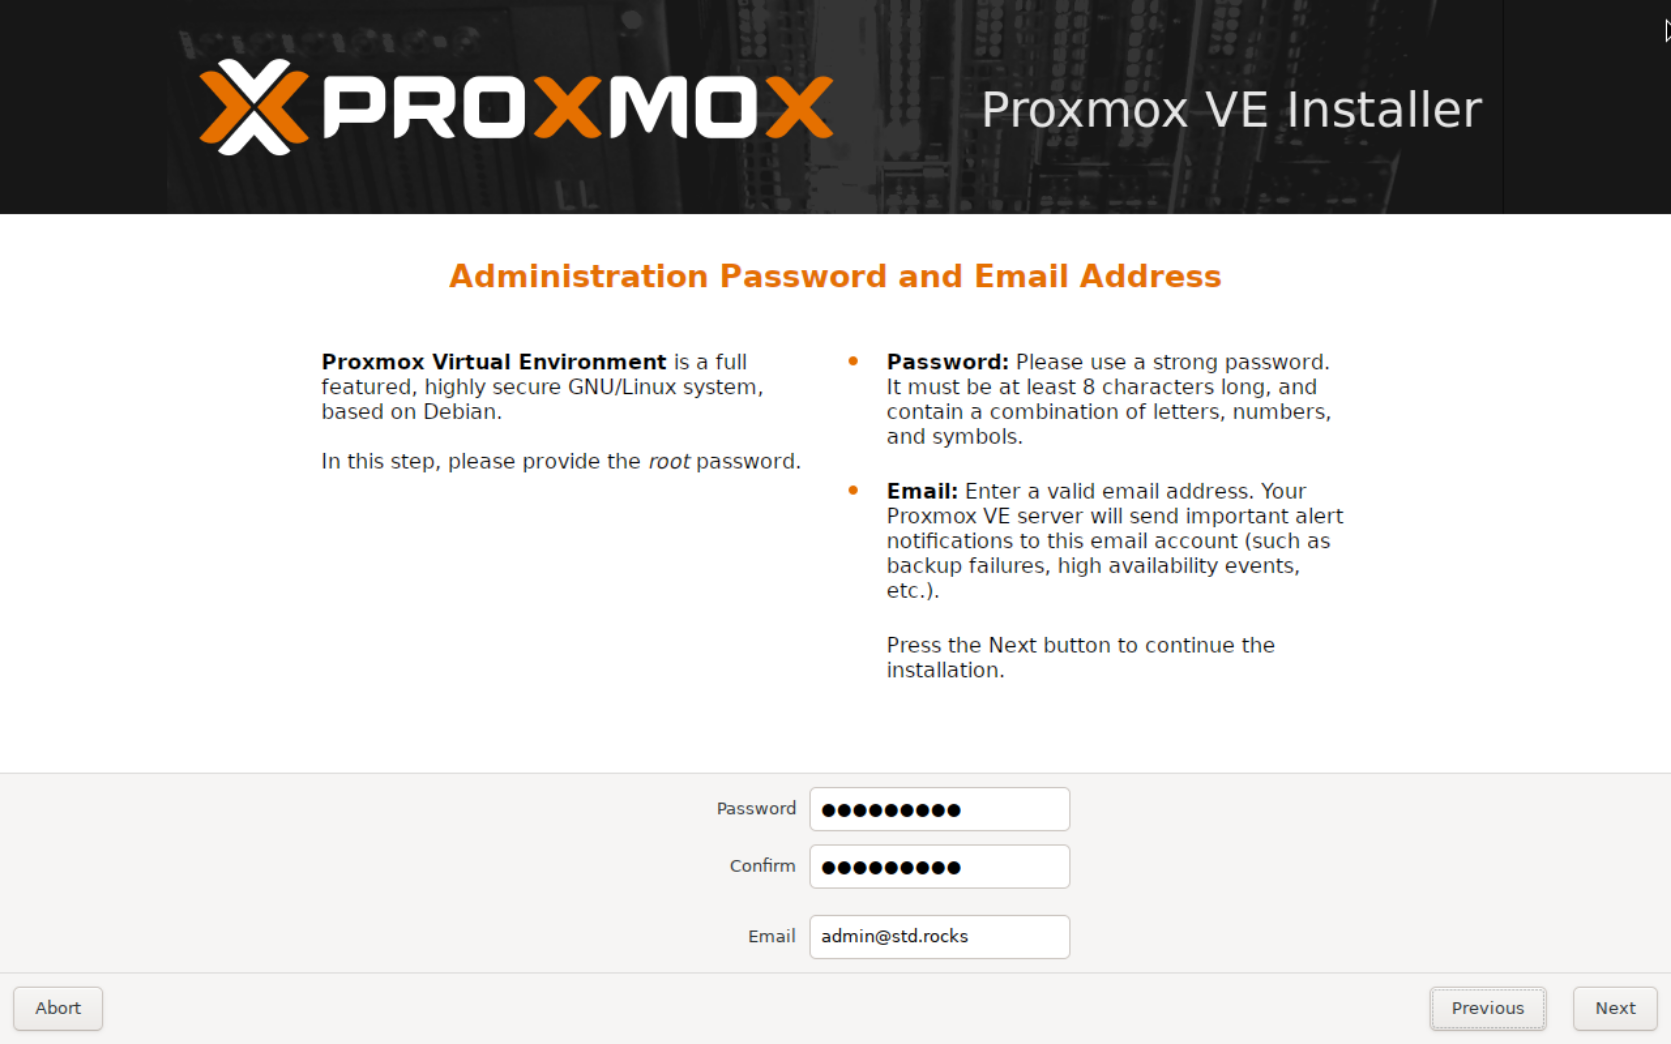
root password and administrator email address for Proxmox VE 9.- Select the physical network interface that will be used for management, then configure the hostname, IP address, gateway, and DNS server:
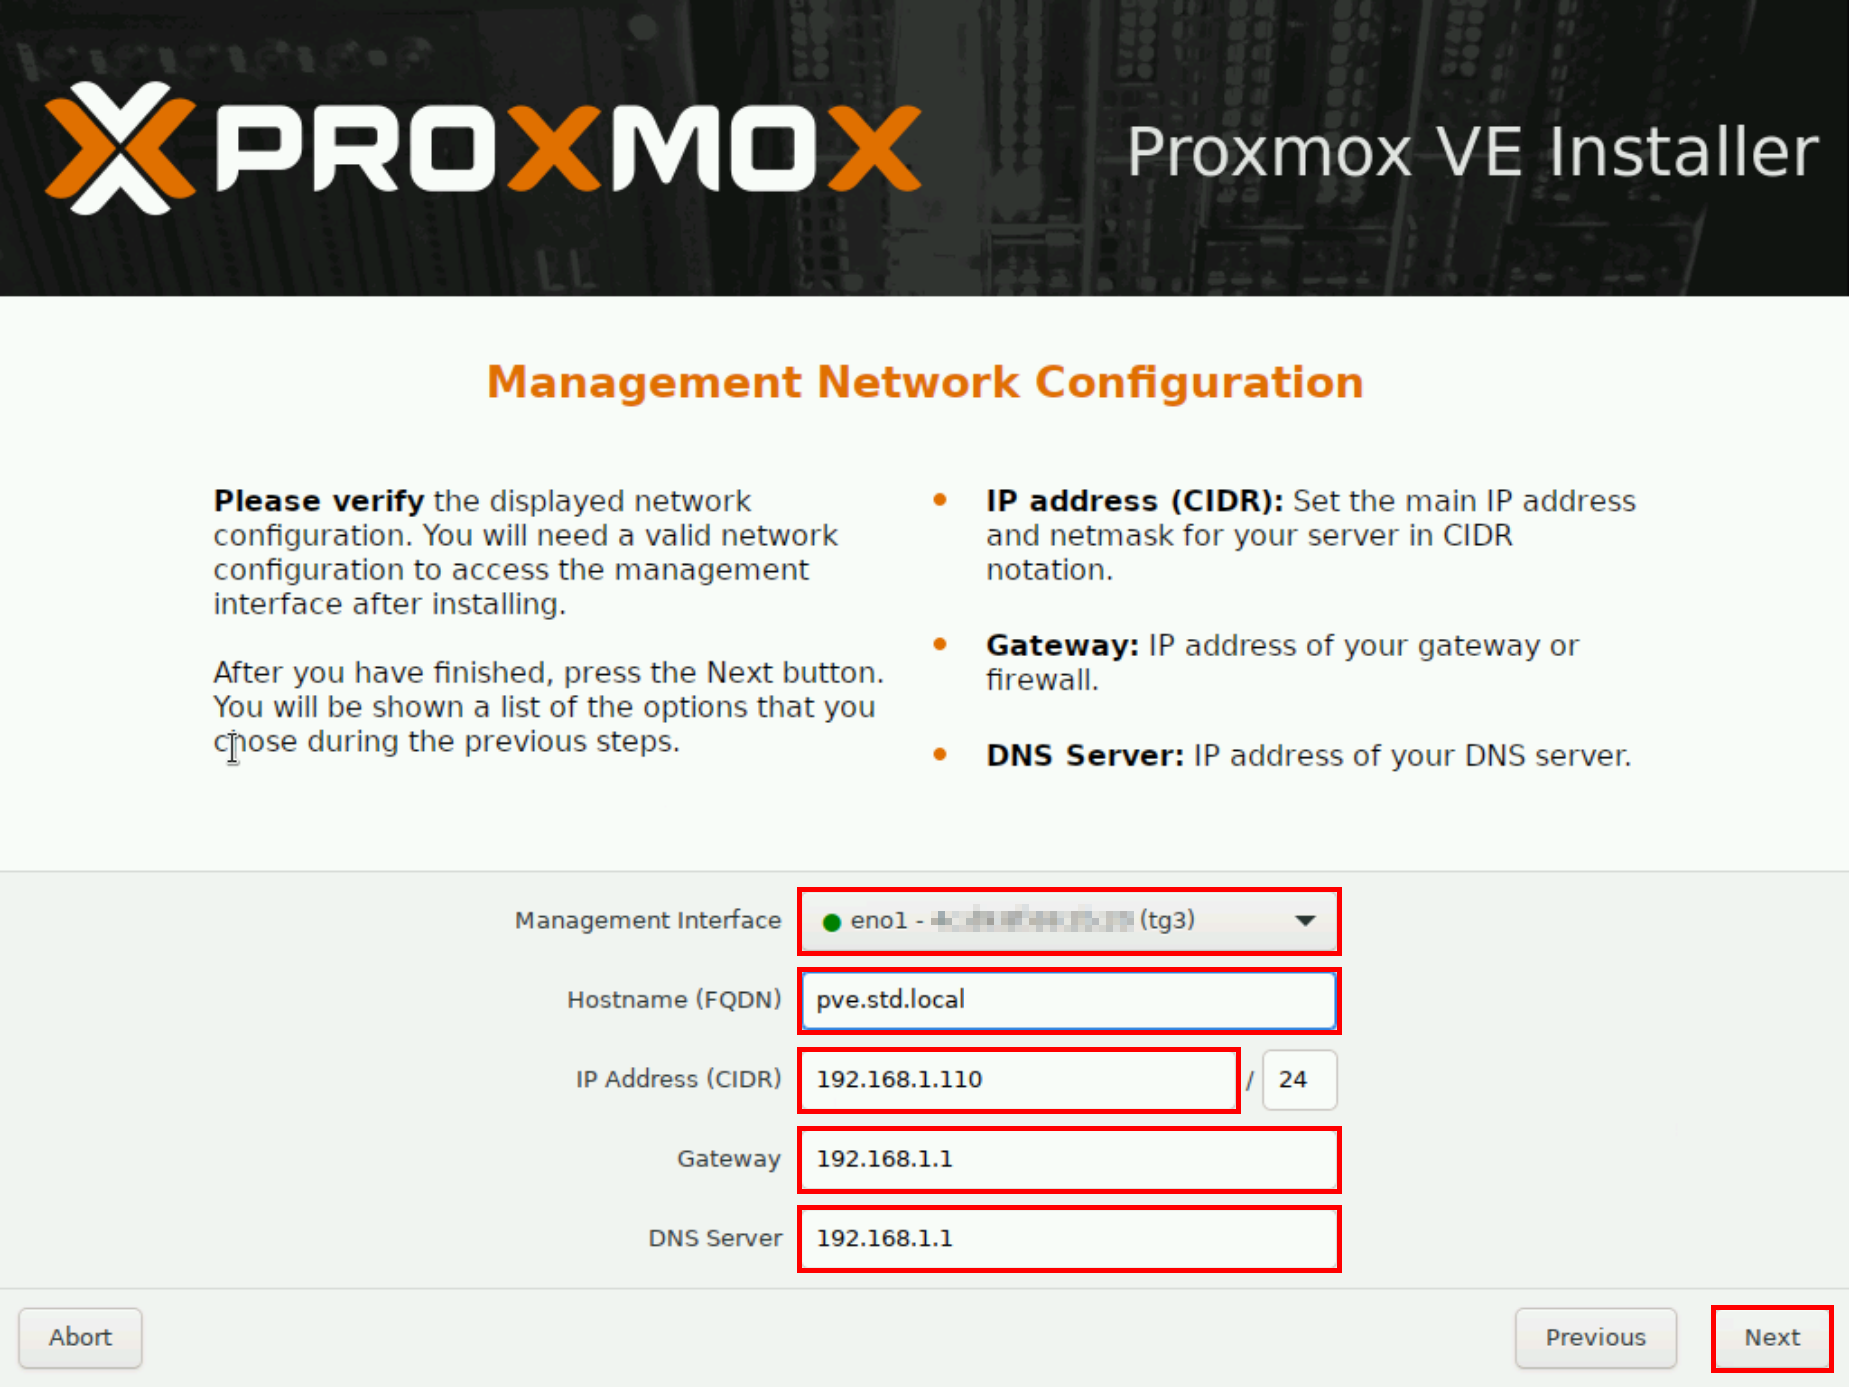
- Review the installation summary and verify the selected storage, location, network, and administrator settings. If everything is correct, click Install to start the Proxmox VE 9 installation:
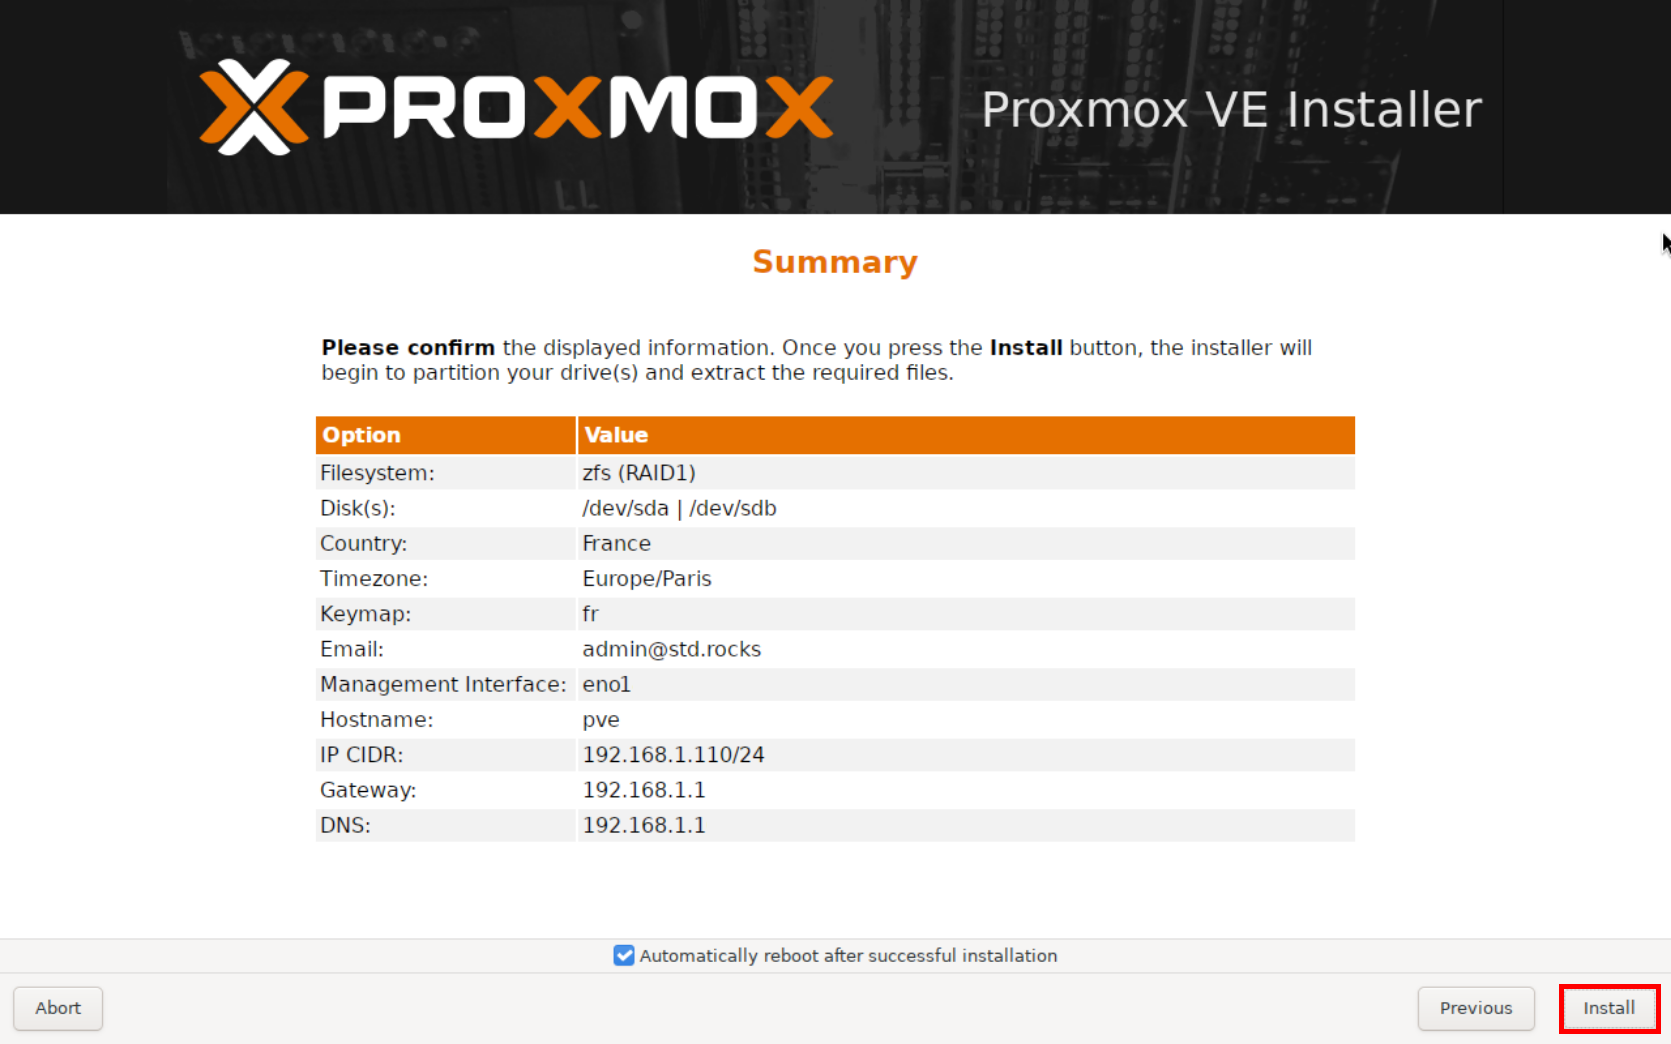
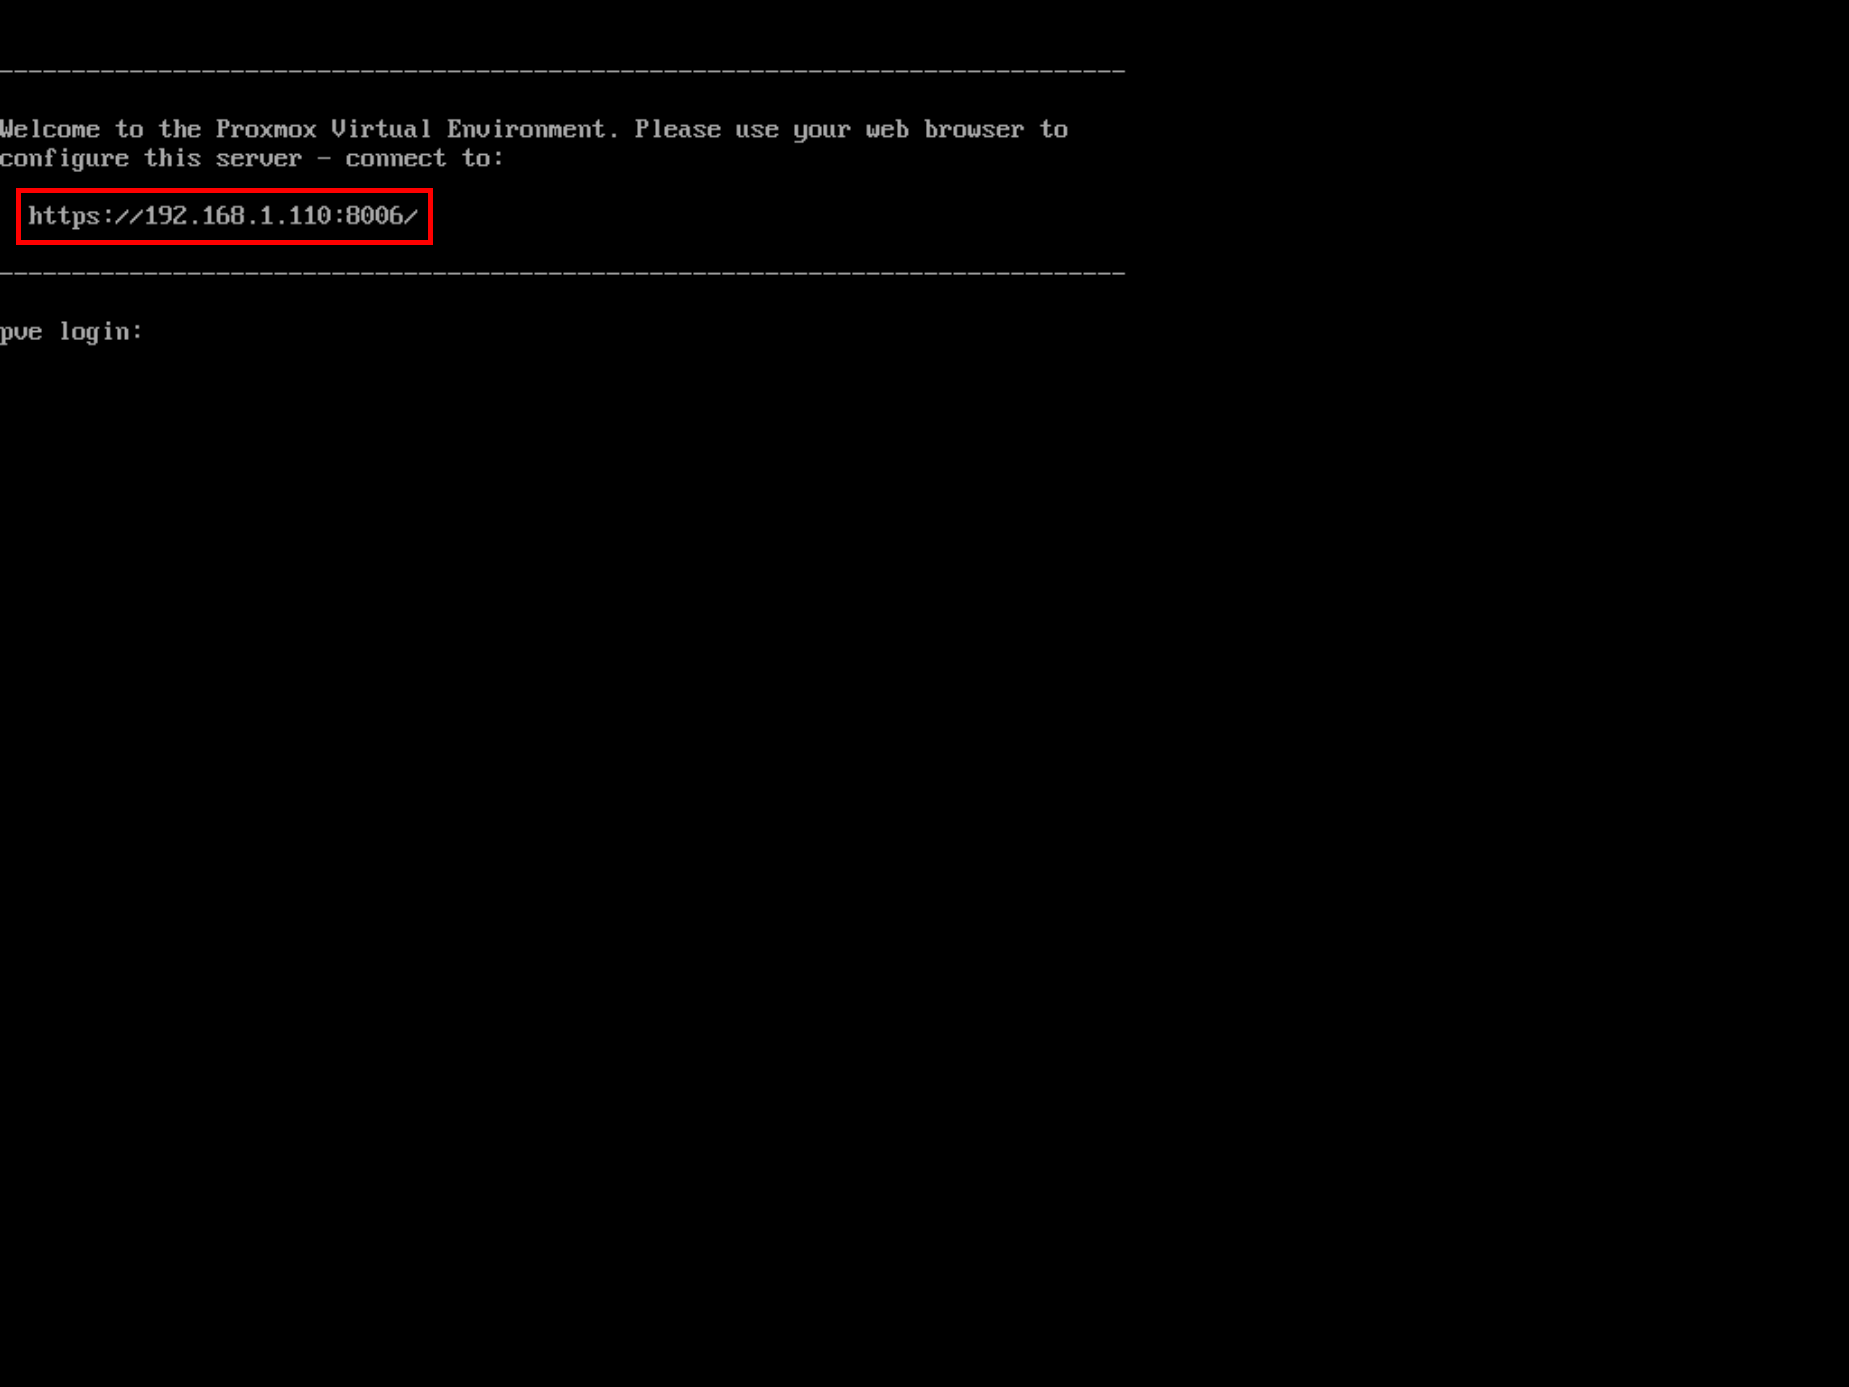
- After the installation completes and the server reboots, the console displays the URL of the Proxmox VE web interface. By default, the management interface is available over HTTPS on port
8006:
8006.Connecting to the Web Interface
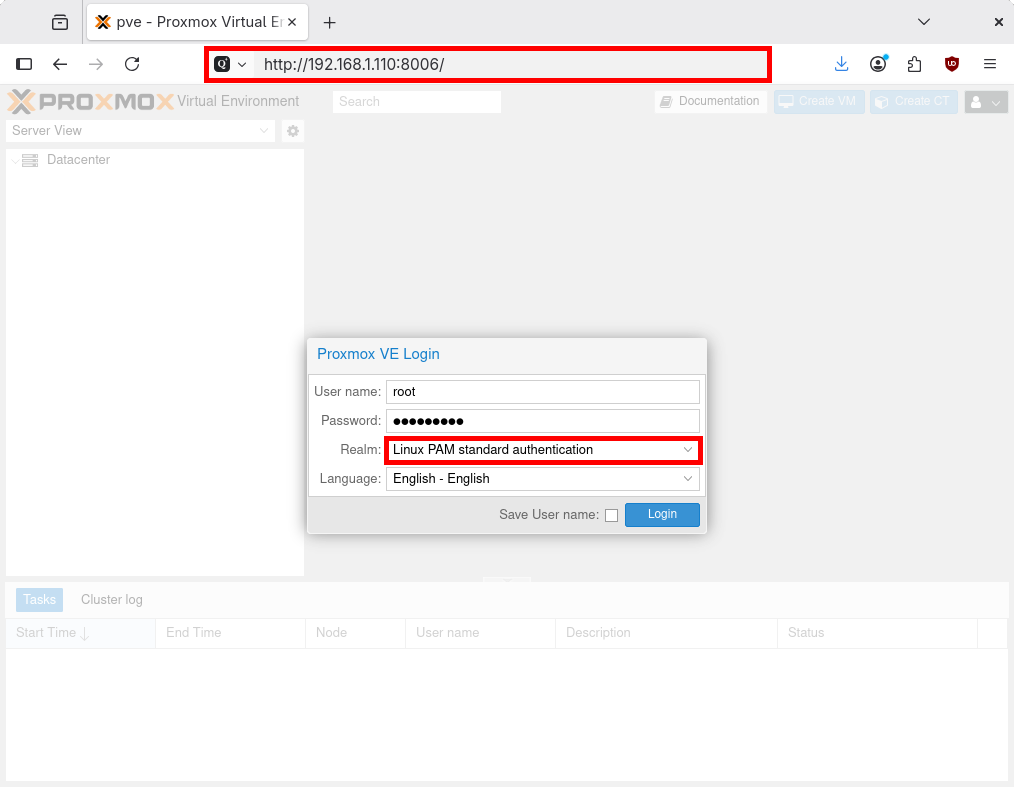
- Open a web browser and connect to the Proxmox VE administration interface using the management IP address configured during installation. Use
https://and port8006, for examplehttps://192.168.1.100:8006. Your browser may display a warning because Proxmox VE uses a self-signed certificate by default on a fresh installation. On the login screen, select Linux PAM standard authentication as the realm, then sign in with therootaccount and the password configured earlier:
root account using the Linux PAM authentication realm.Post Installation
Add the No-Subscription Repository
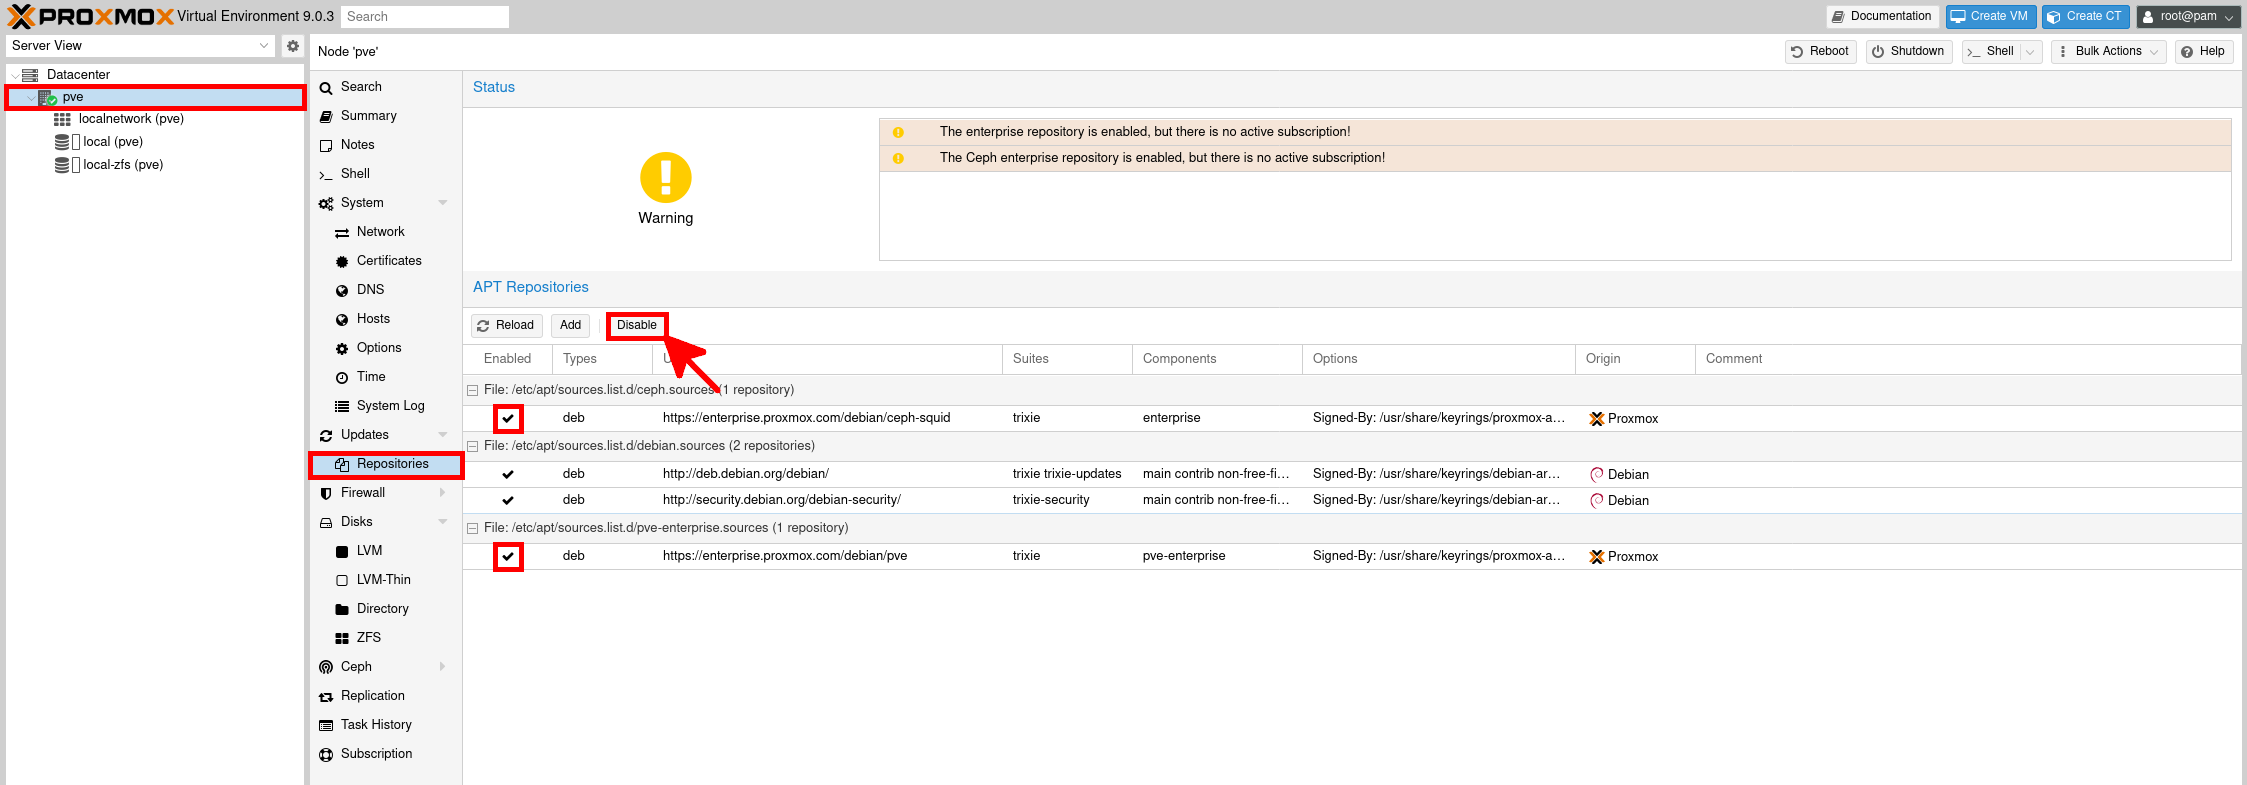
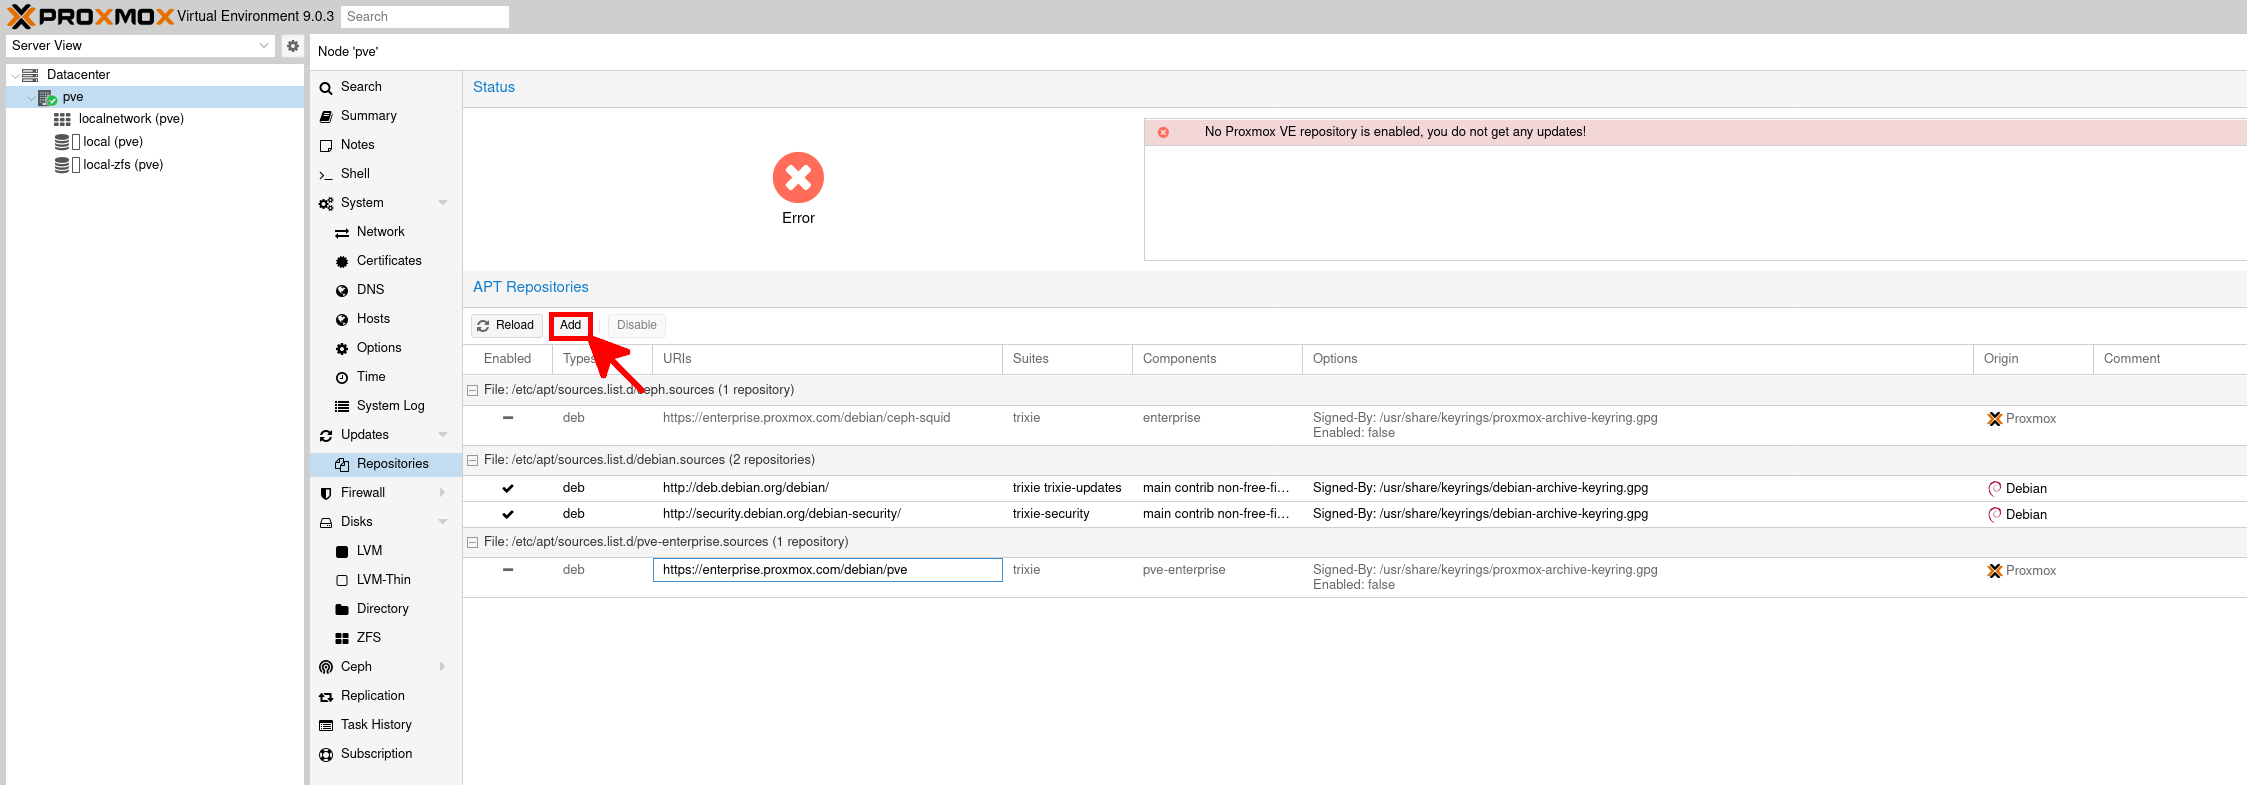
If you do not have a Proxmox VE subscription, you can disable the enterprise repositories, which require an active subscription, and enable the no-subscription repository instead.
- In the APT Repositories section, select each enabled Enterprise Repository entry and click Disable:
- Click Add to configure a new APT repository:
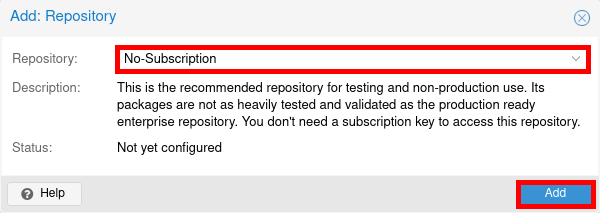
- Select No-Subscription from the repository list, then click Add to enable it:
- Open the Shell and update the package lists, then upgrade the installed packages with the following command:
root@pve:~# apt update && apt full-upgrade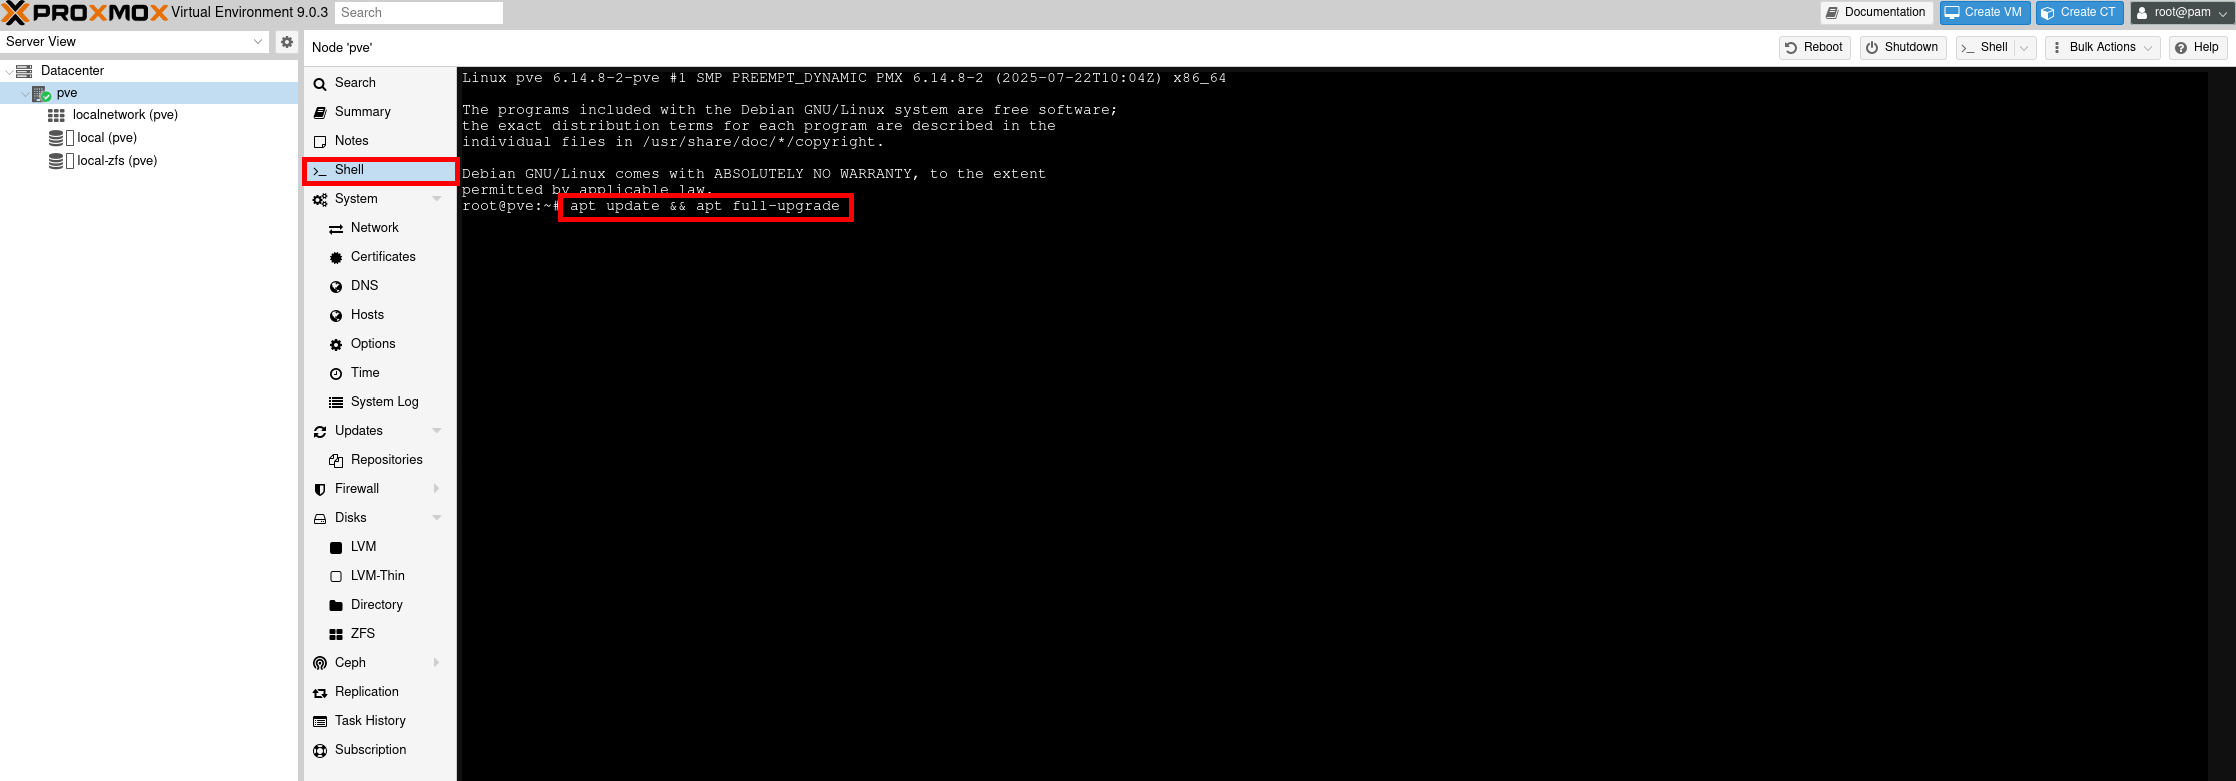
Create a ZFS Storage Pool
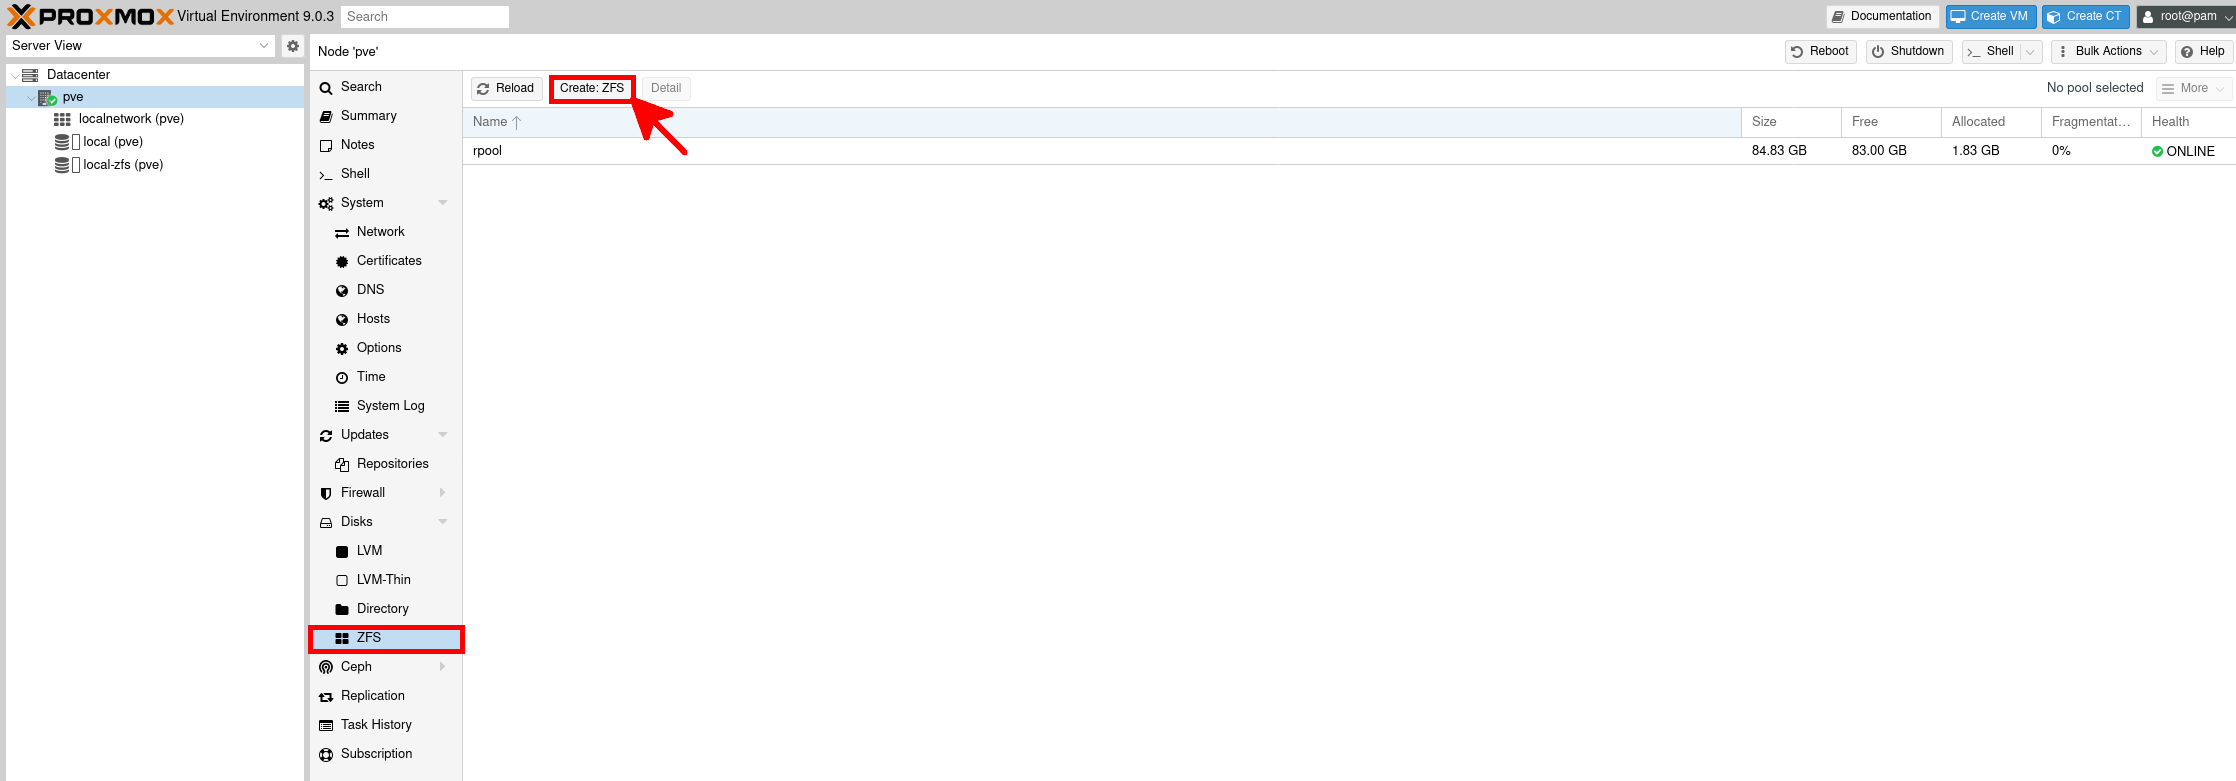
- Go to the ZFS section and click Create: ZFS to create a new ZFS storage pool:
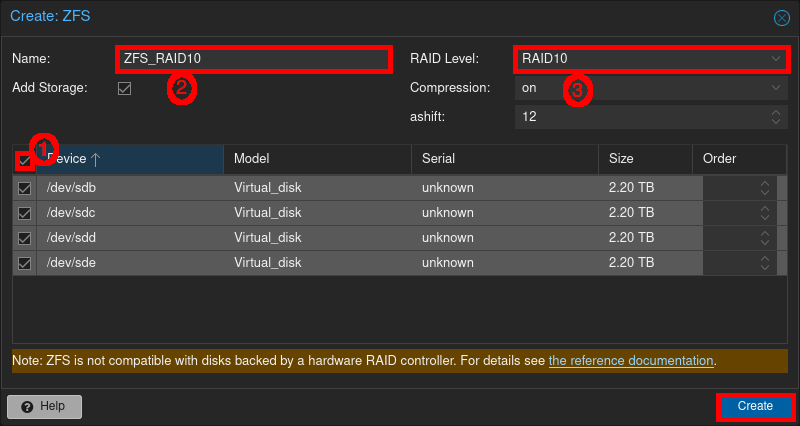
- Select the disks to include in the pool, enter a name, choose the appropriate RAID level, and click Create. In this example, the four disks are configured as a RAID10 ZFS pool for virtual machine storage:
Create a Linux Bridge for Virtual Machines
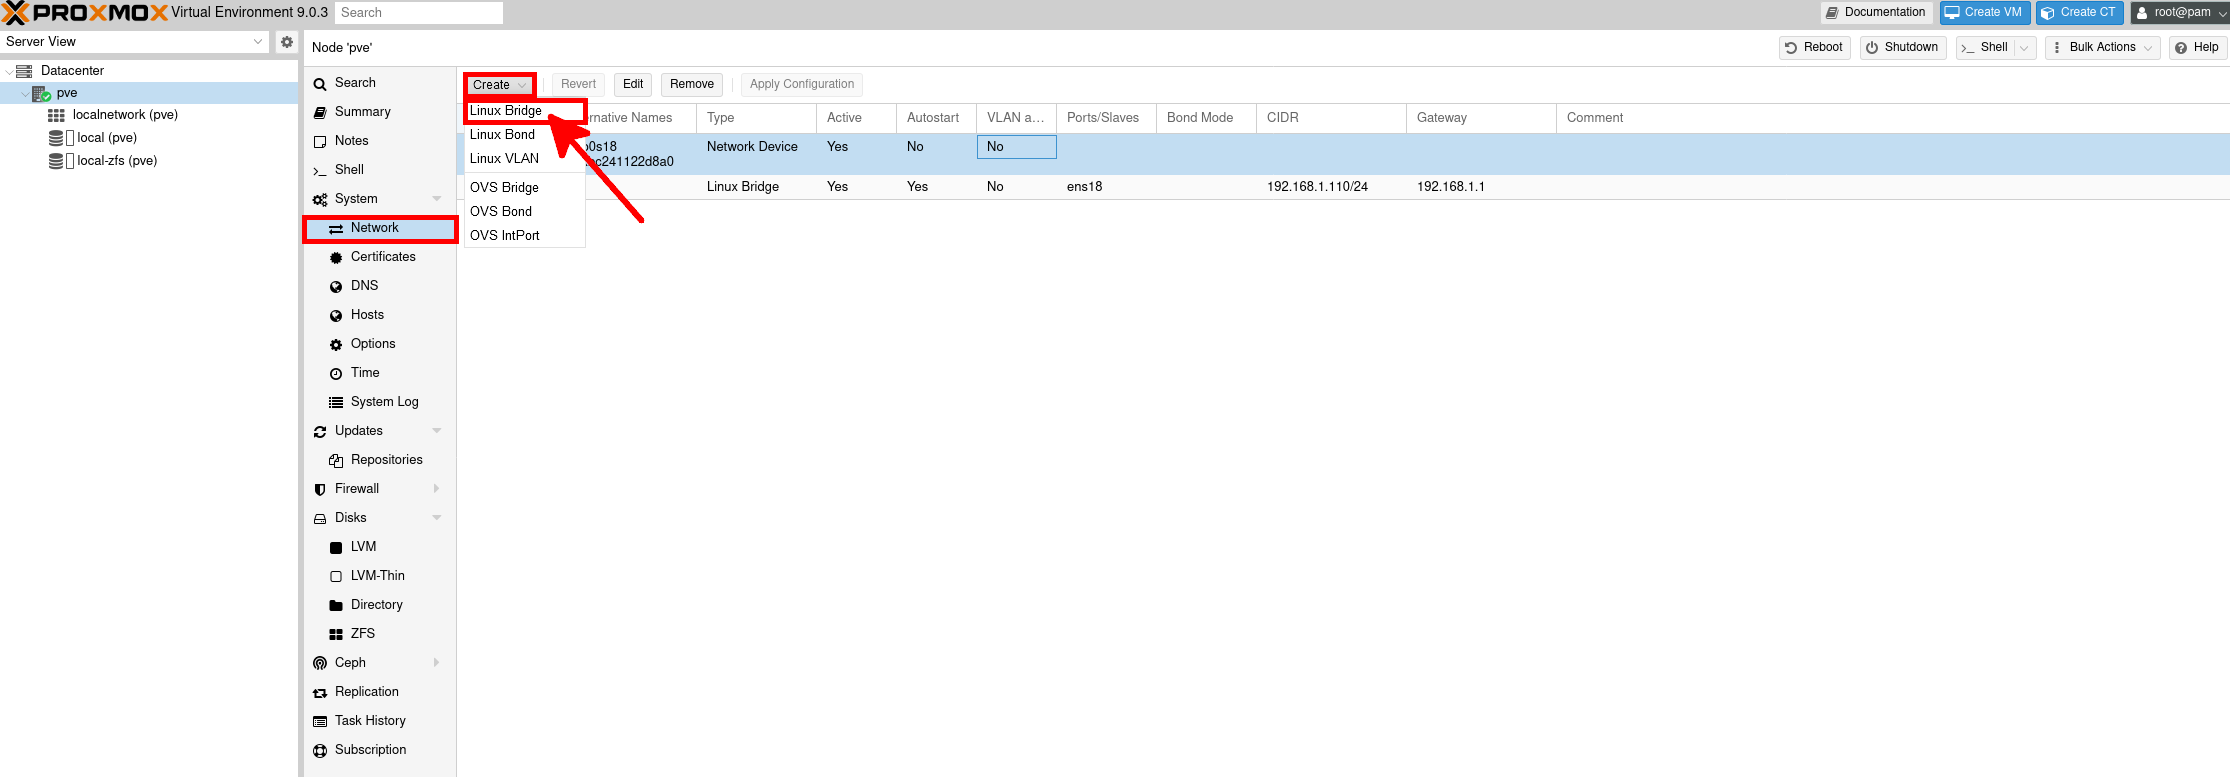
- Go to the Network section and click Create, then select Linux Bridge:
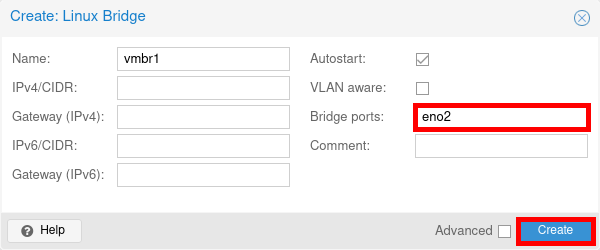
- Enter a name for the bridge, such as
vmbr1, and specify the physical network interface to use as the bridge port. In this example, the bridge is associated witheno1. Then click Create:
eno1 as the physical bridge port for virtual machine traffic.With your Proxmox VE 9 server now installed and configured, you can continue by learning how to create your first virtual machines or how to set up Proxmox Backup Server to protect your virtual infrastructure.